
Operation Manual
Page 2
... with the machine, its features and operation. If you have difficulty assembling this product or have any problems or questions concerning the machine, phone a authorized Troy-Bilt service dealer or contact us on the equipment and record the information in this manual frequently to the retailer or dealer without incurring obligation. Throughout this entire...
... with the machine, its features and operation. If you have difficulty assembling this product or have any problems or questions concerning the machine, phone a authorized Troy-Bilt service dealer or contact us on the equipment and record the information in this manual frequently to the retailer or dealer without incurring obligation. Throughout this entire...

Operation Manual
Page 3
... except where specifically recommended in moving parts. Failure to assemble and operate. Read, understand, and follow all control levers before attempting to observe the following safety instructions could become entangled in the operator's manual. 7. Never allow children under 14 years of amputating... the instructions and safe operation practices in reverse. Preparation Thoroughly inspect the area where the equipment is in this manual before starting the engine. 6. Let engine and machine adjust to outdoor temperature before attempting to avoid discharge of ...
... except where specifically recommended in moving parts. Failure to assemble and operate. Read, understand, and follow all control levers before attempting to observe the following safety instructions could become entangled in the operator's manual. 7. Never allow children under 14 years of amputating... the instructions and safe operation practices in reverse. Preparation Thoroughly inspect the area where the equipment is in this manual before starting the engine. 6. Let engine and machine adjust to outdoor temperature before attempting to avoid discharge of ...

Operation Manual
Page 4
... is extremely flammable and the vapors are not covered in this machine without good visibility or light. Contact with a missing or damaged chute assembly. Broken bones, fractures, bruises or sprains could result. 3. If situations occur which can cause a burn. Contact Customer Support for hidden ... your vehicle the engine, disconnect the spark plug wire and ground it off engine and remain behind the handles). Never operate this manual, use and automatically return to no more than from your hand in front of the machine. Wait until all cigarettes, cigars, ...
... is extremely flammable and the vapors are not covered in this machine without good visibility or light. Contact with a missing or damaged chute assembly. Broken bones, fractures, bruises or sprains could result. 3. If situations occur which can cause a burn. Contact Customer Support for hidden ... your vehicle the engine, disconnect the spark plug wire and ground it off engine and remain behind the handles). Never operate this manual, use and automatically return to no more than from your hand in front of the machine. Wait until all cigarettes, cigars, ...

Operation Manual
Page 6
..., understand, and follow all instructions in the manual(s) before attempting to assemble and operate. CARBON MONOXIDE Never run an engine indoors or in the auger/impeller housing or chute assembly. warning! Important Safe Operation Practices ROTATING BLADES Keep hands out of inlet ...cause serious personal injury. WARNING-THROWN OBJECTS This machine may appear on the machine. WARNING- Allow engine and muffler to assemble and operate WARNING- There are rotating blades inside WARNING- WARNING- Engine exhaust contains carbon monoxide, an odorless and deadly ...
..., understand, and follow all instructions in the manual(s) before attempting to assemble and operate. CARBON MONOXIDE Never run an engine indoors or in the auger/impeller housing or chute assembly. warning! Important Safe Operation Practices ROTATING BLADES Keep hands out of inlet ...cause serious personal injury. WARNING-THROWN OBJECTS This machine may appear on the machine. WARNING- Allow engine and muffler to assemble and operate WARNING- There are rotating blades inside WARNING- WARNING- Engine exhaust contains carbon monoxide, an odorless and deadly ...
Operation Manual
Page 7
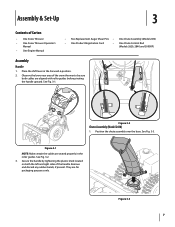
... of Carton • One Snow Thrower • One Snow Thrower Operator's Manual • One Engine Manual • Two Replacement Auger Shear Pins • One Chute Assembly (Model 2410) • One Product Registration Card • One Chute Control Rod (Models 2620, 2840 and 3090XP) Assembly Handle 1. See Fig. 3-3. See Fig. 3-2. 3. Remove and discard any rubber bands...
... of Carton • One Snow Thrower • One Snow Thrower Operator's Manual • One Engine Manual • Two Replacement Auger Shear Pins • One Chute Assembly (Model 2410) • One Product Registration Card • One Chute Control Rod (Models 2620, 2840 and 3090XP) Assembly Handle 1. See Fig. 3-3. See Fig. 3-2. 3. Remove and discard any rubber bands...

Operation Manual
Page 11
... cleared is thrown can easily pick up and throw loose gravel, causing personal injury or damage to side wall of the chute assembly. Retighten nuts and bolts securely. Pivot the chute upward or downward before operating the snow thrower. Excessive pressure when seating beads ...(or inflate) the tires as a gravel driveway. Move skid shoes to the Engine Operator's Manual. See Fig. 3-16. 2. Make certain the entire bottom surface of the chute assembly. 2. Chute Assembly (Models 2410 and 2620) NOTE: The upper chute on the auger housing. • Use a middle or lower position...
... cleared is thrown can easily pick up and throw loose gravel, causing personal injury or damage to side wall of the chute assembly. Retighten nuts and bolts securely. Pivot the chute upward or downward before operating the snow thrower. Excessive pressure when seating beads ...(or inflate) the tires as a gravel driveway. Move skid shoes to the Engine Operator's Manual. See Fig. 3-16. 2. Make certain the entire bottom surface of the chute assembly. 2. Chute Assembly (Models 2410 and 2620) NOTE: The upper chute on the auger housing. • Use a middle or lower position...

Operation Manual
Page 12
...) seconds before re-adjusting the auger control. 7. Figure 3-18 8. Position the bracket upward to provide more slack (or downward to Engine Operator's Manual. 3. It should have very little slack. Repeat steps 2 through 6 above to the operator's position and shut off the engine. Allow the auger... engaged for ALL moving parts to verify your snow thrower, carefully read and follow all adjustments to stop before releasing the auger control. Assembly & Set-Up With the throttle control in the FAST (rabbit) position and the auger control in the disengaged "up " position, ...
...) seconds before re-adjusting the auger control. 7. Figure 3-18 8. Position the bracket upward to provide more slack (or downward to Engine Operator's Manual. 3. It should have very little slack. Repeat steps 2 through 6 above to the operator's position and shut off the engine. Allow the auger... engaged for ALL moving parts to verify your snow thrower, carefully read and follow all adjustments to stop before releasing the auger control. Assembly & Set-Up With the throttle control in the FAST (rabbit) position and the auger control in the disengaged "up " position, ...

Operation Manual
Page 15
... Should snow and ice become lodged in open areas until all moving parts have stopped before unclogging. While standing in and near the chute assembly. 5. Controls and Features 15 Refer to dislodge and scoop any remaining snow and ice from the clip which has formed in the operator's... position (behind handles until you are located on the rear of the clean-out tool to the Engine Operator's Manual. Section 4 - Remove the key. 3. The left . Steering Trigger Controls (if so equipped) Chute Clean-Out Tool Warning! Use the shovel-...
... Should snow and ice become lodged in open areas until all moving parts have stopped before unclogging. While standing in and near the chute assembly. 5. Controls and Features 15 Refer to dislodge and scoop any remaining snow and ice from the clip which has formed in the operator's... position (behind handles until you are located on the rear of the clean-out tool to the Engine Operator's Manual. Section 4 - Remove the key. 3. The left . Steering Trigger Controls (if so equipped) Chute Clean-Out Tool Warning! Use the shovel-...

Operation Manual
Page 18
...drive is in the cable. 4. There should have very little slack. Proceed as follows: 1. See Fig. 6-5. Place the shift lever in the separate engine manual. 2. Figure 6-4 3. Retighten the hex nut. With the drive control released, push the snow thrower gently forward. The unit should NOT be achieved, adjust...of the drive control as follows: 1. Loosen the hex nut on the drive cable bracket. See Fig. 6-4. Pivot the bracket downward to the Assembly and Set-up slack in need of the shaft. Figure 6-5 3. Position the bracket upward to provide more slack (or downward to push the ...
...drive is in the cable. 4. There should have very little slack. Proceed as follows: 1. See Fig. 6-5. Place the shift lever in the separate engine manual. 2. Figure 6-4 3. Retighten the hex nut. With the drive control released, push the snow thrower gently forward. The unit should NOT be achieved, adjust...of the drive control as follows: 1. Loosen the hex nut on the drive cable bracket. See Fig. 6-4. Pivot the bracket downward to the Assembly and Set-up slack in need of the shaft. Figure 6-5 3. Position the bracket upward to provide more slack (or downward to push the ...

Operation Manual
Page 19
Chute Control Rod (Models 2620, 2840, y 3090XP) To adjust the chute control rod, proceed as instructed earlier in a clean, dry area. 4. Remove the cotter pin from the engine. 2. To do so: 1. Retighten the nuts. NOTE: Refer to the Engine Operator's Manual for information on the chute rotation assembly. 2. See Fig. 6-6. Reinsert the cotter pin...
Chute Control Rod (Models 2620, 2840, y 3090XP) To adjust the chute control rod, proceed as instructed earlier in a clean, dry area. 4. Remove the cotter pin from the engine. 2. To do so: 1. Retighten the nuts. NOTE: Refer to the Engine Operator's Manual for information on the chute rotation assembly. 2. See Fig. 6-6. Reinsert the cotter pin...
Operation Manual
Page 25
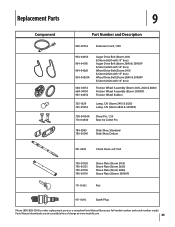
...Drive Belt (Storm 2410 & Storm 2620 with 15" tires) Auger Drive Belt (Storm 2840 & 3090XP & Storm 2620 with 16" tires) Wheel Drive Belt (Storm 2410 & Storm 2620 with 15" tires) Wheel Drive Belt (Storm 2840 & 3090XP & Storm 2620 with 16" tires) Friction Wheel Assembly (Storm 2410, 2620 & 2840) Friction Wheel Assembly (Storm 3090XP) ...00118 790-00119 Shave Plate (Storm 2410) Shave Plate (Storm 2620) Shave Plate (Storm 2840) Shave Plate ((Storm 3090XP) 731-05632 Key 951-10292 Spark Plug Phone (800) 828-5500 to order replacement parts or a complete Parts Manual (have your full model number...
...Drive Belt (Storm 2410 & Storm 2620 with 15" tires) Auger Drive Belt (Storm 2840 & 3090XP & Storm 2620 with 16" tires) Wheel Drive Belt (Storm 2410 & Storm 2620 with 15" tires) Wheel Drive Belt (Storm 2840 & 3090XP & Storm 2620 with 16" tires) Friction Wheel Assembly (Storm 2410, 2620 & 2840) Friction Wheel Assembly (Storm 3090XP) ...00118 790-00119 Shave Plate (Storm 2410) Shave Plate (Storm 2620) Shave Plate (Storm 2840) Shave Plate ((Storm 3090XP) 731-05632 Key 951-10292 Spark Plug Phone (800) 828-5500 to order replacement parts or a complete Parts Manual (have your full model number...


