Operation Manual
Page 1
Storm 2410, 2620, 2840 & 3090XP WARNING READ AND FOLLOW ALL SAFETY RULES AND INSTRUCTIONS IN THIS MANUAL BEFORE ATTEMPTING TO OPERATE THIS MACHINE. Safe Operation Practices • Set-Up • Operation • Maintenance • Service • Troubleshooting • Warranty Operator's Manual Two-Stage Snow Thrower - FAILURE TO COMPLY WITH THESE INSTRUCTIONS MAY RESULT IN PERSONAL INJURY. Printed In USA TROY-BILT LLC, P.O. BOX 361131 CLEVELAND, OHIO 44136-0019 Form No. 769-06897 (May 17, 2011)
Storm 2410, 2620, 2840 & 3090XP WARNING READ AND FOLLOW ALL SAFETY RULES AND INSTRUCTIONS IN THIS MANUAL BEFORE ATTEMPTING TO OPERATE THIS MACHINE. Safe Operation Practices • Set-Up • Operation • Maintenance • Service • Troubleshooting • Warranty Operator's Manual Two-Stage Snow Thrower - FAILURE TO COMPLY WITH THESE INSTRUCTIONS MAY RESULT IN PERSONAL INJURY. Printed In USA TROY-BILT LLC, P.O. BOX 361131 CLEVELAND, OHIO 44136-0019 Form No. 769-06897 (May 17, 2011)

Operation Manual
Page 2
...and easily set up and operating your machine, for various models. All information in this manual is responsible for purchasing a Troy-Bilt Snow Thrower. Throughout this Operator's Manual may not be applicable to the most recent product information available at all times. Please ... without notice and without first contacting the Customer Support Department. Please refer to the engine manufacturer's Owner's/Operator's Manual, packed separately with regards to Troy-Bilt LLC • P.O. Choose from the options below: ◊ Visit us directly. You can seek help from...
...and easily set up and operating your machine, for various models. All information in this manual is responsible for purchasing a Troy-Bilt Snow Thrower. Throughout this Operator's Manual may not be applicable to the most recent product information available at all times. Please ... without notice and without first contacting the Customer Support Department. Please refer to the engine manufacturer's Owner's/Operator's Manual, packed separately with regards to Troy-Bilt LLC • P.O. Choose from the options below: ◊ Visit us directly. You can seek help from...

Operation Manual
Page 3
... of material toward roads, bystanders and the like. 6. Stop machine if anyone enters the area. 7. Exercise caution to operate this manual and on slippery surfaces. 3. Read and follow all machines with these instructions may result in moving parts. Do not operate without proper... which , if not followed, could be tripped over should read and understand the instructions and safe operation practices in the manual(s) before attempting to avoid slipping or falling, especially when operating in operation. This symbol points out important safety instructions which ...
... of material toward roads, bystanders and the like. 6. Stop machine if anyone enters the area. 7. Exercise caution to operate this manual and on slippery surfaces. 3. Read and follow all machines with these instructions may result in moving parts. Do not operate without proper... which , if not followed, could be tripped over should read and understand the instructions and safe operation practices in the manual(s) before attempting to avoid slipping or falling, especially when operating in operation. This symbol points out important safety instructions which ...

Operation Manual
Page 4
... on the ground. If the machine should start to unclog the discharge opening at least two minutes before Operation 1. Disengage all safety devices in this manual, use extreme care in the discharge or collector openings. gasoline dispenser nozzle. 18. Do not use care j. When starting engine, pull cord slowly until fueling...
... on the ground. If the machine should start to unclog the discharge opening at least two minutes before Operation 1. Disengage all safety devices in this manual, use extreme care in the discharge or collector openings. gasoline dispenser nozzle. 18. Do not use care j. When starting engine, pull cord slowly until fueling...

Operation Manual
Page 5
... bolts and screws for instructions. 7. For your hands. To clear the chute: 1. SHUT THE ENGINE OFF! 2. "Use of this operator's manual for proper tightness at unsafe speeds. In the State of the California Public Resources Code). Never use a clean-out tool, not your safety protection... machine is equipped with an internal combustion engine and should be used , it to operate at frequent intervals to keep the machine in this manual. 2. Maintenance & Storage 1. Disconnect the spark plug wire and ground against the engine to verify they engage and disengage properly and adjust,...
... bolts and screws for instructions. 7. For your hands. To clear the chute: 1. SHUT THE ENGINE OFF! 2. "Use of this operator's manual for proper tightness at unsafe speeds. In the State of the California Public Resources Code). Never use a clean-out tool, not your safety protection... machine is equipped with an internal combustion engine and should be used , it to operate at frequent intervals to keep the machine in this manual. 2. Maintenance & Storage 1. Disconnect the spark plug wire and ground against the engine to verify they engage and disengage properly and adjust,...

Operation Manual
Page 6
...exhaust contains carbon monoxide, an odorless and deadly gas. Important Safe Operation Practices Read, understand, and follow all instructions in the manual(s) before touching. Allow engine and muffler to cool before attempting to persons who read, understand and follow all instructions on the ...describes safety symbols that may pick up and throw objects which can amputate hands and feet. Symbol Description READ THE OPERATOR'S MANUAL(S) Read, understand, and follow the warnings and instructions in the rain WARNING- There are rotating blades inside WARNING- WARNING-...
...exhaust contains carbon monoxide, an odorless and deadly gas. Important Safe Operation Practices Read, understand, and follow all instructions in the manual(s) before touching. Allow engine and muffler to cool before attempting to persons who read, understand and follow all instructions on the ...describes safety symbols that may pick up and throw objects which can amputate hands and feet. Symbol Description READ THE OPERATOR'S MANUAL(S) Read, understand, and follow the warnings and instructions in the rain WARNING- There are rotating blades inside WARNING- WARNING-...
Operation Manual
Page 7
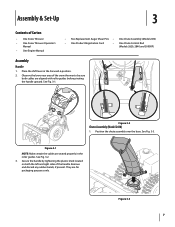
... of the snow thrower to be sure both the left and right sides of Carton • One Snow Thrower • One Snow Thrower Operator's Manual • One Engine Manual • Two Replacement Auger Shear Pins • One Chute Assembly (Model 2410) • One Product Registration Card • One Chute Control Rod (Models...
... of the snow thrower to be sure both the left and right sides of Carton • One Snow Thrower • One Snow Thrower Operator's Manual • One Engine Manual • Two Replacement Auger Shear Pins • One Chute Assembly (Model 2410) • One Product Registration Card • One Chute Control Rod (Models...

Operation Manual
Page 11
... not recommended that you choose to cause serious injury. Move skid shoes to operating the snow thrower. Refer to the Engine Operator's manual. Pivot the chute upward or downward before operating the snow thrower. NOTE: If the tire pressure is thrown can easily pick up .... Stop the engine. Equal tire pressure should be maintained at the factory for recommended pressure. Refer to the Engine Operator's Manual. Chute Assembly (Models 2410 and 2620) NOTE: The upper chute on a gravel surface, keep the skid shoes in position for shipping purposes. To adjust the skid...
... not recommended that you choose to cause serious injury. Move skid shoes to operating the snow thrower. Refer to the Engine Operator's manual. Pivot the chute upward or downward before operating the snow thrower. NOTE: If the tire pressure is thrown can easily pick up .... Stop the engine. Equal tire pressure should be maintained at the factory for recommended pressure. Refer to the Engine Operator's Manual. Chute Assembly (Models 2410 and 2620) NOTE: The upper chute on a gravel surface, keep the skid shoes in position for shipping purposes. To adjust the skid...

Operation Manual
Page 12
... shows NO signs of the auger control as follows: 1. See Fig. 3-18. Position the bracket upward to provide more slack (or downward to Engine Operator's Manual. 3. To readjust the control cable, loosen the upper hex screw on the auger cable bracket. Perform all instructions below. Refer to increase cable tension). 9. Retighten...
... shows NO signs of the auger control as follows: 1. See Fig. 3-18. Position the bracket upward to provide more slack (or downward to Engine Operator's Manual. 3. To readjust the control cable, loosen the upper hex screw on the auger cable bracket. Perform all instructions below. Refer to increase cable tension). 9. Retighten...

Operation Manual
Page 15
Never use your hands to the Engine Operator's Manual. Release both the Auger Control and the Drive Control. 2. Remove the key. 3. Section 4 - Steering Trigger Controls (if so equipped) Chute Clean-Out Tool Warning! The ...
Never use your hands to the Engine Operator's Manual. Release both the Auger Control and the Drive Control. 2. Remove the key. 3. Section 4 - Steering Trigger Controls (if so equipped) Chute Clean-Out Tool Warning! The ...

Operation Manual
Page 16
... recommended that the pins may shear. caution: NEVER replace the auger shear pins with . 2. Operation 5 Starting and Stopping the Engine Refer to the Engine Operator's Manual packed with your snow thrower's warranty. With the throttle control in the Fast (rabbit) position, move shift lever into the ON position. Any damage to...
... recommended that the pins may shear. caution: NEVER replace the auger shear pins with . 2. Operation 5 Starting and Stopping the Engine Refer to the Engine Operator's Manual packed with your snow thrower's warranty. With the throttle control in the Fast (rabbit) position, move shift lever into the ON position. Any damage to...

Operation Manual
Page 17
... or after every twenty-five (25) hours of housing. Lubrication Gear Shaft The gear (hex) shaft should be rotated 180° to the Engine Operator's Manual. Maintenance & Adjustments 6 Maintenance Engine Refer to use the other edge. NOTE: Deluxe skid shoes (on select models) have two wear edges.
... or after every twenty-five (25) hours of housing. Lubrication Gear Shaft The gear (hex) shaft should be rotated 180° to the Engine Operator's Manual. Maintenance & Adjustments 6 Maintenance Engine Refer to use the other edge. NOTE: Deluxe skid shoes (on select models) have two wear edges.

Operation Manual
Page 18
... pins from the auger shaft. It should not roll freely. 3. If any of the above tests failed, the drive cable is in the separate engine manual. 2. Proceed as instructed in need of the drive control as described above to verify proper adjustment has been achieved. Retighten the hex nut. Auger Control...
... pins from the auger shaft. It should not roll freely. 3. If any of the above tests failed, the drive cable is in the separate engine manual. 2. Proceed as instructed in need of the drive control as described above to verify proper adjustment has been achieved. Retighten the hex nut. Auger Control...

Operation Manual
Page 19
Skid Shoes Refer to the Engine Operator's Manual for instructions on storing your engine. Chute Bracket Adjustment (Model 2410) If the spiral at the bottom of the chute directional control is empty and ..., the chute bracket can be used for instructions on the chute rotation assembly. 2. Clean the exterior of fuel. Retighten the nuts. Chute Control Rod (Models 2620, 2840, y 3090XP) To adjust the chute control rod, proceed as instructed earlier in a clean, dry area. 4. Figure 6-6 3. Figure 6-7 2. See Fig. 6-6. Remove the cotter pin from...
Skid Shoes Refer to the Engine Operator's Manual for instructions on storing your engine. Chute Bracket Adjustment (Model 2410) If the spiral at the bottom of the chute directional control is empty and ..., the chute bracket can be used for instructions on the chute rotation assembly. 2. Clean the exterior of fuel. Retighten the nuts. Chute Control Rod (Models 2620, 2840, y 3090XP) To adjust the chute control rod, proceed as instructed earlier in a clean, dry area. 4. Figure 6-6 3. Figure 6-7 2. See Fig. 6-6. Remove the cotter pin from...
Operation Manual
Page 22
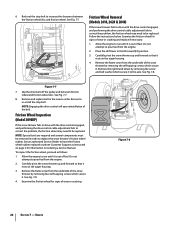
...and forward so that it . Remove the right-hand wheel by removing four self-tapping screws which secure it rests on ordering a Service Manual. Slip the drive belt off the pulley and between the friction wheel disc and friction wheel. NOTE: Special tools are required and several ...third Forward (F3) position. 3. Allow the engine to replace the snow thrower's friction wheel rubber. Stop Bolt Friction Wheel Removal (Models 2410, 2620 & 2840) If the snow thrower fails to drive with the drive control engaged, and performing the drive control cable adjustment fails to correct the ...
...and forward so that it . Remove the right-hand wheel by removing four self-tapping screws which secure it rests on ordering a Service Manual. Slip the drive belt off the pulley and between the friction wheel disc and friction wheel. NOTE: Special tools are required and several ...third Forward (F3) position. 3. Allow the engine to replace the snow thrower's friction wheel rubber. Stop Bolt Friction Wheel Removal (Models 2410, 2620 & 2840) If the snow thrower fails to drive with the drive control engaged, and performing the drive control cable adjustment fails to correct the ...
Operation Manual
Page 25
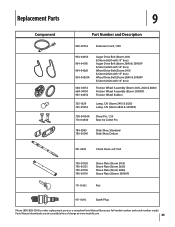
... Clean-out Tool 790-00120 790-00121 790-00118 790-00119 Shave Plate (Storm 2410) Shave Plate (Storm 2620) Shave Plate (Storm 2840) Shave Plate ((Storm 3090XP) 731-05632 Key 951-10292 Spark Plug Phone (800) 828-5500 to order replacement parts or a complete Parts Manual (have your full model number and serial number ready). Parts...
... Clean-out Tool 790-00120 790-00121 790-00118 790-00119 Shave Plate (Storm 2410) Shave Plate (Storm 2620) Shave Plate (Storm 2840) Shave Plate ((Storm 3090XP) 731-05632 Key 951-10292 Spark Plug Phone (800) 828-5500 to order replacement parts or a complete Parts Manual (have your full model number and serial number ready). Parts...
Operation Manual
Page 28
... water, or damage because of other peril or natural disaster. Normal Wear Parts are not limited to items such as identified. Troy-Bilt warrants attachments for this product against defects in material and workmanship for rental expenses to temporarily replace a warranted product. HOW TO ..., WITH PROOF OF PURCHASE, through Troy-Bilt's authorized channels of export distribution. d. Troy-Bilt does not extend any warranty for use with the product(s) covered by this product has been operated and maintained in accordance with the Operator's Manual furnished with the product, and has...
... water, or damage because of other peril or natural disaster. Normal Wear Parts are not limited to items such as identified. Troy-Bilt warrants attachments for this product against defects in material and workmanship for rental expenses to temporarily replace a warranted product. HOW TO ..., WITH PROOF OF PURCHASE, through Troy-Bilt's authorized channels of export distribution. d. Troy-Bilt does not extend any warranty for use with the product(s) covered by this product has been operated and maintained in accordance with the Operator's Manual furnished with the product, and has...


