
Operation Manual
Page 8
Installing the Drift Cutters (If so equipped) 1. Recoil Starter Handle A Handle Knob B Figure 3-7 NOTE: The opening of the eye bolt should face toward the back of the snow thrower. 8 Section 3- Align the holes in .... Install the drift cutters and secure with the carriage bolts and flange lock nuts removed in Fig. 3-7. 2. See Fig. 3-5. 1 Chute Rotation Control Figure 3-6 Installing the Recoil Starter Handle 1. Remove the eye bolt and handle knob from the manual bag. 2.
Installing the Drift Cutters (If so equipped) 1. Recoil Starter Handle A Handle Knob B Figure 3-7 NOTE: The opening of the eye bolt should face toward the back of the snow thrower. 8 Section 3- Align the holes in .... Install the drift cutters and secure with the carriage bolts and flange lock nuts removed in Fig. 3-7. 2. See Fig. 3-5. 1 Chute Rotation Control Figure 3-6 Installing the Recoil Starter Handle 1. Remove the eye bolt and handle knob from the manual bag. 2.
Operation Manual
Page 9
See Fig. 3-7. 5. Section 3 - Securely tighten the eye bolt and handle knob. Assembly & Set-Up 9 Slowly pull the recoil starter handle up towards the eye bolt. 4. Slip the recoil starter rope into the eye bolt from the back of the snow thrower. Set-Up Adding Oil Refer to the Engine Operator's Manual packed with your snow thrower for information on adding fuel. Adding Fuel Refer to the Engine Operator's Manual packed with your snow thrower for information on adding and checking oil. 3.
See Fig. 3-7. 5. Section 3 - Securely tighten the eye bolt and handle knob. Assembly & Set-Up 9 Slowly pull the recoil starter handle up towards the eye bolt. 4. Slip the recoil starter rope into the eye bolt from the back of the snow thrower. Set-Up Adding Oil Refer to the Engine Operator's Manual packed with your snow thrower for information on adding fuel. Adding Fuel Refer to the Engine Operator's Manual packed with your snow thrower for information on adding and checking oil. 3.

Operation Manual
Page 10
... at which the snow is propelled, allowing snow close to the pavement's surface to all features in contact with the pavement. Controls & Features 4 Auger Control Recoil Starter Handle Chute Rotation Control EZ Chute Low-Crank Chute Assembly Drift Cutters Auger Shave Plate Figure 4-1 NOTE: This Operator's Manual covers several models. or downward...
... at which the snow is propelled, allowing snow close to the pavement's surface to all features in contact with the pavement. Controls & Features 4 Auger Control Recoil Starter Handle Chute Rotation Control EZ Chute Low-Crank Chute Assembly Drift Cutters Auger Shave Plate Figure 4-1 NOTE: This Operator's Manual covers several models. or downward...
Operation Manual
Page 11
Chute Rotation Control (If so equipped) The chute rotation control is optional for throwing. Recoil Starter Handle The recoil starter handle is used to assist snow falling into the augers for normal snow conditions. Drift Cutters (If so Equipped) The drift cutters are designed for ...
Chute Rotation Control (If so equipped) The chute rotation control is optional for throwing. Recoil Starter Handle The recoil starter handle is used to assist snow falling into the augers for normal snow conditions. Drift Cutters (If so Equipped) The drift cutters are designed for ...
Operation Manual
Page 15
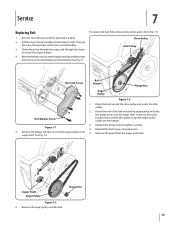
... Fig. 7-2. To replace the belt follow these instructions and refer to push down on the handles. 3. auger shaft. Auger Shaft Auger Pulley Figure 7-2 6. Pull the recoil starter handle until the fuel tank is felt. Replace the flange nut and tighten securely. Figure 7-1 4. Reinstall the belt cover removed earlier. 5. Remove the board from...
... Fig. 7-2. To replace the belt follow these instructions and refer to push down on the handles. 3. auger shaft. Auger Shaft Auger Pulley Figure 7-2 6. Pull the recoil starter handle until the fuel tank is felt. Replace the flange nut and tighten securely. Figure 7-1 4. Reinstall the belt cover removed earlier. 5. Remove the board from...
Operation Manual
Page 16
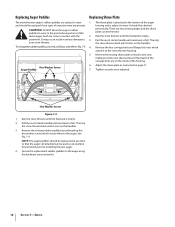
... the bottom of the auger housing and is felt. There are present. Then tip the snow thrower back until resistance is felt. Pull the recoil starter handle until it rests on the handles. 3. Then tip the snow thrower back until the fuel tank is empty. 2. Run the snow thrower... until it to the snow thrower housing. 5. Pull the recoil starter handle until the fuel tank is empty. 3. Run the snow thrower until resistance is subject to wear. Adjust the shave plate as follows and refer...
... the bottom of the auger housing and is felt. There are present. Then tip the snow thrower back until resistance is felt. Pull the recoil starter handle until it rests on the handles. 3. Then tip the snow thrower back until the fuel tank is empty. 2. Run the snow thrower... until it to the snow thrower housing. 5. Pull the recoil starter handle until the fuel tank is empty. 3. Run the snow thrower until resistance is subject to wear. Adjust the shave plate as follows and refer...


