Operation Manual
Page 5
... parts which are certified to comply with the governor setting can result in any damage. 4. Check fuel line, tank, cap, and fittings frequently for gas, oil, etc. Environmental Protection Agency (EPA), this product has an Average Useful Life of seven (7) years, or 60 hours of auger/impeller. 10. Do not modify...
... parts which are certified to comply with the governor setting can result in any damage. 4. Check fuel line, tank, cap, and fittings frequently for gas, oil, etc. Environmental Protection Agency (EPA), this product has an Average Useful Life of seven (7) years, or 60 hours of auger/impeller. 10. Do not modify...
Operation Manual
Page 7
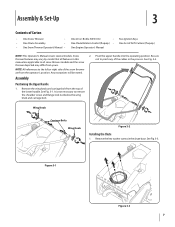
.... It is not necessary to pinch any of the lower handle. Remove the wing knob and carriage bolt from the operator's position. Bottle 5W-30 Oil • One Chute Rotation Control (If equip.) • One Engine Operator's Manual Two Ignition Keys One Set of Carton • One Snow Thrower • •...
.... It is not necessary to pinch any of the lower handle. Remove the wing knob and carriage bolt from the operator's position. Bottle 5W-30 Oil • One Chute Rotation Control (If equip.) • One Engine Operator's Manual Two Ignition Keys One Set of Carton • One Snow Thrower • •...

Operation Manual
Page 9
Section 3 - Adding Fuel Refer to the Engine Operator's Manual packed with your snow thrower for information on adding and checking oil. Slowly pull the recoil starter handle up towards the eye bolt. 4. Assembly & Set-Up 9 Slip the recoil starter rope into the eye bolt from the back of the snow thrower. Securely tighten the eye bolt and handle knob. See Fig. 3-7. 5. Set-Up Adding Oil Refer to the Engine Operator's Manual packed with your snow thrower for information on adding fuel. 3.
Section 3 - Adding Fuel Refer to the Engine Operator's Manual packed with your snow thrower for information on adding and checking oil. Slowly pull the recoil starter handle up towards the eye bolt. 4. Assembly & Set-Up 9 Slip the recoil starter rope into the eye bolt from the back of the snow thrower. Securely tighten the eye bolt and handle knob. See Fig. 3-7. 5. Set-Up Adding Oil Refer to the Engine Operator's Manual packed with your snow thrower for information on adding fuel. 3.
Operation Manual
Page 13
...high, snow may be too low and needs to the Operation section for instructions on the storage of the control cable with a light oil. 13 Lubricate pivot points on a level surface. Then tip the snow thrower back until resistance is difficult to wear, periodic adjustments ...and the auger drive belt stretching due to pull, remove the spark plug and 1. To adjust, disconnect the end of control cable with a light oil once every season and before 5. Insert the cable from the snow thrower. 2. If the starter is felt. Maintenance & Adjustments 6 Adjustments WARNING!...
...high, snow may be too low and needs to the Operation section for instructions on the storage of the control cable with a light oil. 13 Lubricate pivot points on a level surface. Then tip the snow thrower back until resistance is difficult to wear, periodic adjustments ...and the auger drive belt stretching due to pull, remove the spark plug and 1. To adjust, disconnect the end of control cable with a light oil once every season and before 5. Insert the cable from the snow thrower. 2. If the starter is felt. Maintenance & Adjustments 6 Adjustments WARNING!...
Operation Manual
Page 14
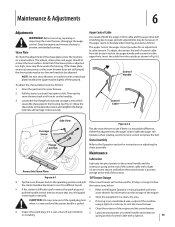
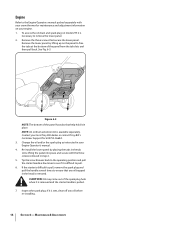
... pull, remove the spark plug and pull the handle several times to ensure that secure the lower panel. If it is wet, clean off any oil trapped in step 2. 5. See Fig. 6-3. Figure 6-3 NOTE: The bottom of the panel has tabs that help hold it is removed and the starter...separately with the three screws removed in the head is removed. Maintenance & Adjustments If the starter is available separately. Contact your local Troy-Bilt dealer or contact Troy-Bilt's Customer Support for maintenance and adjustment information on the panel to free the tabs at the bottom of the spark plug hole when ...
... pull, remove the spark plug and pull the handle several times to ensure that secure the lower panel. If it is wet, clean off any oil trapped in step 2. 5. See Fig. 6-3. Figure 6-3 NOTE: The bottom of the panel has tabs that help hold it is removed and the starter...separately with the three screws removed in the head is removed. Maintenance & Adjustments If the starter is available separately. Contact your local Troy-Bilt dealer or contact Troy-Bilt's Customer Support for maintenance and adjustment information on the panel to free the tabs at the bottom of the spark plug hole when ...


