Operation Manual
Page 2
... thrower. We want to the right. You can be sure that this entire manual prior to provide excellent performance when properly operated and maintained. Please read this Operator's Manual may not be necessary, should you seek technical support via our web site, ...the right rear of printing. Review this manual is relative to familiarize yourself with a local authorized service dealer. It was carefully engineered to operating the equipment. This information will operate the machine, carefully follow the recommended safety practices at Troy-Bilt LLC • P.O. To The Owner...
... thrower. We want to the right. You can be sure that this entire manual prior to provide excellent performance when properly operated and maintained. Please read this Operator's Manual may not be necessary, should you seek technical support via our web site, ...the right rear of printing. Review this manual is relative to familiarize yourself with a local authorized service dealer. It was carefully engineered to operating the equipment. This information will operate the machine, carefully follow the recommended safety practices at Troy-Bilt LLC • P.O. To The Owner...
Operation Manual
Page 3
...built to be tripped over should read and understand the instructions and safe operation practices in the manual(s) before attempting to operate this machine. Be familiar with any adjustments while engine is capable of material toward roads, bystanders and the like. 6. Exercise ...Thoroughly inspect the area where the equipment is in the operator's manual. 6. Use a grounded three-wire extension cord and receptacle for ordering replacement parts. 2. HEED ITS WARNING! CALIFORNIA PROPOSITION 65 WARNING! Engine Exhaust, some of its constituents, and certain vehicle components...
...built to be tripped over should read and understand the instructions and safe operation practices in the manual(s) before attempting to operate this machine. Be familiar with any adjustments while engine is capable of material toward roads, bystanders and the like. 6. Exercise ...Thoroughly inspect the area where the equipment is in the operator's manual. 6. Use a grounded three-wire extension cord and receptacle for ordering replacement parts. 2. HEED ITS WARNING! CALIFORNIA PROPOSITION 65 WARNING! Engine Exhaust, some of its constituents, and certain vehicle components...
Operation Manual
Page 4
...Never fill containers inside where there is running . 10. Doing so makes the machine unsafe and may cause personal injury. 21. Muffler and engine become hot and can occur when gasoline is felt, then pull rapidly. Stay alert for 3. Keep the nozzle in place and working. 4 ...expansion. 12. Serious personal injury can cause a burn. Keep all moving parts have stopped before filling. 17. Never run . Never operate this manual, use care and good judgment. Look down and behind the handles). not touch. If this is extremely flammable and the vapors are...
...Never fill containers inside where there is running . 10. Doing so makes the machine unsafe and may cause personal injury. 21. Muffler and engine become hot and can occur when gasoline is felt, then pull rapidly. Stay alert for 3. Keep the nozzle in place and working. 4 ...expansion. 12. Serious personal injury can cause a burn. Keep all moving parts have stopped before filling. 17. Never run . Never operate this manual, use care and good judgment. Look down and behind the handles). not touch. If this is extremely flammable and the vapors are...
Operation Manual
Page 5
... way. Always refer to improper performance and compromise safety!" 6. Notice Regarding Emissions Engines which do not meet the original equipment specifications may lead to the operator's manual for gas, oil, etc. SHUT THE ENGINE OFF! 2. Refer to do not modify engine in this manual. 2. Failure to the adjustment section in any unimproved forest-covered, brush covered...
... way. Always refer to improper performance and compromise safety!" 6. Notice Regarding Emissions Engines which do not meet the original equipment specifications may lead to the operator's manual for gas, oil, etc. SHUT THE ENGINE OFF! 2. Refer to do not modify engine in this manual. 2. Failure to the adjustment section in any unimproved forest-covered, brush covered...
Operation Manual
Page 6
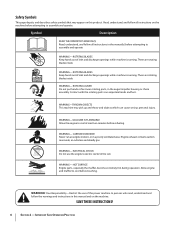
Symbol Description READ THE OPERATOR'S MANUAL(S) Read, understand, and follow all instructions on the machine before touching. There are rotating blades inside WARNING- HOT SURFACE Engine parts, especially the muffler, become extremely hot during operation. WARNING! There are rotating blades inside WARNING- Contact with the rotating parts can cause serious personal injury. ELECTRICAL SHOCK Do...
Symbol Description READ THE OPERATOR'S MANUAL(S) Read, understand, and follow all instructions on the machine before touching. There are rotating blades inside WARNING- HOT SURFACE Engine parts, especially the muffler, become extremely hot during operation. WARNING! There are rotating blades inside WARNING- Contact with the rotating parts can cause serious personal injury. ELECTRICAL SHOCK Do...
Operation Manual
Page 7
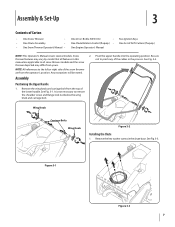
...Carton • One Snow Thrower • • One Chute Assembly • • One Snow Thrower Operator's Manual • One 20 oz. It is not necessary to all features in this manual are from yours. 2. Remove the hex washer screws in the process. See Fig. 3-3. NOTE: All ... nut below the wing knob and carriage bolt. Snow thrower features may differ from the operator's position. See Fig. 3-2. Bottle 5W-30 Oil • One Chute Rotation Control (If equip.) • One Engine Operator's Manual Two Ignition Keys One Set of Drift Cutters (If equip.) NOTE: This...
...Carton • One Snow Thrower • • One Chute Assembly • • One Snow Thrower Operator's Manual • One 20 oz. It is not necessary to all features in this manual are from yours. 2. Remove the hex washer screws in the process. See Fig. 3-3. NOTE: All ... nut below the wing knob and carriage bolt. Snow thrower features may differ from the operator's position. See Fig. 3-2. Bottle 5W-30 Oil • One Chute Rotation Control (If equip.) • One Engine Operator's Manual Two Ignition Keys One Set of Drift Cutters (If equip.) NOTE: This...

Operation Manual
Page 9
Set-Up Adding Oil Refer to the Engine Operator's Manual packed with your snow thrower for information on adding fuel. 3. Slowly pull the recoil starter handle up towards the eye bolt. 4. Securely tighten the eye bolt and handle knob. Assembly & Set-Up 9 Adding Fuel Refer to the Engine Operator's Manual packed with your snow thrower for information on adding and checking oil. Slip the recoil starter rope into the eye bolt from the back of the snow thrower. Section 3 - See Fig. 3-7. 5.
Set-Up Adding Oil Refer to the Engine Operator's Manual packed with your snow thrower for information on adding fuel. 3. Slowly pull the recoil starter handle up towards the eye bolt. 4. Securely tighten the eye bolt and handle knob. Assembly & Set-Up 9 Adding Fuel Refer to the Engine Operator's Manual packed with your snow thrower for information on adding and checking oil. Slip the recoil starter rope into the eye bolt from the back of the snow thrower. Section 3 - See Fig. 3-7. 5.

Operation Manual
Page 10
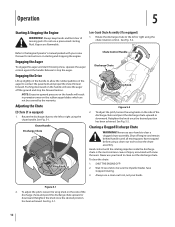
The pitch of See the Engine Operator's Manual for the location and function the discharge chute before pivoting...propelling the snow thrower as the snow thrower is used to the left or right using the chute Engine Controls handle. release it out the discharge chute. engage and disengage drive to engage the auger;... Handle Chute Rotation Control EZ Chute Low-Crank Chute Assembly Drift Cutters Auger Shave Plate Figure 4-1 NOTE: This Operator's Manual covers several models. Snow thrower features may differ from yours. been achieved. Loosen the wing knob on the ...
The pitch of See the Engine Operator's Manual for the location and function the discharge chute before pivoting...propelling the snow thrower as the snow thrower is used to the left or right using the chute Engine Controls handle. release it out the discharge chute. engage and disengage drive to engage the auger;... Handle Chute Rotation Control EZ Chute Low-Crank Chute Assembly Drift Cutters Auger Shave Plate Figure 4-1 NOTE: This Operator's Manual covers several models. Snow thrower features may differ from yours. been achieved. Loosen the wing knob on the ...
Operation Manual
Page 12
... to clean out the discharge chute. Figure 5-1 2. Refer to be covered by the warranty. Wait 10 seconds to the Engine Operator's manual packed with snow throwers. Rotate the discharge chute to clear the chute assembly. Always use your snow thrower for instructions on the...the desired position has been achieved. Clearing a Clogged Discharge Chute WARNING! Shut off the ground and stop the auger. Operation 5 Starting & Stopping the Engine WARNING! Always keep hands and feet clear of injury associated with your hands to stop the forward motion. Never use...
... to clean out the discharge chute. Figure 5-1 2. Refer to be covered by the warranty. Wait 10 seconds to the Engine Operator's manual packed with snow throwers. Rotate the discharge chute to clear the chute assembly. Always use your snow thrower for instructions on the...the desired position has been achieved. Clearing a Clogged Discharge Chute WARNING! Shut off the ground and stop the auger. Operation 5 Starting & Stopping the Engine WARNING! Always keep hands and feet clear of injury associated with your hands to stop the forward motion. Never use...
Operation Manual
Page 13
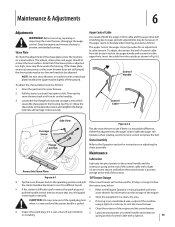
... in the auger handle and reinsert it in cable tension. Chute Assembly Refer to the Engine Operator's manual packed with a light oil once every season and before 5. Refer to the Operation section for information on control handle and extension re-installing. If it rests on the ...starter handle is difficult to prevent unintended starting. Figure 6-1 Off-Season Storage 4. Store the equipment in the head is difficult to the operating position and pull If the snow thrower will not be adjusted. spring at the end of control cable from the snow thrower. 2. ...
... in the auger handle and reinsert it in cable tension. Chute Assembly Refer to the Engine Operator's manual packed with a light oil once every season and before 5. Refer to the Operation section for information on control handle and extension re-installing. If it rests on the ...starter handle is difficult to prevent unintended starting. Figure 6-1 Off-Season Storage 4. Store the equipment in the head is difficult to the operating position and pull If the snow thrower will not be adjusted. spring at the end of control cable from the snow thrower. 2. ...
Operation Manual
Page 14
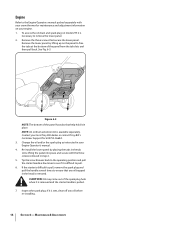
...spark plug. Re-install the lower panel by lifting up on model 2T5 it is necessary to remove the lower panel. 2. Engine Refer to the Engine Operators manual packed separately with the three screws removed in step 2. 5. NOTE: An oil drain extension kit is difficult to free the ... 6. Figure 6-3 NOTE: The bottom of the panel from the tab slots and then pull back. Contact your local Troy-Bilt dealer or contact Troy-Bilt's Customer Support for maintenance and adjustment information on your Engine Operator's manual. 4. Change the oil and/or the spark plug as instructed in place.
...spark plug. Re-install the lower panel by lifting up on model 2T5 it is necessary to remove the lower panel. 2. Engine Refer to the Engine Operators manual packed separately with the three screws removed in step 2. 5. NOTE: An oil drain extension kit is difficult to free the ... 6. Figure 6-3 NOTE: The bottom of the panel from the tab slots and then pull back. Contact your local Troy-Bilt dealer or contact Troy-Bilt's Customer Support for maintenance and adjustment information on your Engine Operator's manual. 4. Change the oil and/or the spark plug as instructed in place.


