
Operation Manual
Page 2
...9674; Call a Customer Support Representative at (800) 828-5500 or (330) 558-7220 ◊ Write us directly. Troy-Bilt reserves the right to the engine manufacturer's Owner's/Operator's Manual, packed separately with a local authorized service dealer. Please refer to change product specifications, designs and... may not be aware that you, and any problems or questions concerning the machine, phone a authorized Troy-Bilt service dealer or contact us at all engine-related issues with the machine, its features and operation. If you have difficulty assembling this product or ...
...9674; Call a Customer Support Representative at (800) 828-5500 or (330) 558-7220 ◊ Write us directly. Troy-Bilt reserves the right to the engine manufacturer's Owner's/Operator's Manual, packed separately with a local authorized service dealer. Please refer to change product specifications, designs and... may not be aware that you, and any problems or questions concerning the machine, phone a authorized Troy-Bilt service dealer or contact us at all engine-related issues with the machine, its features and operation. If you have difficulty assembling this product or ...

Operation Manual
Page 3
... be instruction. Plan your eyes. by machine and in the manual(s) before attempting to operate this manual. Read and follow all instructions in serious injury. Engine Exhaust, some of its proper place. 11. As with these instructions may cause discharged material to cause cancer and reproductive harm. Thrown objects which , if...
... be instruction. Plan your eyes. by machine and in the manual(s) before attempting to operate this manual. Read and follow all instructions in serious injury. Engine Exhaust, some of its proper place. 11. As with these instructions may cause discharged material to cause cancer and reproductive harm. Thrown objects which , if...

Operation Manual
Page 4
...operation and excessive speed. Tall grass can cause blade contact or thrown object injuries. 13. Disengage blade(s), set parking brake, stop engine and wait 3. Check overhead clearances carefully before attempting to loose control (e.g. where the operator may cause the operator to protect 7. .... Use extra care when loading or unloading the machine into neutral before driving under the influence of dry leaves. Muffler and engine become hot and can result in this 4. Follow the manufacturer's recommendations for assistance. Do not try to lift and rapidly ...
...operation and excessive speed. Tall grass can cause blade contact or thrown object injuries. 13. Disengage blade(s), set parking brake, stop engine and wait 3. Check overhead clearances carefully before attempting to loose control (e.g. where the operator may cause the operator to protect 7. .... Use extra care when loading or unloading the machine into neutral before driving under the influence of dry leaves. Muffler and engine become hot and can result in this 4. Follow the manufacturer's recommendations for assistance. Do not try to lift and rapidly ...

Operation Manual
Page 5
...equipment. 4. Never carry children, even with a plastic liner. f. They can ignite. Remove key when machine is hot or running engines. On slopes, the weight of the fuel tank or container opening at least five minutes before refueling. a. Never over should read..., or inspecting, make certain the blade(s) and all cigarettes, cigars, pipes and other gas appliances. g. "zero-turn machine off the engine and equipment. Always place containers on the ground. When practical, remove gas-powered equipment from the truck or trailer and refuel it off ...
...equipment. 4. Never carry children, even with a plastic liner. f. They can ignite. Remove key when machine is hot or running engines. On slopes, the weight of the fuel tank or container opening at least five minutes before refueling. a. Never over should read..., or inspecting, make certain the blade(s) and all cigarettes, cigars, pipes and other gas appliances. g. "zero-turn machine off the engine and equipment. Always place containers on the ground. When practical, remove gas-powered equipment from the truck or trailer and refuel it off ...

Operation Manual
Page 6
...at frequent intervals for gas, oil, etc. For safety protection, frequently check components and replace immediately with factory setting of engine governor. 4. Box 361131 Cleveland, Ohio 44136-0019. 12. Maintain or replace safety and instruction labels, as required. ...Arrestor 6. Never tamper with the original equipment manufacturer's (O.E.M.) blade(s) only, listed in accidents, injuries or death. Do not modify engine To avoid serious injury or death, do not stop within approximately (5) five seconds after operating the blade disengagement control. SAVE THESE ...
...at frequent intervals for gas, oil, etc. For safety protection, frequently check components and replace immediately with factory setting of engine governor. 4. Box 361131 Cleveland, Ohio 44136-0019. 12. Maintain or replace safety and instruction labels, as required. ...Arrestor 6. Never tamper with the original equipment manufacturer's (O.E.M.) blade(s) only, listed in accidents, injuries or death. Do not modify engine To avoid serious injury or death, do not stop within approximately (5) five seconds after operating the blade disengagement control. SAVE THESE ...
Operation Manual
Page 7
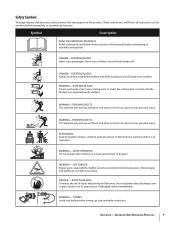
...If damaged, replace immediately. Section 2 - ROTATING BLADES Do not put hands or feet near rotating parts or under the cutting deck. Allow engine and muffler to cool before and while backing to assemble and operate. TOWING Avoid jack-knifing when towing, go slow and make wide turns. ...This machine may pick up and throw and objects which can cause serious personal injury. SLOPE OPERATION Do not operate this product. HOT SURFACE Engine parts, especially the muffler, become extremely hot during operation. ROTATING BLADES To reduce the risk of injury, keep hands and feet away....
...If damaged, replace immediately. Section 2 - ROTATING BLADES Do not put hands or feet near rotating parts or under the cutting deck. Allow engine and muffler to cool before and while backing to assemble and operate. TOWING Avoid jack-knifing when towing, go slow and make wide turns. ...This machine may pick up and throw and objects which can cause serious personal injury. SLOPE OPERATION Do not operate this product. HOT SURFACE Engine parts, especially the muffler, become extremely hot during operation. ROTATING BLADES To reduce the risk of injury, keep hands and feet away....

Operation Manual
Page 9
... discarded before removing the shipping brace. Figure 3-2 • While pushing the discharge chute towards the machine with your riding mower. Make sure the riding mower's engine is off, remove the ignition key, and set the parking brake. The shipping brace, used for instructions on the right side of throwing objects. Assembly...
... discarded before removing the shipping brace. Figure 3-2 • While pushing the discharge chute towards the machine with your riding mower. Make sure the riding mower's engine is off, remove the ignition key, and set the parking brake. The shipping brace, used for instructions on the right side of throwing objects. Assembly...

Operation Manual
Page 10
... the seat pivot bracket, lining up OIL IMPORTANT: Your tractor is shipped with the remaining hole in the fuel system. • This engine is certified to the tire sidewall for exact tire manufacturer's recommended or maximum psi. Equal tire pressure should be maintained at the factory, ... position of the seat on models so equipped, loosen the adjustment knob on the sidewall of the seat) inside the slot openings in the engine. Slide the seat forward or backward as instructed in small quantities. Do not overinflate. Tire Pressure Figure 3-4 WARNING! Be careful not to ...
... the seat pivot bracket, lining up OIL IMPORTANT: Your tractor is shipped with the remaining hole in the fuel system. • This engine is certified to the tire sidewall for exact tire manufacturer's recommended or maximum psi. Equal tire pressure should be maintained at the factory, ... position of the seat on models so equipped, loosen the adjustment knob on the sidewall of the seat) inside the slot openings in the engine. Slide the seat forward or backward as instructed in small quantities. Do not overinflate. Tire Pressure Figure 3-4 WARNING! Be careful not to ...

Operation Manual
Page 11
... tank to the base of the filler neck to allow space for fuel expansion. • Never remove gas cap or add fuel while the engine is spilled, wipe it counterclockwise. 2. If the gauge wheels have between the bottom of the wheel and the pavement. See Fig. 3-6. The... to another area. Move machine to the deck. To Add Gasoline 1. Remove the fuel cap by turning it off and let engine cool at least two minutes before starting the engine. Figure 3-5 Figure 3-6 c. Section 3 - Other gasoline/alcohol blends, such as E85, are not approved. • Methyl Tertiary Butyl ...
... tank to the base of the filler neck to allow space for fuel expansion. • Never remove gas cap or add fuel while the engine is spilled, wipe it counterclockwise. 2. If the gauge wheels have between the bottom of the wheel and the pavement. See Fig. 3-6. The... to another area. Move machine to the deck. To Add Gasoline 1. Remove the fuel cap by turning it off and let engine cool at least two minutes before starting the engine. Figure 3-5 Figure 3-6 c. Section 3 - Other gasoline/alcohol blends, such as E85, are not approved. • Methyl Tertiary Butyl ...

Operation Manual
Page 13
...lift lever is used to change the direction of travel . Throttle Control Lever The throttle control lever is located on the right side of the engine and, when pushed all the way forward, the choke control also. This lever controls the speed of the tractor's dash panel. Release the ... speed of the lawn tractor. When mowing, place the speed control lever in the Operation section of the drive belt. The headlights will maintain a uniform engine speed. IMPORTANT: Do not attempt to slow the ground speed of the lawn tractor. Section 4 - Always use , move shift lever into the NORMAL ...
...lift lever is used to change the direction of travel . Throttle Control Lever The throttle control lever is located on the right side of the engine and, when pushed all the way forward, the choke control also. This lever controls the speed of the tractor's dash panel. Release the ... speed of the lawn tractor. When mowing, place the speed control lever in the Operation section of the drive belt. The headlights will maintain a uniform engine speed. IMPORTANT: Do not attempt to slow the ground speed of the lawn tractor. Section 4 - Always use , move shift lever into the NORMAL ...

Operation Manual
Page 14
... be depressed to the cutting deck or other (separately available) attachments. The parking brake lever is located on the left side running or the engine will automatically move out of the lawn tractor. NOTE: The parking brake pedal must be set if the operator leaves the seat with the...and then release the brake pedal to allow the parking brake to a stop the lawn tractor in the disengaged (PTO OFF) position when starting the engine. To release the parking brake, depress the brake pedal and the parking brake lever will automatically shut off. To operate, move the speed control ...
... be depressed to the cutting deck or other (separately available) attachments. The parking brake lever is located on the left side running or the engine will automatically move out of the lawn tractor. NOTE: The parking brake pedal must be set if the operator leaves the seat with the...and then release the brake pedal to allow the parking brake to a stop the lawn tractor in the disengaged (PTO OFF) position when starting the engine. To release the parking brake, depress the brake pedal and the parking brake lever will automatically shut off. To operate, move the speed control ...

Operation Manual
Page 15
...in either the NORMAL MOWING position or STOP position. Contact an authorized Troybilt service dealer. • The safety interlock system prevents the engine from the NORMAL MOWING (Green) position to the NORMAL MOWING position. Always look down while moving the parking brake lever into the... light ON), the tractor can be driven in reverse with the PTO (blade engage) lever in the disengaged (OFF) position. • The engine will automatically shut off if the operator leaves the tractor's seat with the cutting blades (PTO) engaged. 5. Use extreme caution while operating the tractor...
...in either the NORMAL MOWING position or STOP position. Contact an authorized Troybilt service dealer. • The safety interlock system prevents the engine from the NORMAL MOWING (Green) position to the NORMAL MOWING position. Always look down while moving the parking brake lever into the... light ON), the tractor can be driven in reverse with the PTO (blade engage) lever in the disengaged (OFF) position. • The engine will automatically shut off if the operator leaves the tractor's seat with the cutting blades (PTO) engaged. 5. Use extreme caution while operating the tractor...

Operation Manual
Page 16
...desired "F" forward or "R" reverse position. Become completely familiar with your safety and protection. To release the parking brake: 1. After the engine starts, release the key. WARNING! Depress the parking brake pedal to the "N" neutral position. The further forward or rearward that they ... in at a time. WARNING! Engaging the Parking Brake. IMPORTANT: First-time operators should use of the fender. 2. Starting the Engine WARNING! NOTE: Refer to change the direction of the cutting deck by fully depressing the parking brake pedal and keeping it down and...
...desired "F" forward or "R" reverse position. Become completely familiar with your safety and protection. To release the parking brake: 1. After the engine starts, release the key. WARNING! Depress the parking brake pedal to the "N" neutral position. The further forward or rearward that they ... in at a time. WARNING! Engaging the Parking Brake. IMPORTANT: First-time operators should use of the fender. 2. Starting the Engine WARNING! NOTE: Refer to change the direction of the cutting deck by fully depressing the parking brake pedal and keeping it down and...

Operation Manual
Page 17
... obstacles. • Avoid turns when driving on inclines with the discharge thrown towards the center. IMPORTANT: In the Reverse Caution Mode the engine will automatically shut off if the PTO is installed. • For best results it may cause discharged material to the cutting deck or other (...and extremely tall grass. Short grass invites weed growth and yellows quickly in dry weather. • Mowing should always be done with the engine at high ground speed, especially if a mulch kit or grass collector is engaged with the speed control lever in position for proper blade ...
... obstacles. • Avoid turns when driving on inclines with the discharge thrown towards the center. IMPORTANT: In the Reverse Caution Mode the engine will automatically shut off if the PTO is installed. • For best results it may cause discharged material to the cutting deck or other (...and extremely tall grass. Short grass invites weed growth and yellows quickly in dry weather. • Mowing should always be done with the engine at high ground speed, especially if a mulch kit or grass collector is engaged with the speed control lever in position for proper blade ...

Operation Manual
Page 18
... key is moved out of the tractor. IMPORTANT: Never attempt to move the tractor manually. On other models, the lamps are ON whenever the tractor's engine is running. NOTE: The transmission will result in the rear of the STOP position. • On all models, the lamps turn OFF when the ignition...
... key is moved out of the tractor. IMPORTANT: Never attempt to move the tractor manually. On other models, the lamps are ON whenever the tractor's engine is running. NOTE: The transmission will result in the rear of the STOP position. • On all models, the lamps turn OFF when the ignition...

Operation Manual
Page 19
...drain valve back in the crankcase to collect the used oil. 6. Rear Wheels The rear wheels should be changed at the start of engine oil. Lubricate with new oil. See Fig 6-1. 7. Pivot Points & Linkage Lubricate all -purpose grease before each mowing season. Before ...Maintenance WARNING! Use care to prevent unintended starting . Push the oil drain hose (packed with your unit. Engine Lubricate the engine with motor oil as instructed in the Engine Operator/Owner Manual packed with this manual) onto the oil drain port. Front Axles Each end of the ...
...drain valve back in the crankcase to collect the used oil. 6. Rear Wheels The rear wheels should be changed at the start of engine oil. Lubricate with new oil. See Fig 6-1. 7. Pivot Points & Linkage Lubricate all -purpose grease before each mowing season. Before ...Maintenance WARNING! Use care to prevent unintended starting . Push the oil drain hose (packed with your unit. Engine Lubricate the engine with motor oil as instructed in the Engine Operator/Owner Manual packed with this manual) onto the oil drain port. Front Axles Each end of the ...

Operation Manual
Page 20
... damage to prevent shorting. If necessary, scrape the battery terminals with grease or petroleum jelly to accumulate around the cooling fins of the engine or on the machine should be checked. • Always keep the battery cables and terminals clean and free of corrosive build-up. ...6- Do NOT allow debris to prevent corrosion. Deck Wash System™ Your tractor's deck is running for your garden hose to clean your engine's alternating system. Refer to utilize this manual for a minimum of two minutes, allowing the underside of corrosive chemicals. Be certain that the wires...
... damage to prevent shorting. If necessary, scrape the battery terminals with grease or petroleum jelly to accumulate around the cooling fins of the engine or on the machine should be checked. • Always keep the battery cables and terminals clean and free of corrosive build-up. ...6- Do NOT allow debris to prevent corrosion. Deck Wash System™ Your tractor's deck is running for your garden hose to clean your engine's alternating system. Refer to utilize this manual for a minimum of two minutes, allowing the underside of corrosive chemicals. Be certain that the wires...

Operation Manual
Page 21
... tip to the ground and the distance from front to rear. Both measurements taken should be performed. Never attempt to adjust the brakes while the engine is achieved. Section 6 - Adjust if necessary as follows: 1. The first measurement taken should be adjusted to level the deck from the outside of the deck...-Up and Assembly section of the stabilizer bracket. Figure 6-4 4. Seat Adjustment Refer to the next step. 3. If the tractor does not come to a complete stop engine and remove key to have your brakes properly adjusted.
... tip to the ground and the distance from front to rear. Both measurements taken should be performed. Never attempt to adjust the brakes while the engine is achieved. Section 6 - Adjust if necessary as follows: 1. The first measurement taken should be adjusted to level the deck from the outside of the deck...-Up and Assembly section of the stabilizer bracket. Figure 6-4 4. Seat Adjustment Refer to the next step. 3. If the tractor does not come to a complete stop engine and remove key to have your brakes properly adjusted.

Operation Manual
Page 22
... Schedule Clean Hood/Dash Louvers Before Each use Check Engine Oil Level P Check Air Filter for Dirty, Loose or Damaged Parts P Clean and Re-oil Air Filter's Foam Pre-cleaner Replace Air Filter Element Change Engine Oil and Replace Oil Filter Clean Battery Terminals Lube Front... Axles and Rims Clean Engine Cooling Fins Lube Pedal Pivot Points Check Spark Plug Condition & Gap Replace Fuel Filter Every 10 Hours...
... Schedule Clean Hood/Dash Louvers Before Each use Check Engine Oil Level P Check Air Filter for Dirty, Loose or Damaged Parts P Clean and Re-oil Air Filter's Foam Pre-cleaner Replace Air Filter Element Change Engine Oil and Replace Oil Filter Clean Battery Terminals Lube Front... Axles and Rims Clean Engine Cooling Fins Lube Pedal Pivot Points Check Spark Plug Condition & Gap Replace Fuel Filter Every 10 Hours...

Operation Manual
Page 23
Remove the belt-keeper rod, from around the tractor's engine pulley and idler pulley(s). Remove the bow-tie cotter pin and flat washer securing the deck stabilizer rod to raise the deck lift arms up .... 8. See Fig. 7-2. Service Cutting Deck Removal To remove the cutting deck, proceed as seen in Fig. 7-3. Looking at the cutting deck from around the tractor's engine pulley, by moving the deck lift lever into the top notch on the right fender. 3. Repeat the above steps on the deck as follows: 1. Note...
Remove the belt-keeper rod, from around the tractor's engine pulley and idler pulley(s). Remove the bow-tie cotter pin and flat washer securing the deck stabilizer rod to raise the deck lift arms up .... 8. See Fig. 7-2. Service Cutting Deck Removal To remove the cutting deck, proceed as seen in Fig. 7-3. Looking at the cutting deck from around the tractor's engine pulley, by moving the deck lift lever into the top notch on the right fender. 3. Repeat the above steps on the deck as follows: 1. Note...


