Operation Manual
Page 4
... for any metal, rocks, bottles, cans, or other debris build-up or carry machine while the engine is running. Do not attempt to build up oil or fuel spillage and remove any damaged parts. attachment while the engine is hot or 8. Wait 5 minutes before filling. 4. Clean up in the feeding chambers...
... for any metal, rocks, bottles, cans, or other debris build-up or carry machine while the engine is running. Do not attempt to build up oil or fuel spillage and remove any damaged parts. attachment while the engine is hot or 8. Wait 5 minutes before filling. 4. Clean up in the feeding chambers...
Operation Manual
Page 5
.... 11. Tampering with safety devices. If a spark arrester is an open flame, spark or pilot light such as necessary. 6. Check bolts and screws for gas, oil, etc. Observe proper disposal laws and regulations for proper tightness at unsafe speeds. Always refer to keep the machine in accidents, injuries or death. Section...
.... 11. Tampering with safety devices. If a spark arrester is an open flame, spark or pilot light such as necessary. 6. Check bolts and screws for gas, oil, etc. Observe proper disposal laws and regulations for proper tightness at unsafe speeds. Always refer to keep the machine in accidents, injuries or death. Section...
Operation Manual
Page 7
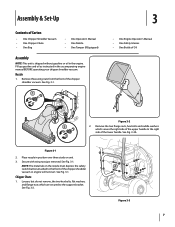
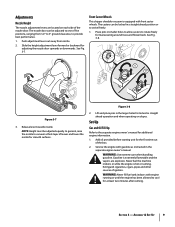
... safety switch button attached to the front of the upper handle to the support bracket. See Fig. 3-1. Remove three wing nuts from the front of Oil 2 3 Figure 3-2 2. See Fig. 3-1. 1 3 • One Engine Operator's Manual • One Safety Glasses • One Bottle of the chipper shredder vacuum. A B Figure 3-3 7 ...washers, and flange nuts which secure the right side of the chipper shredder vacuum or engine will not start. Fill up gasoline and oil as instructed in the engine. Remove the two flange nuts, hex bolts and saddle washers which are secured to the right side of...
... safety switch button attached to the front of the upper handle to the support bracket. See Fig. 3-1. Remove three wing nuts from the front of Oil 2 3 Figure 3-2 2. See Fig. 3-1. 1 3 • One Engine Operator's Manual • One Safety Glasses • One Bottle of the chipper shredder vacuum. A B Figure 3-3 7 ...washers, and flange nuts which secure the right side of the chipper shredder vacuum or engine will not start. Fill up gasoline and oil as instructed in the engine. Remove the two flange nuts, hex bolts and saddle washers which are secured to the right side of...
Operation Manual
Page 9
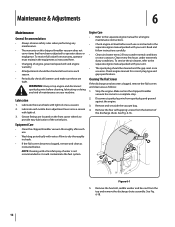
... fuel tank indoors with gasoline as instructed in a straight ahead position or to cool for at least two minutes after running . Assembly & Set-Up 9 Add oil provided before starting unit for smooth surfaces. See Fig. 3-7. In general, raise the nozzle to rotate freely for locked or straight ahead operation and when...'s manual for adjusting the nozzle door upwards or downwards. Slide the height adjustment lever forward or backward for additional engine information. 1. Set-Up Gas and Oil Fill-Up Refer to provide best performance. 1.
... fuel tank indoors with gasoline as instructed in a straight ahead position or to cool for at least two minutes after running . Assembly & Set-Up 9 Add oil provided before starting unit for smooth surfaces. See Fig. 3-7. In general, raise the nozzle to rotate freely for locked or straight ahead operation and when...'s manual for adjusting the nozzle door upwards or downwards. Slide the height adjustment lever forward or backward for additional engine information. 1. Set-Up Gas and Oil Fill-Up Refer to provide best performance. 1.
Operation Manual
Page 12
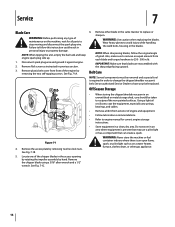
...Care • Clean the chipper/shredder vacuum thoroughly after each season. • Periodically check all engine maintenance instructions. • Check engine oil level before cleaning, lubricating or doing any maintenance. • The warranty on this chipper/shredder vacuum does not cover items that have been... subjected to dry thoroughly in the separate engine manual packed with light oil. 3. NOTE: Cleaning with water. Lubricate the rear wheels with your unit. • The spark plug should be cleaned and the ...
...Care • Clean the chipper/shredder vacuum thoroughly after each season. • Periodically check all engine maintenance instructions. • Check engine oil level before cleaning, lubricating or doing any maintenance. • The warranty on this chipper/shredder vacuum does not cover items that have been... subjected to dry thoroughly in the separate engine manual packed with light oil. 3. NOTE: Cleaning with water. Lubricate the rear wheels with your unit. • The spark plug should be cleaned and the ...
Operation Manual
Page 14
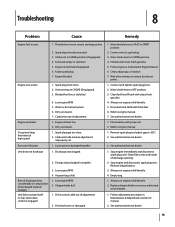
... cover from front of the engine by removing two hex lock nuts. See an authorized Service Dealer to rustproof the non-painted surfaces. Using a light oil or silicone, coat the equipment, especially any type of maintenance on a water heater, furnace, clothes dryer, or other blade in the same manner to replace...
... cover from front of the engine by removing two hex lock nuts. See an authorized Service Dealer to rustproof the non-painted surfaces. Using a light oil or silicone, coat the equipment, especially any type of maintenance on a water heater, furnace, clothes dryer, or other blade in the same manner to replace...
Operation Manual
Page 15
Spark plug wire disconnected. 3. Faulty spark plug. 7. Engine flooded. 1. Engine oil level low. 2. Discharge area clogged. 2. Connect wire to restart, but do not prime. 1. Wait a few minutes to spark plug. 3. Move choke ...Loose parts or damaged impeller. 1. Drive belt worn or damaged. 1. Move throttle lever to engine manual. 1. Connect and tighten spark plug boot. 2. Refill with proper oil. 2. Fill crankcase with fresh fuel. 6. See authorized service dealer. 2. Choke not in impeller. 3. Dirty air cleaner. 7. Carburetor idle mixture adjustment improperly set. 1....
Spark plug wire disconnected. 3. Faulty spark plug. 7. Engine flooded. 1. Engine oil level low. 2. Discharge area clogged. 2. Connect wire to restart, but do not prime. 1. Wait a few minutes to spark plug. 3. Move choke ...Loose parts or damaged impeller. 1. Drive belt worn or damaged. 1. Move throttle lever to engine manual. 1. Connect and tighten spark plug boot. 2. Refill with proper oil. 2. Fill crankcase with fresh fuel. 6. See authorized service dealer. 2. Choke not in impeller. 3. Dirty air cleaner. 7. Carburetor idle mixture adjustment improperly set. 1....


