
Operation Manual
Page 1
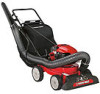
Safe Operation Practices • Set-Up • Operation • Maintenance • Service • Troubleshooting • Warranty Operator's Manual Yard Vacuum/Chipper/Shredder with Vacuum/Hose Model CSV 060 WARNING READ AND FOLLOW ALL SAFETY RULES AND INSTRUCTIONS IN THIS MANUAL BEFORE ATTEMPTING TO OPERATE THIS MACHINE. Printed In USA TROY-BILT LLC, P.O. BOX 361131 CLEVELAND, OHIO 44136-0019 Form No. 769-06154 (May 24, 2010) FAILURE TO COMPLY WITH THESE INSTRUCTIONS MAY RESULT IN PERSONAL INJURY.
Safe Operation Practices • Set-Up • Operation • Maintenance • Service • Troubleshooting • Warranty Operator's Manual Yard Vacuum/Chipper/Shredder with Vacuum/Hose Model CSV 060 WARNING READ AND FOLLOW ALL SAFETY RULES AND INSTRUCTIONS IN THIS MANUAL BEFORE ATTEMPTING TO OPERATE THIS MACHINE. Printed In USA TROY-BILT LLC, P.O. BOX 361131 CLEVELAND, OHIO 44136-0019 Form No. 769-06154 (May 24, 2010) FAILURE TO COMPLY WITH THESE INSTRUCTIONS MAY RESULT IN PERSONAL INJURY.

Operation Manual
Page 2
... model plate on the equipment and record the information in the provided area to the right. You can locate the model plate by Troy-Bilt. Choose from the experts. Troy-Bilt's Customer Support telephone numbers, website address and mailing address can seek help from the options below: ◊ Visit us on this...illustrated in personal injury or property damage. Table of product specifications for various models. To The Owner 1 Thank You Thank you for purchasing a Chipper/Shredder Vacuum manufactured by standing at the operator's position and looking down at all times.
... model plate on the equipment and record the information in the provided area to the right. You can locate the model plate by Troy-Bilt. Choose from the experts. Troy-Bilt's Customer Support telephone numbers, website address and mailing address can seek help from the options below: ◊ Visit us on this...illustrated in personal injury or property damage. Table of product specifications for various models. To The Owner 1 Thank You Thank you for purchasing a Chipper/Shredder Vacuum manufactured by standing at the operator's position and looking down at all times.

Operation Manual
Page 3
... feet from the machine while it against the engine. Children 16 and over should read and understand the instructions and safe operation practices in the chipper chute. 4. Thoroughly inspect the area where the equipment is capable of the operator can amputate fingers, hands, and feet. 8. Always wear safety glasses or safety...
... feet from the machine while it against the engine. Children 16 and over should read and understand the instructions and safe operation practices in the chipper chute. 4. Thoroughly inspect the area where the equipment is capable of the operator can amputate fingers, hands, and feet. 8. Always wear safety glasses or safety...

Operation Manual
Page 4
...while the engine is running . Move unit to assure continued safe operation. 3. feed intake, and cutting chamber are empty and free of the chipper chute while feeding material into the machine to the machine. 4 Section 2 - nozzle. 6. Never fuel machine indoors. Never attempt to no more... moving parts have stopped, disconnect the spark plug wire and ground it against the engine before starting the machine, make sure the chipper chute, 16. Do not touch. 2. care and good judgement. Contact Customer Support for damage. Wash your machine should start making...
...while the engine is running . Move unit to assure continued safe operation. 3. feed intake, and cutting chamber are empty and free of the chipper chute while feeding material into the machine to the machine. 4 Section 2 - nozzle. 6. Never fuel machine indoors. Never attempt to no more... moving parts have stopped, disconnect the spark plug wire and ground it against the engine before starting the machine, make sure the chipper chute, 16. Do not touch. 2. care and good judgement. Contact Customer Support for damage. Wash your machine should start making...

Operation Manual
Page 7
... the carriage screws and wing nuts from the inside and secure with hairpin clips. handle. B See Fig. 3-1. Assembly & Set-Up 3 Contents of Carton • One Chipper/Shredder Vacuum • One Upper and Lower Handle • One Bag • One Operator's Manual • One Hose Assembly • One Bottle of upper NOTE... seated properly into the handle). Make sure the rope guide is on the handle brackets with notch in the accompanying engine manual BEFORE operating your chipper shredder vacuum. Unfold the upper handle until it aligns with lower handle.
... the carriage screws and wing nuts from the inside and secure with hairpin clips. handle. B See Fig. 3-1. Assembly & Set-Up 3 Contents of Carton • One Chipper/Shredder Vacuum • One Upper and Lower Handle • One Bag • One Operator's Manual • One Hose Assembly • One Bottle of upper NOTE... seated properly into the handle). Make sure the rope guide is on the handle brackets with notch in the accompanying engine manual BEFORE operating your chipper shredder vacuum. Unfold the upper handle until it aligns with lower handle.

Operation Manual
Page 8
... tube) in curved end of hose handle next to the end of hose assembly into the lower hose handle bracket. the first hole (closest to chipper chute and into the rope guide. Slip the starter rope into hose cradle (if applicable). Lay hose tubing in the hose a. Assembly & Set-Up See...
... tube) in curved end of hose handle next to the end of hose assembly into the lower hose handle bracket. the first hole (closest to chipper chute and into the rope guide. Slip the starter rope into hose cradle (if applicable). Lay hose tubing in the hose a. Assembly & Set-Up See...

Operation Manual
Page 9
... the engine is extremely flammable and the vapors are in place. Slip bag over the top of 2. NOTE: The bag/chute switch button attached to chipper shredder conditions. 1. Bag 1. Grasp bag handle with gasoline as leverage when sliding the locking rod. Service the engine with one hand and slide locking rod...
... the engine is extremely flammable and the vapors are in place. Slip bag over the top of 2. NOTE: The bag/chute switch button attached to chipper shredder conditions. 1. Bag 1. Grasp bag handle with gasoline as leverage when sliding the locking rod. Service the engine with one hand and slide locking rod...

Operation Manual
Page 10
... it to the right upper handle. Always wear the safety glasses provided with this unit or eye shields while operating or while performing any chipper shredder can result in foreign objects being thrown into the eyes, which can be fed into the impeller for shredding. See Fig. 4-1....yard waste such as leaves or pine needles can damage your eyes severely. Controls and Features 4 Recoil Starter Bag Hose Handle Hose Extension Chipper Chute Nozzle Height Adjustment Lever Hose Assembly Nozzle/Hose Vac Lever Nozzle Figure 4-1 WARNING: The operation of any adjustments or repairs. Hose...
... it to the right upper handle. Always wear the safety glasses provided with this unit or eye shields while operating or while performing any chipper shredder can result in foreign objects being thrown into the eyes, which can be fed into the impeller for shredding. See Fig. 4-1....yard waste such as leaves or pine needles can damage your eyes severely. Controls and Features 4 Recoil Starter Bag Hose Handle Hose Extension Chipper Chute Nozzle Height Adjustment Lever Hose Assembly Nozzle/Hose Vac Lever Nozzle Figure 4-1 WARNING: The operation of any adjustments or repairs. Hose...

Operation Manual
Page 11
... Flap Inner Flap 3 1 Figure 5-1 4 Figure 5-2 6. Fold outer flap over opening. 7. Grasp bag handle with one hand and pull lock rod on mounting bracket with your chipper/ shredder vacuum for instructions on the back of unit. 5. WARNING: Do not at any time make any adjustments without first stopping engine and disconnecting spark...
... Flap Inner Flap 3 1 Figure 5-1 4 Figure 5-2 6. Fold outer flap over opening. 7. Grasp bag handle with one hand and pull lock rod on mounting bracket with your chipper/ shredder vacuum for instructions on the back of unit. 5. WARNING: Do not at any time make any adjustments without first stopping engine and disconnecting spark...

Operation Manual
Page 12
Using The Nozzle Vacuum Yard waste such as leaves and pine needles can be fed into the chipper chute. 1. Place nozzle/hose vac lever in hard to the hose assembly. If necessary, attach the hose extension to vacuum in the bottom position on ...the nozzle to redirect vacuum to reach places as follows: a. Secure strap on top of the hose adapter to keep the chipper blade sharp. IMPORTANT: The flail screen is also important to operate the hose assembly. See Fig. 5-3. 4. Place both hands on hose extension to the machine...
Using The Nozzle Vacuum Yard waste such as leaves and pine needles can be fed into the chipper chute. 1. Place nozzle/hose vac lever in hard to the hose assembly. If necessary, attach the hose extension to vacuum in the bottom position on ...the nozzle to redirect vacuum to reach places as follows: a. Secure strap on top of the hose adapter to keep the chipper blade sharp. IMPORTANT: The flail screen is also important to operate the hose assembly. See Fig. 5-3. 4. Place both hands on hose extension to the machine...
Operation Manual
Page 13
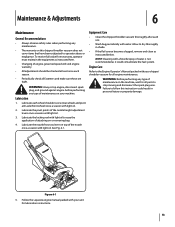
... with light oil to stop engine, disconnect spark plug, and ground against engine before performing any type of maintenance on your chipper/ shredder vacuum for all parts to ease the application of attaching on or removing bag. 4. Failure to operator abuse or ...Maintenance & Adjustments 6 Maintenance General Recommendations • Always observe safety rules when performing any maintenance. • The warranty on this chipper/shredder vacuum does not cover items that have been subjected to follow this instruction could contaminate the fuel system. WARNING: Before performing...
... with light oil to stop engine, disconnect spark plug, and ground against engine before performing any type of maintenance on your chipper/ shredder vacuum for all parts to ease the application of attaching on or removing bag. 4. Failure to operator abuse or ...Maintenance & Adjustments 6 Maintenance General Recommendations • Always observe safety rules when performing any maintenance. • The warranty on this chipper/shredder vacuum does not cover items that have been subjected to follow this instruction could contaminate the fuel system. WARNING: Before performing...

Operation Manual
Page 14
... becomes clogged, remove the flail screen and clean area as instructed in the OPERATION section to obtain access to flail screen. 4. Figure 6-2 5. Make certain the chipper/shredder vacuum has come to retaining post. 3. Remove hex screw on right side of rear housing near mounting bracket and the flange lock nut that...
... becomes clogged, remove the flail screen and clean area as instructed in the OPERATION section to obtain access to flail screen. 4. Figure 6-2 5. Make certain the chipper/shredder vacuum has come to retaining post. 3. Remove hex screw on right side of rear housing near mounting bracket and the flange lock nut that...

Operation Manual
Page 15
... Shoulder Screw Wave Washer Wheel Lock Nut Figure 7-2 5. Figure 7-3 15 Remove bag assembly or blower chute. 3. Figure 7-1 4. Remove the three hex cap screws holding the chipper chute to retaining post. 2.
... Shoulder Screw Wave Washer Wheel Lock Nut Figure 7-2 5. Figure 7-3 15 Remove bag assembly or blower chute. 3. Figure 7-1 4. Remove the three hex cap screws holding the chipper chute to retaining post. 2.

Operation Manual
Page 16
...storage instructions. • Store equipment in an area where equipment is present that may use a pilot light or has a component that hold the chipper blade to rustproof the non-painted surfaces. Using a 3/16" allen wrench, remove the flat head cap screws that can create a spark. ...engine to the nozzle mounting hardware and impeller. The nuts on the flat head cap screws can be reached underneath to remove. 9. WARNING: The chipper blade is reassembled with a file or on a grinding wheel. Using a light oil or silicone, coat the equipment, especially any springs, bearings, ...
...storage instructions. • Store equipment in an area where equipment is present that may use a pilot light or has a component that hold the chipper blade to rustproof the non-painted surfaces. Using a 3/16" allen wrench, remove the flat head cap screws that can create a spark. ...engine to the nozzle mounting hardware and impeller. The nuts on the flat head cap screws can be reached underneath to remove. 9. WARNING: The chipper blade is reassembled with a file or on a grinding wheel. Using a light oil or silicone, coat the equipment, especially any springs, bearings, ...

Operation Manual
Page 17
...authorized service dealer. 1. Faulty spark plug. 8. Spark plug gap too close. 2. Discharge area clogged. 2. Low engine RPM. 4. Chipper blade dull. 1. Make certain the bag is correctly secured, and the bag/chute switch button is full. 1. Stop engine immediately and ...Clean fuel line; Refill with clean, fresh gasoline. 4. Clean flail screen and inside of adjustment. 1. Remove lodged object. 3. Replace chipper blade or see your authorized service dealer. 17 Spark plug boot loose. 2. Carburetor idle mixture adjustment improperly set. 1. Move engine switch ...
...authorized service dealer. 1. Faulty spark plug. 8. Spark plug gap too close. 2. Discharge area clogged. 2. Low engine RPM. 4. Chipper blade dull. 1. Make certain the bag is correctly secured, and the bag/chute switch button is full. 1. Stop engine immediately and ...Clean fuel line; Refill with clean, fresh gasoline. 4. Clean flail screen and inside of adjustment. 1. Remove lodged object. 3. Replace chipper blade or see your authorized service dealer. 17 Spark plug boot loose. 2. Carburetor idle mixture adjustment improperly set. 1. Move engine switch ...

Operation Manual
Page 18
Parts Manual downloads are also available free of charge at www.troybilt.com. 18 Replacement Parts Component 9 Part Number and Description 664-04029 Bag 981-0490 Chipper Blade 719-0329 Flail Blade (2 total) 734-04033 Wheel Phone (800) 828-5500 or (330) 558-7220 to order replacement parts or a complete Parts Manual (have your full model number and serial number ready).
Parts Manual downloads are also available free of charge at www.troybilt.com. 18 Replacement Parts Component 9 Part Number and Description 664-04029 Bag 981-0490 Chipper Blade 719-0329 Flail Blade (2 total) 734-04033 Wheel Phone (800) 828-5500 or (330) 558-7220 to order replacement parts or a complete Parts Manual (have your full model number and serial number ready).

Parts Manual
Page 29
... Assembly Complete Machine Screw, 5/16-24 x 1.0 Shoulder Pin, .5 x 2.625 Hex Lock Nut, 5/16-24 Nut, Jam Lock, 3/8-16 Flail Blade Lock Washer, 5/16 Shredder Blade Chipper Blade Clevis Pin,.50 x 4.62 Lock Washer, 3/8 Flat Washer,.406 x 1.25 Hex Cap Screw, 3/8-24 x 2.2 Bell Washer.340 ID x.872 OD Shredder Hopper Assembly Hex...
... Assembly Complete Machine Screw, 5/16-24 x 1.0 Shoulder Pin, .5 x 2.625 Hex Lock Nut, 5/16-24 Nut, Jam Lock, 3/8-16 Flail Blade Lock Washer, 5/16 Shredder Blade Chipper Blade Clevis Pin,.50 x 4.62 Lock Washer, 3/8 Flat Washer,.406 x 1.25 Hex Cap Screw, 3/8-24 x 2.2 Bell Washer.340 ID x.872 OD Shredder Hopper Assembly Hex...

Parts Manual
Page 31
...-3004A 710-0809† 964-04023* 723-0400* † Model Series 420 †† Model Series 410 * Not Shown Description Lock Rod Chipper Chute Support Chipper Chute Hinge Chute Flap Strip Hex Cap Screw, 5/16-18 x 1.50 Tube Support Frame Assembly Hex Sems Screw, 3/8-16 x 1.25 Special Lock... Washer, 5/16 Push Cap, 5/8 Wheel, 10 x 4 x 4 Spacer, .64 x .88 x .38 Axle, 22.47" Elbow Fitting Push Nut,.25ID x.50OD Chipper Chute Flange Lock Nut, 5/16-18 Hex Cap Screw, 1/4-20 x 1.250 Debris Collection Bag Safety Glasses 31 CS Model Series 410 & 420 Ref No. 1 2 3 4 5 6 7 8...
...-3004A 710-0809† 964-04023* 723-0400* † Model Series 420 †† Model Series 410 * Not Shown Description Lock Rod Chipper Chute Support Chipper Chute Hinge Chute Flap Strip Hex Cap Screw, 5/16-18 x 1.50 Tube Support Frame Assembly Hex Sems Screw, 3/8-16 x 1.25 Special Lock... Washer, 5/16 Push Cap, 5/8 Wheel, 10 x 4 x 4 Spacer, .64 x .88 x .38 Axle, 22.47" Elbow Fitting Push Nut,.25ID x.50OD Chipper Chute Flange Lock Nut, 5/16-18 Hex Cap Screw, 1/4-20 x 1.250 Debris Collection Bag Safety Glasses 31 CS Model Series 410 & 420 Ref No. 1 2 3 4 5 6 7 8...

Parts Manual
Page 33
...-18 x .625 14. 710-0157 Hex Cap Screw 5/16-24 x .75 710-0888† Hex Cap Screw 5/16-24 x 1.00 15. 981-0490 Chipper Blade (standard) 942-0544B Chipper Blade (premium) 16. 710-1054 Hex Cap Screw 5/16-24 x 1.0 17. 981-04096 Impeller Assembly (standard) 681-04095 Impeller Assembly (premium) 18. 912...
...-18 x .625 14. 710-0157 Hex Cap Screw 5/16-24 x .75 710-0888† Hex Cap Screw 5/16-24 x 1.00 15. 981-0490 Chipper Blade (standard) 942-0544B Chipper Blade (premium) 16. 710-1054 Hex Cap Screw 5/16-24 x 1.0 17. 981-04096 Impeller Assembly (standard) 681-04095 Impeller Assembly (premium) 18. 912...

Parts Manual
Page 35
.... 749-1004†† 25. 781-0633†† - 964-04022^ - 723-0400^ † Model Series 450 †† Model Series 460 ^ Not Shown Description Chipper Shredder Chute Bell Washer.340 ID x.872 OD Hex Nut 5/16-18 Push Cap Frame Screw, 3/8-16 x 1.250 Axle Assembly Axle Assembly Spacer Wheel Comp....0 x 2.5 Plastic Wheel Comp., 10.0 x 4.0 Gray Hex Cap Screw 5/16-18 x 1.50 Hex Lock Nut 5/16-18 Bell Washer 5/16 x 1.0 Bell Washer.340 ID x.872 OD Chipper Chute Assembly Hex Cap Screw 1/4-20 x 1.25 Hex Cap Screw 1/4 -20 x.620 Hex Cap Screw, 1/4-20 x 1.250 Hex Lock Nut 1/4-20 Pop Rivet...
.... 749-1004†† 25. 781-0633†† - 964-04022^ - 723-0400^ † Model Series 450 †† Model Series 460 ^ Not Shown Description Chipper Shredder Chute Bell Washer.340 ID x.872 OD Hex Nut 5/16-18 Push Cap Frame Screw, 3/8-16 x 1.250 Axle Assembly Axle Assembly Spacer Wheel Comp....0 x 2.5 Plastic Wheel Comp., 10.0 x 4.0 Gray Hex Cap Screw 5/16-18 x 1.50 Hex Lock Nut 5/16-18 Bell Washer 5/16 x 1.0 Bell Washer.340 ID x.872 OD Chipper Chute Assembly Hex Cap Screw 1/4-20 x 1.25 Hex Cap Screw 1/4 -20 x.620 Hex Cap Screw, 1/4-20 x 1.250 Hex Lock Nut 1/4-20 Pop Rivet...
