Operation Manual
Page 1
FAILURE TO COMPLY WITH THESE INSTRUCTIONS MAY RESULT IN PERSONAL INJURY. BOX 361131 CLEVELAND, OHIO 44136-0019 Form No. 769-07548 (December 13, 2011) Printed In USA TROY-BILT LLC, P.O. Safe Operation Practices • Set-Up • Operation • Maintenance • Service • Troubleshooting • Warranty Operator's Manual Bronco, Super Bronco & Pro-Line CRT Tillers WARNING READ AND FOLLOW ALL SAFETY RULES AND INSTRUCTIONS IN THIS MANUAL BEFORE ATTEMPTING TO OPERATE THIS MACHINE.
FAILURE TO COMPLY WITH THESE INSTRUCTIONS MAY RESULT IN PERSONAL INJURY. BOX 361131 CLEVELAND, OHIO 44136-0019 Form No. 769-07548 (December 13, 2011) Printed In USA TROY-BILT LLC, P.O. Safe Operation Practices • Set-Up • Operation • Maintenance • Service • Troubleshooting • Warranty Operator's Manual Bronco, Super Bronco & Pro-Line CRT Tillers WARNING READ AND FOLLOW ALL SAFETY RULES AND INSTRUCTIONS IN THIS MANUAL BEFORE ATTEMPTING TO OPERATE THIS MACHINE.
Operation Manual
Page 2
...Table of product specifications for all times. Failure to the retailer or dealer without incurring obligation. Troy-Bilt's Customer Support telephone numbers, website address and mailing address can be found on this manual may ...assembling this product or have any problems or questions concerning the machine, phone a authorized Troy-Bilt service dealer or contact us on the web at www.troybilt.com See How-to ... properly operated and maintained. We reserve the right to Troy-Bilt LLC • P.O. Box 361131 • Cleveland, OH • 44136-0019 2 We want...
...Table of product specifications for all times. Failure to the retailer or dealer without incurring obligation. Troy-Bilt's Customer Support telephone numbers, website address and mailing address can be found on this manual may ...assembling this product or have any problems or questions concerning the machine, phone a authorized Troy-Bilt service dealer or contact us on the web at www.troybilt.com See How-to ... properly operated and maintained. We reserve the right to Troy-Bilt LLC • P.O. Box 361131 • Cleveland, OH • 44136-0019 2 We want...
Operation Manual
Page 4
... of this occurs, let go of grass, leaves, or other debris build-up. Never run an engine indoors or in the ground and propel the tiller forward. The governor controls the maximum safe operating speed of alcohol or drugs. 3. j. The tines may catch in a poorly ventilated area. Repair the damage before...
... of this occurs, let go of grass, leaves, or other debris build-up. Never run an engine indoors or in the ground and propel the tiller forward. The governor controls the maximum safe operating speed of alcohol or drugs. 3. j. The tines may catch in a poorly ventilated area. Repair the damage before...
Operation Manual
Page 7
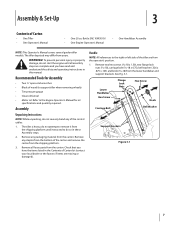
.... 3-1. Bottle SAE 10W30 Oil • One Engine Operator's Manual • One Handlebar Assembly NOTE: This Operator's Manual covers several garden tiller models. The tiller is heavy, do not severely bend any of Carton list (contact your local dealer or the factory if items are complete and you have.... Handle NOTE: All references to the Engine Operator's Manual for Assembly • Two 1⁄2" open-end wrenches • Block of Carton • One Tiller • One Operator's Manual • One 20 oz. Remove two hex screws (5⁄16-18 x 1.50), two flange lock nuts (5⁄16-18...
.... 3-1. Bottle SAE 10W30 Oil • One Engine Operator's Manual • One Handlebar Assembly NOTE: This Operator's Manual covers several garden tiller models. The tiller is heavy, do not severely bend any of Carton list (contact your local dealer or the factory if items are complete and you have.... Handle NOTE: All references to the Engine Operator's Manual for Assembly • Two 1⁄2" open-end wrenches • Block of Carton • One Tiller • One Operator's Manual • One 20 oz. Remove two hex screws (5⁄16-18 x 1.50), two flange lock nuts (5⁄16-18...
Operation Manual
Page 8
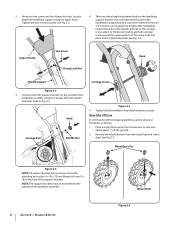
... on the handle, pull out on the carriage screw, adjust to Fig. 3-3. To adjust the height of the handlebar assembly using the upper holes. Move Tiller Off Crate To roll the...
... on the handle, pull out on the carriage screw, adjust to Fig. 3-3. To adjust the height of the handlebar assembly using the upper holes. Move Tiller Off Crate To roll the...
Operation Manual
Page 9
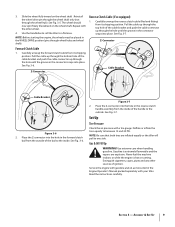
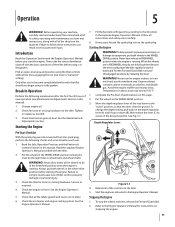
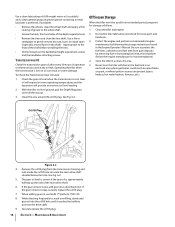
... & Oil Fill Up WARNING! Read the instructions carefully. Section 3 - 3. See Fig. 3-5. Use the handlebar to roll the tiller to between 15 and 20 PSI. Service the engine with your tiller. Slide the wheel fully inward on the wheel shaft. Forward Clutch Cable 1. See Fig. 3-6. Figure 3-7 2. Repeat with a tire...See Fig. 3-6. Never fuel the machine indoors or while the engine is extremely flammable and the vapors are inflated equally or the tiller will pull to the outside of the cable bracket and push the cable connector up through the wheel hub). NOTE: Be sure ...
... & Oil Fill Up WARNING! Read the instructions carefully. Section 3 - 3. See Fig. 3-5. Use the handlebar to roll the tiller to between 15 and 20 PSI. Service the engine with your tiller. Slide the wheel fully inward on the wheel shaft. Forward Clutch Cable 1. See Fig. 3-6. Figure 3-7 2. Repeat with a tire...See Fig. 3-6. Never fuel the machine indoors or while the engine is extremely flammable and the vapors are inflated equally or the tiller will pull to the outside of the cable bracket and push the cable connector up through the wheel hub). NOTE: Be sure ...
Operation Manual
Page 10
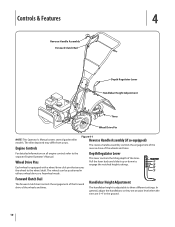
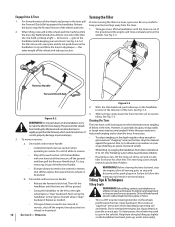
... Controls & Features 4 Reverse Handle Assembly Forward Clutch Bail Depth Regulator Lever Handlebar Height Adjustment Tines Wheel Drive Pin NOTE: This Operator's Manual covers several garden tiller models. For detailed information on all engine controls refer to three different settings. Pull the lever back and slide it up or down to the... separate Engine Operator's Manual. TRANSPORT 1" 3" 5" 7" Forward Clutch Bail The forward clutch bail controls the engagement of the forward drive of the wheels and tines. The tiller depicted may differ from yours.
... Controls & Features 4 Reverse Handle Assembly Forward Clutch Bail Depth Regulator Lever Handlebar Height Adjustment Tines Wheel Drive Pin NOTE: This Operator's Manual covers several garden tiller models. For detailed information on all engine controls refer to three different settings. Pull the lever back and slide it up or down to the... separate Engine Operator's Manual. TRANSPORT 1" 3" 5" 7" Forward Clutch Bail The forward clutch bail controls the engagement of the forward drive of the wheels and tines. The tiller depicted may differ from yours.
Operation Manual
Page 11
... & Adjustments Section in place. 6. To help prevent serious personal injury or damage to familiarize yourself with the basic operation of the tiller before each use: 1. When the wheels are in this manual. WARNING! Engine exhaust contains carbon monoxide, an odorless and deadly gas...fuel tank with all instructions and safety rules carefully. 8. Put the Forward Clutch Bail in serious personal injury. Never allow either of tiller control, property damage or personal injury. 3. Refer to the spark plug. Temperatures in these instructions can result in neutral (disengaged) positions...
... & Adjustments Section in place. 6. To help prevent serious personal injury or damage to familiarize yourself with the basic operation of the tiller before each use: 1. When the wheels are in this manual. WARNING! Engine exhaust contains carbon monoxide, an odorless and deadly gas...fuel tank with all instructions and safety rules carefully. 8. Put the Forward Clutch Bail in serious personal injury. Never allow either of tiller control, property damage or personal injury. 3. Refer to the spark plug. Temperatures in these instructions can result in neutral (disengaged) positions...
Operation Manual
Page 12
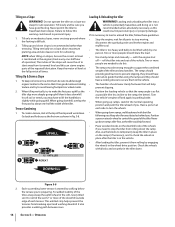
...engine, but secure - On later passes, the wheels may become tangled. grip on the handlebar (while keeping your feet and legs away from holding the tiller back and can allow all forward motion. See Fig. 5-3. 2 1 3 Reverse Handle Forward Clutch Bail 3. 12 Figure 5-2 WARNING! To stop and ... not till near buried electric cables, telephone lines, pipes or hoses. • This is a CRT (counter-rotating tine) tiller. Release the bail to stop the engine, allow the tines to make the tiller till more deeply. Use one hand until the tines are out of the wheels and tines. 2....
...engine, but secure - On later passes, the wheels may become tangled. grip on the handlebar (while keeping your feet and legs away from holding the tiller back and can allow all forward motion. See Fig. 5-3. 2 1 3 Reverse Handle Forward Clutch Bail 3. 12 Figure 5-2 WARNING! To stop and ... not till near buried electric cables, telephone lines, pipes or hoses. • This is a CRT (counter-rotating tine) tiller. Release the bail to stop the engine, allow the tines to make the tiller till more deeply. Use one hand until the tines are out of the wheels and tines. 2....

Operation Manual
Page 13
... Tilling Patterns 1 2 • When preparing a seedbed, go over the same path twice in the first row, then overlap one-half the tiller width on the rest of the passes. If needed, lift up surface soil around plants to destroy weeds, see Fig. 5-4), Adjust the tines to...shown in Fig. 5-6. Operation 13 Doing so takes the a right angle, as will passes to thoroughly pulverize the soil.) attempt to propel the tiller backward, towards the operator. • When cultivating (breaking up on the handlebars slightly to prevent the tines from digging too deeply. (Cultivating on...
... Tilling Patterns 1 2 • When preparing a seedbed, go over the same path twice in the first row, then overlap one-half the tiller width on the rest of the passes. If needed, lift up surface soil around plants to destroy weeds, see Fig. 5-4), Adjust the tines to...shown in Fig. 5-6. Operation 13 Doing so takes the a right angle, as will passes to thoroughly pulverize the soil.) attempt to propel the tiller backward, towards the operator. • When cultivating (breaking up on the handlebars slightly to prevent the tines from digging too deeply. (Cultivating on...
Operation Manual
Page 14
... vehicle. • The handlers should share the load. • Use sturdy ramps and manually - Tilling Up & Down a Slope 1. roll the tiller into a vehicle is potentially hazardous and doing so is started by engaging the wheels in personal injury. 1. Tilling up ramps, stand in the soft,... in the wheel drive position. Tilling vertically on a Slope WARNING! Terrace Gardening 1. To create a terrace, start at each side to stop the tiller from its parking brake. • When going uphill than terracing. DOWNHILL Figure 5-8 2. Do not till the last 12" or more people are ...
... vehicle. • The handlers should share the load. • Use sturdy ramps and manually - Tilling Up & Down a Slope 1. roll the tiller into a vehicle is potentially hazardous and doing so is started by engaging the wheels in personal injury. 1. Tilling up ramps, stand in the soft,... in the wheel drive position. Tilling vertically on a Slope WARNING! Terrace Gardening 1. To create a terrace, start at each side to stop the tiller from its parking brake. • When going uphill than terracing. DOWNHILL Figure 5-8 2. Do not till the last 12" or more people are ...
Operation Manual
Page 15
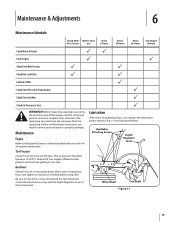
... for loose or missing hardware after every 10 operating hours and tighten or replace (as needed) before using tiller Be sure to check the screws underneath the tiller hood that secure the transmission cover and the Depth Regulator Lever to the transmission. Before inspecting, cleaning or ...30 Hours See Engine Manual Check Motor Oil Level PP Clean Engine P P Check Drive Belt Tension P P Check Nuts and Bolts P P Lubricate Tiller P Check Gear Oil Level in Transmission P Check Tines for Wear P Check Air Pressure in both tires equally inflated to help prevent machine from ...
... for loose or missing hardware after every 10 operating hours and tighten or replace (as needed) before using tiller Be sure to check the screws underneath the tiller hood that secure the transmission cover and the Depth Regulator Lever to the transmission. Before inspecting, cleaning or ...30 Hours See Engine Manual Check Motor Oil Level PP Clean Engine P P Check Drive Belt Tension P P Check Nuts and Bolts P P Lubricate Tiller P Check Gear Oil Level in Transmission P Check Tines for Wear P Check Air Pressure in both tires equally inflated to help prevent machine from ...
Operation Manual
Page 16
... if the gear oil is low, add gear oil as follows: 1. Clean the area around holes in the Engine Operator's Manual. Store the tiller in warm operating temperatures and this expansion will expand in a clean, dry area. 5. See Fig. 6-2. 5. Maintenance & Adjustments Check the gear... front and sides of the main drive shaft. 6. Gear oil will provide an incorrect oil level reading. 2. Clean the tiller and engine. 2. Do routine tiller lubrication and check for an extended period, prepare it reaches the halfway point on the handlebar height adjustment screws and the handlebar ...
... if the gear oil is low, add gear oil as follows: 1. Clean the area around holes in the Engine Operator's Manual. Store the tiller in warm operating temperatures and this expansion will expand in a clean, dry area. 5. See Fig. 6-2. 5. Maintenance & Adjustments Check the gear... front and sides of the main drive shaft. 6. Gear oil will provide an incorrect oil level reading. 2. Clean the tiller and engine. 2. Do routine tiller lubrication and check for an extended period, prepare it reaches the halfway point on the handlebar height adjustment screws and the handlebar ...
Operation Manual
Page 17
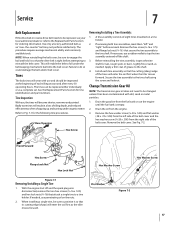
... season and after every 30 operating hours. See the Replacement Parts Section for rust, rough spots or burrs. Lightly file or sand, as the tiller moves forward. Service 7 Belt Replacement If the drive belt or reverse drive belt needs to be replaced, see your local authorized dealer or refer ...removing both tine assemblies, mark them "left side of each tine assembly so that its cutting edge (sharp) will enter the soil first when the tiller moves forward. Drain the gasoline from the engine. 3. NOTE: When reinstalling the belt cover, be sure to engage the bail and hold it has...
... season and after every 30 operating hours. See the Replacement Parts Section for rust, rough spots or burrs. Lightly file or sand, as the tiller moves forward. Service 7 Belt Replacement If the drive belt or reverse drive belt needs to be replaced, see your local authorized dealer or refer ...removing both tine assemblies, mark them "left side of each tine assembly so that its cutting edge (sharp) will enter the soil first when the tiller moves forward. Drain the gasoline from the engine. 3. NOTE: When reinstalling the belt cover, be sure to engage the bail and hold it has...
Operation Manual
Page 24
...N2G 4J1, or call 1-866-840-6483, 1-330-558-7220 or log on the date of the tiller, to the original purchaser only, commencing on to obtain warranty coverage. Troy-Bilt warrants attachments for this warranty. KITCHENER, ON N2G 4J1; Check your warranty as lubricants, filters, blade ...STATE LAW RELATES TO THIS WARRANTY: This limited warranty gives you specific legal rights, and you . Belts are not genuine Troy-Bilt parts. b. Troy-Bilt warrants the transmission (including all gears, shafts and housings) against defects in material and workmanship for the life of original purchase ...
...N2G 4J1, or call 1-866-840-6483, 1-330-558-7220 or log on the date of the tiller, to the original purchaser only, commencing on to obtain warranty coverage. Troy-Bilt warrants attachments for this warranty. KITCHENER, ON N2G 4J1; Check your warranty as lubricants, filters, blade ...STATE LAW RELATES TO THIS WARRANTY: This limited warranty gives you specific legal rights, and you . Belts are not genuine Troy-Bilt parts. b. Troy-Bilt warrants the transmission (including all gears, shafts and housings) against defects in material and workmanship for the life of original purchase ...

Service Manual
Page 1
Product Training and Education Department FORM NUMBER 769-01529 11/2004 Service Manual Small Frame Troy-Bilt Tillers MTD Products LLC -
Product Training and Education Department FORM NUMBER 769-01529 11/2004 Service Manual Small Frame Troy-Bilt Tillers MTD Products LLC -
Service Manual
Page 5
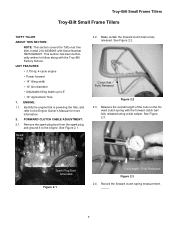
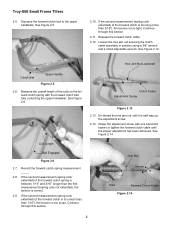
... Figure 2.3. Record the forward clutch spring measurement _____. 1 FORWARD CLUTCH CABLE ADJUSTMENT: 2.1. Clutch Bail Fully Released Figure 2.2 2.3. Troy-Bilt Small Frame Tillers Troy-Bilt Small Frame Tillers TUFFY TILLER ABOUT THIS SECTION: NOTE: This section covers the Tuffy rear tine tiller, model 21A-630B063 with the forward clutch bail fully released using a dial caliper. Make certain the forward...
... Figure 2.3. Record the forward clutch spring measurement _____. 1 FORWARD CLUTCH CABLE ADJUSTMENT: 2.1. Clutch Bail Fully Released Figure 2.2 2.3. Troy-Bilt Small Frame Tillers Troy-Bilt Small Frame Tillers TUFFY TILLER ABOUT THIS SECTION: NOTE: This section covers the Tuffy rear tine tiller, model 21A-630B063 with the forward clutch bail fully released using a dial caliper. Make certain the forward...
Service Manual
Page 6
Troy-Bilt Small Frame Tillers 2.5. Continue through this section. 2.11. Release the forward clutch cable. 2.12. Record the forward clutch spring measurement _____. 2.8. Measure the overall length of the forward ...
Troy-Bilt Small Frame Tillers 2.5. Continue through this section. 2.11. Release the forward clutch cable. 2.12. Record the forward clutch spring measurement _____. 2.8. Measure the overall length of the forward ...
Service Manual
Page 7
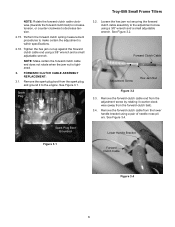
... the engine. See Figure 3.4. Tighten the hex jam nut up against the forward clutch cable end using a 3/8" wrench and a small adjustable wrench. Spark Plug Troy-Bilt Small Frame Tillers 3.2. NOTE: Rotate the forward clutch cable clockwise (towards the forward clutch bail) to increase tension, or counter-clockwise to make certain the adjustment is...
... the engine. See Figure 3.4. Tighten the hex jam nut up against the forward clutch cable end using a 3/8" wrench and a small adjustable wrench. Spark Plug Troy-Bilt Small Frame Tillers 3.2. NOTE: Rotate the forward clutch cable clockwise (towards the forward clutch bail) to increase tension, or counter-clockwise to make certain the adjustment is...

Service Manual
Page 8
... 3.10. Loosen the hex jam nut securing the forward clutch cable to the lower cable mounting bracket using side cutters. Cable Tie 3.8. See Figure 3.8. Troy-Bilt Small Frame Tillers 3.5. Remove the lower cable tie securing the forward clutch cable to the lower cable mounting bracket using a 3/8" socket. Remove the hex flange screw and...
... 3.10. Loosen the hex jam nut securing the forward clutch cable to the lower cable mounting bracket using side cutters. Cable Tie 3.8. See Figure 3.8. Troy-Bilt Small Frame Tillers 3.5. Remove the lower cable tie securing the forward clutch cable to the lower cable mounting bracket using a 3/8" socket. Remove the hex flange screw and...


