Owners Manual DWM3780XOUT Multi-language
Page 1
Owner's Manual Outdoor Full-Motion TV Wall Mount Model: DWM3780XOUT Español 9 • Français 17 25 • Deutsch 33 CAUTION: DO NOT EXCEED MAXIMUM LISTED WEIGHT CAPACITY. tripplite.com/warranty 20-07-197 933CC6.indb 1 1111 W. 35th Street, Chicago, IL 60609 USA • tripplite.com/support Copyright © 2020 Tripp Lite. All rights reserved. 1 10/12/2020 1:41...
Owner's Manual Outdoor Full-Motion TV Wall Mount Model: DWM3780XOUT Español 9 • Français 17 25 • Deutsch 33 CAUTION: DO NOT EXCEED MAXIMUM LISTED WEIGHT CAPACITY. tripplite.com/warranty 20-07-197 933CC6.indb 1 1111 W. 35th Street, Chicago, IL 60609 USA • tripplite.com/support Copyright © 2020 Tripp Lite. All rights reserved. 1 10/12/2020 1:41...
Owners Manual DWM3780XOUT Multi-language
Page 2
....com/support. • This mounting bracket was designed to be installed and utilized ONLY as to register your new Tripp Lite product. THIS WARRANTY DOES NOT APPLY TO NORMAL WEAR OR TO DAMAGE RESULTING FROM ACCIDENT, MISUSE, ABUSE OR NEGLECT. Specifications are subject to win a FREE Tripp Lite product!* * No purchase necessary. Important Safety Instructions NOTE: Read the entire instruction manual before...
....com/support. • This mounting bracket was designed to be installed and utilized ONLY as to register your new Tripp Lite product. THIS WARRANTY DOES NOT APPLY TO NORMAL WEAR OR TO DAMAGE RESULTING FROM ACCIDENT, MISUSE, ABUSE OR NEGLECT. Specifications are subject to win a FREE Tripp Lite product!* * No purchase necessary. Important Safety Instructions NOTE: Read the entire instruction manual before...
Owners Manual DWM3780XOUT Multi-language
Page 3
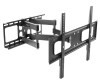
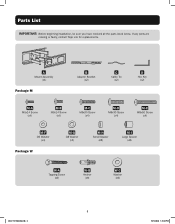
Parts List IMPORTANT: Before beginning installation, be sure you have received all the parts listed below. If any parts are missing or faulty, contact Tripp Lite for replacements. A Mount Assembly (x1) Package M B Adapter Bracket (x2) C Cable Tie (x2) D Hex Key (x2) M-A M5x14 Screw (x4) M-B M6x14 Screw (x4) M-C M6x30 Screw (x4) M-D M8x30 Screw (x4) M-E M8x50 Screw (x4) M-F D6 Washer (x4) Package W M-G D8 Washer (x4) M-H Small Spacer (x8) M-I Large Spacer (x8) W-A Tapping Screw (x6) W-B Anchor (x6) W-C Washer (x6) 3 20-07-197 933CC6.indb 3 10/12/2020 1:41:04 PM
Parts List IMPORTANT: Before beginning installation, be sure you have received all the parts listed below. If any parts are missing or faulty, contact Tripp Lite for replacements. A Mount Assembly (x1) Package M B Adapter Bracket (x2) C Cable Tie (x2) D Hex Key (x2) M-A M5x14 Screw (x4) M-B M6x14 Screw (x4) M-C M6x30 Screw (x4) M-D M8x30 Screw (x4) M-E M8x50 Screw (x4) M-F D6 Washer (x4) Package W M-G D8 Washer (x4) M-H Small Spacer (x8) M-I Large Spacer (x8) W-A Tapping Screw (x6) W-B Anchor (x6) W-C Washer (x6) 3 20-07-197 933CC6.indb 3 10/12/2020 1:41:04 PM
Owners Manual DWM3780XOUT Multi-language
Page 4
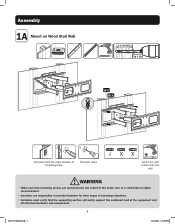
...; 4 mm) W-C W-A Find and mark the exact location of mounting holes Drill pilot holes Screw the wall mount onto the wall WARNING • Make sure that mounting screws are responsible to provide hardware for other types of mounting situations. • Installers must verify that the supporting surface will safely support the combined load of the studs. Use of a stud finder is highly recommended. •...
...; 4 mm) W-C W-A Find and mark the exact location of mounting holes Drill pilot holes Screw the wall mount onto the wall WARNING • Make sure that mounting screws are responsible to provide hardware for other types of mounting situations. • Installers must verify that the supporting surface will safely support the combined load of the studs. Use of a stud finder is highly recommended. •...
Owners Manual DWM3780XOUT Multi-language
Page 5
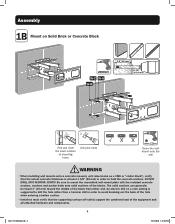
...Screw the wall mount onto the wall WARNING • When installing wall mounts onto a concrete masonry unit (also known as a CMU or "cinder block"), verify that the supporting surface will safely support the combined load of the equipment and all attached hardware and components. 5 20-07-197 933CC6.indb 5 10/12/2020 1:41:06 PM Assembly 1B Mount on a slow setting.... • Installers must verify that the actual concrete thickness is at least 1 3/8" (35 mm) in order to mount the assembled wall-mount plate with the included concrete anchors, washers and anchor bolts onto solid sections...
...Screw the wall mount onto the wall WARNING • When installing wall mounts onto a concrete masonry unit (also known as a CMU or "cinder block"), verify that the supporting surface will safely support the combined load of the equipment and all attached hardware and components. 5 20-07-197 933CC6.indb 5 10/12/2020 1:41:06 PM Assembly 1B Mount on a slow setting.... • Installers must verify that the actual concrete thickness is at least 1 3/8" (35 mm) in order to mount the assembled wall-mount plate with the included concrete anchors, washers and anchor bolts onto solid sections...
Owners Manual DWM3780XOUT Multi-language
Page 6
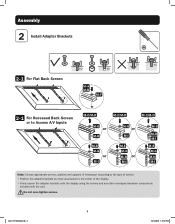
... A/V Inputs M-C/M-D M-C/M-D M-C/M-D M-G or M-H M-E M-G or M-I M-G or M-I M-E M-G M-H or M-I M-G M-H M-I M-E M-G M-H M-I Note: Choose appropriate screws, washers and spacers (if necessary) according to the type of screen. • Position the adapter brackets as close as possible to the center of the display. • Firmly secure the adapter brackets onto the display using the screws and any other necessary hardware components included with...
... A/V Inputs M-C/M-D M-C/M-D M-C/M-D M-G or M-H M-E M-G or M-I M-G or M-I M-E M-G M-H or M-I M-G M-H M-I M-E M-G M-H M-I Note: Choose appropriate screws, washers and spacers (if necessary) according to the type of screen. • Position the adapter brackets as close as possible to the center of the display. • Firmly secure the adapter brackets onto the display using the screws and any other necessary hardware components included with...

Owners Manual DWM3780XOUT Multi-language
Page 7
Assembly 3 Hang Display onto the Wall Mount With the aid of an assistant or mechanical lifting equipment, hook the display with attached adapter brackets over the top of the wall mount's arm assembly plate. 4 Hang Display onto the Wall Mount 20-07-197 933CC6.indb 7 Tighten the two safety bolts on the bottom of the adapter brackets to secure the unit. 7 10/12/2020 1:41:08 PM
Assembly 3 Hang Display onto the Wall Mount With the aid of an assistant or mechanical lifting equipment, hook the display with attached adapter brackets over the top of the wall mount's arm assembly plate. 4 Hang Display onto the Wall Mount 20-07-197 933CC6.indb 7 Tighten the two safety bolts on the bottom of the adapter brackets to secure the unit. 7 10/12/2020 1:41:08 PM
Owners Manual DWM3780XOUT Multi-language
Page 8
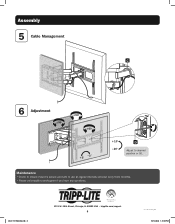
Assembly 5 Cable Management C 6 Adjustment ±90° ±90° ±60° -3° +3° +10° -20° D Adjust to use at regular intervals (at least every three months). • Please visit tripplite.com/support if you have any questions. 20-07-197 933CC6.indb 8 1111 W. 35th Street, Chicago, IL 60609 USA • tripplite.com/support 8 20-07-197 93-3CC6_RevA 10/12/2020 1:41:09 PM Maintenance • Check to ensure mount is secure and safe to desired position or tilt.
Assembly 5 Cable Management C 6 Adjustment ±90° ±90° ±60° -3° +3° +10° -20° D Adjust to use at regular intervals (at least every three months). • Please visit tripplite.com/support if you have any questions. 20-07-197 933CC6.indb 8 1111 W. 35th Street, Chicago, IL 60609 USA • tripplite.com/support 8 20-07-197 93-3CC6_RevA 10/12/2020 1:41:09 PM Maintenance • Check to ensure mount is secure and safe to desired position or tilt.