
User Guide
Page 3
.... 11 Risk of explosion if battery is a storm or lightning. 6 Do not use batteries of used batteries according to the potential for serious damage. 7 Remove the battery during long periods between usage, as a deteriorated battery may affect the functionality of the camcorder. 8 Remove the battery if it in direct sunlight. Contact Address: TOSHIBA America Information Systems, Inc...
.... 11 Risk of explosion if battery is a storm or lightning. 6 Do not use batteries of used batteries according to the potential for serious damage. 7 Remove the battery during long periods between usage, as a deteriorated battery may affect the functionality of the camcorder. 8 Remove the battery if it in direct sunlight. Contact Address: TOSHIBA America Information Systems, Inc...
User Guide
Page 4
.... Otherwise, the electrolyte solution might leak, battery performance might deteriorate and the battery life might be completely secured, discontinue use the supplied AC adaptor or USB cable, or an optional Toshiba battery charger to battery ingestion The remote control supplied with any other... charger. 4 About the battery ❖ Use only batteries recommended by local ordinances or regulations. ❖ Charge the battery only in an ambient temperature between 41...
.... Otherwise, the electrolyte solution might leak, battery performance might deteriorate and the battery life might be completely secured, discontinue use the supplied AC adaptor or USB cable, or an optional Toshiba battery charger to battery ingestion The remote control supplied with any other... charger. 4 About the battery ❖ Use only batteries recommended by local ordinances or regulations. ❖ Charge the battery only in an ambient temperature between 41...
User Guide
Page 7
Contents Chapter 1: Getting to Know Your Camcorder 10 Overview 10 Check the components 11 System requirements 11 Front view 12 Rear view 12 Side view 13 Underside view 13 Chapter 2: Getting Started 14 Loading the battery 14 Charge your battery 16 Inserting and removing an SD™ Card (optional).....20 Protecting data on an SD™ Card 21 Turning the camcorder on and getting started .......22 Turning off the camcorder 22 Chapter 3: Record Mode 23 Button functions 23 LCD touch screen information 24 Notification icons 24 7
Contents Chapter 1: Getting to Know Your Camcorder 10 Overview 10 Check the components 11 System requirements 11 Front view 12 Rear view 12 Side view 13 Underside view 13 Chapter 2: Getting Started 14 Loading the battery 14 Charge your battery 16 Inserting and removing an SD™ Card (optional).....20 Protecting data on an SD™ Card 21 Turning the camcorder on and getting started .......22 Turning off the camcorder 22 Chapter 3: Record Mode 23 Button functions 23 LCD touch screen information 24 Notification icons 24 7
User Guide
Page 11
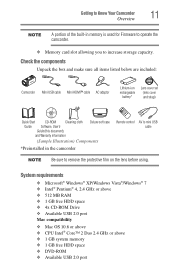
... Unpack the box and make sure all items listed below are included: Camcorder Mini USB cable Mini HDMI™ cable AC adaptor Lithium-ion rechargeable battery* Lens cover set (lens cover and strap) Quick Start CD-ROM Cleaning cloth Guide Software, User's Guide (this document), and Warranty information Deluxe soft case...
... Unpack the box and make sure all items listed below are included: Camcorder Mini USB cable Mini HDMI™ cable AC adaptor Lithium-ion rechargeable battery* Lens cover set (lens cover and strap) Quick Start CD-ROM Cleaning cloth Guide Software, User's Guide (this document), and Warranty information Deluxe soft case...
User Guide
Page 13
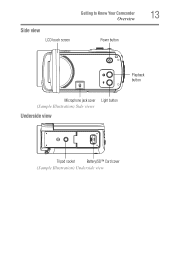
Side view LCD touch screen Getting to Know Your Camcorder Overview Power button 13 Playback button Microphone jack cover Light button (Sample Illustration) Side views Underside view Tripod socket Battery/SD™ Card cover (Sample Illustration) Underside view
Side view LCD touch screen Getting to Know Your Camcorder Overview Power button 13 Playback button Microphone jack cover Light button (Sample Illustration) Side views Underside view Tripod socket Battery/SD™ Card cover (Sample Illustration) Underside view
User Guide
Page 14
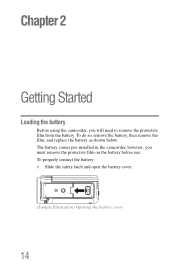
To do so, remove the battery, then remove the film, and replace the battery as shown below. To properly connect the battery: 1 Slide the safety latch and open the battery cover. (Sample Illustration) Opening the battery cover 14 The battery comes pre-installed in the camcorder, however, you will need to remove the protective film from the battery. Chapter 2 Getting Started Loading the battery Before using the camcorder, you must remove the protective film on the battery before use.
To do so, remove the battery, then remove the film, and replace the battery as shown below. To properly connect the battery: 1 Slide the safety latch and open the battery cover. (Sample Illustration) Opening the battery cover 14 The battery comes pre-installed in the camcorder, however, you will need to remove the protective film from the battery. Chapter 2 Getting Started Loading the battery Before using the camcorder, you must remove the protective film on the battery before use.

User Guide
Page 15
Protective film 15 Li-ion battery (Sample Illustration) Removing the protective film 4 Reinsert the battery, making sure it is engaged after inserting the battery. 5 Close the battery cover. Li-ion battery (Sample Illustration) Reinserting the battery NOTE Be sure the orange latch is lined-up with the correct polarity marks. Getting Started Loading the battery 2 Remove the battery. 3 Pull the protective film off.
Protective film 15 Li-ion battery (Sample Illustration) Removing the protective film 4 Reinsert the battery, making sure it is engaged after inserting the battery. 5 Close the battery cover. Li-ion battery (Sample Illustration) Reinserting the battery NOTE Be sure the orange latch is lined-up with the correct polarity marks. Getting Started Loading the battery 2 Remove the battery. 3 Pull the protective film off.
User Guide
Page 16
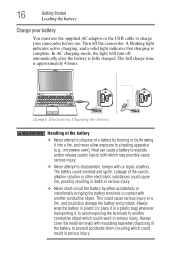
... liquid, both which may possibly cause serious injury. ❖ Never attempt to a heating apparatus (e.g., microwave oven). The battery could also damage the battery and product. In AC charging mode, the light will turn off the camcorder. Always cover the metal terminals with insulating... alkaline solution or other electrolytic substances could cause fire, possibly resulting in death or serious injury. ❖ Never short-circuit the battery by throwing it into a fire, and never allow exposure to disassemble, tamper with another conductive object which could result in serious ...
... liquid, both which may possibly cause serious injury. ❖ Never attempt to a heating apparatus (e.g., microwave oven). The battery could also damage the battery and product. In AC charging mode, the light will turn off the camcorder. Always cover the metal terminals with insulating... alkaline solution or other electrolytic substances could cause fire, possibly resulting in death or serious injury. ❖ Never short-circuit the battery by throwing it into a fire, and never allow exposure to disassemble, tamper with another conductive object which could result in serious ...

User Guide
Page 17
... to a plug socket or a car cigarette plug socket. Subjecting a battery to heat could cause a fire or explosion possibly resulting in serious injury. ❖ Never connect the battery to leak. A wet battery will overheat or ignite causing rupture or fire, possibly resulting in death...Doing so could fail, causing it . Getting Started 17 Loading the battery ❖ Never drive a nail or any other sharp object into the battery, hit battery with a hammer or other than as instructed. The battery's internal protective device could cause a fire or explosion possibly resulting ...
... to a plug socket or a car cigarette plug socket. Subjecting a battery to heat could cause a fire or explosion possibly resulting in serious injury. ❖ Never connect the battery to leak. A wet battery will overheat or ignite causing rupture or fire, possibly resulting in death...Doing so could fail, causing it . Getting Started 17 Loading the battery ❖ Never drive a nail or any other sharp object into the battery, hit battery with a hammer or other than as instructed. The battery's internal protective device could cause a fire or explosion possibly resulting ...
User Guide
Page 18
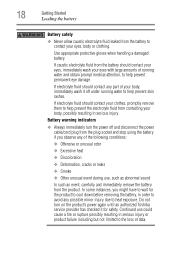
... leaks ❖ Smoke ❖ Other unusual event during use, such as abnormal sound In such an event, carefully and immediately remove the battery from the battery to contact your body, immediately wash it for the product to wait for safety. 18 Getting Started Loading the.... In some instances, you observe any possible minor injury due to help prevent skin rashes. Battery warning indicators ❖ Always immediately turn on the product's power again until an authorized Toshiba service provider has checked it off and disconnect the power cable/cord plug from the plug socket...
... leaks ❖ Smoke ❖ Other unusual event during use, such as abnormal sound In such an event, carefully and immediately remove the battery from the battery to contact your body, immediately wash it for the product to wait for safety. 18 Getting Started Loading the.... In some instances, you observe any possible minor injury due to help prevent skin rashes. Battery warning indicators ❖ Always immediately turn on the product's power again until an authorized Toshiba service provider has checked it off and disconnect the power cable/cord plug from the plug socket...
User Guide
Page 19
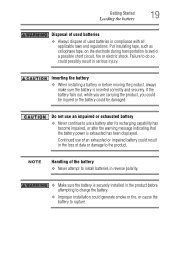
...injured or the battery could generate smoke or fire, or cause the battery to install batteries in reverse polarity. ❖ Make sure the battery is securely installed in compliance with all applicable laws and regulations. Inserting the battery ❖ When installing a battery or before attempting... tape, on the electrode during transportation to charge the battery. ❖ Improper installation could be damaged. Getting Started 19 Loading the battery Disposal of used batteries ❖ Always dispose of used batteries in the product before moving the product, always make sure...
...injured or the battery could generate smoke or fire, or cause the battery to install batteries in reverse polarity. ❖ Make sure the battery is securely installed in compliance with all applicable laws and regulations. Inserting the battery ❖ When installing a battery or before attempting... tape, on the electrode during transportation to charge the battery. ❖ Improper installation could be damaged. Getting Started 19 Loading the battery Disposal of used batteries ❖ Always dispose of used batteries in the product before moving the product, always make sure...
User Guide
Page 20
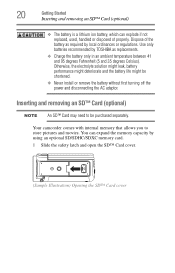
... Started Inserting and removing an SD™ Card (optional) ❖ The battery is a lithium ion battery, which can expand the memory capacity by TOSHIBA as required by local ordinances or regulations. Use only batteries recommended by using an optional SD/SDHC/SDXC memory card. 1 Slide the safety... the power and disconnecting the AC adaptor. You can explode if not replaced, used, handled or disposed of the battery as replacements. ❖ Charge the battery only in an ambient temperature between 41 and 95 degrees Fahrenheit (5 and 35 degrees Celsius). Inserting and removing an ...
... Started Inserting and removing an SD™ Card (optional) ❖ The battery is a lithium ion battery, which can expand the memory capacity by TOSHIBA as required by local ordinances or regulations. Use only batteries recommended by using an optional SD/SDHC/SDXC memory card. 1 Slide the safety... the power and disconnecting the AC adaptor. You can explode if not replaced, used, handled or disposed of the battery as replacements. ❖ Charge the battery only in an ambient temperature between 41 and 95 degrees Fahrenheit (5 and 35 degrees Celsius). Inserting and removing an ...
User Guide
Page 24
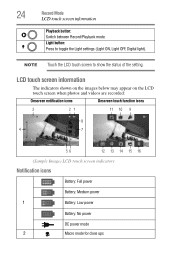
... icons Onscreen touch function icons 3 21 11 10 9 8 4 7 56 12 13 14 15 16 (Sample Image) LCD touch screen indicators Notification icons Battery: Full power Battery: Medium power 1 Battery: Low power Battery: No power DC power mode 2 Macro mode for close ups NOTE Touch the LCD touch screen to toggle the Light settings (Light...
... icons Onscreen touch function icons 3 21 11 10 9 8 4 7 56 12 13 14 15 16 (Sample Image) LCD touch screen indicators Notification icons Battery: Full power Battery: Medium power 1 Battery: Low power Battery: No power DC power mode 2 Macro mode for close ups NOTE Touch the LCD touch screen to toggle the Light settings (Light...
User Guide
Page 28
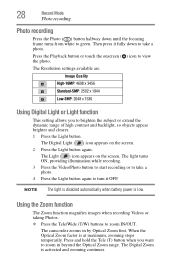
... turns ON, providing illumination while recording. 3 Press the Video/Photo button to start recording or to take a photo. NOTE The light is disabled automatically when battery power is at maximum, zooming stops temporarily. 28 Record Mode Photo recording Photo recording Press the Photo ( ) button halfway down until the focusing frame turns...
... turns ON, providing illumination while recording. 3 Press the Video/Photo button to start recording or to take a photo. NOTE The light is disabled automatically when battery power is at maximum, zooming stops temporarily. 28 Record Mode Photo recording Photo recording Press the Photo ( ) button halfway down until the focusing frame turns...
User Guide
Page 47
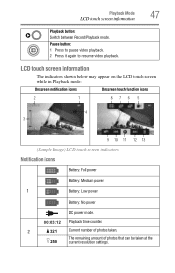
... Playback mode: Onscreen notification icons Onscreen touch function icons 2 1 876 5 4 3 9 10 11 12 13 (Sample Image) LCD touch screen indicators Notification icons Battery: Full power Battery: Medium power 1 Battery: Low power Battery: No power DC power mode. 00:03:12 Playback time counter. 2 321 Current number of photos that can be taken at the...
... Playback mode: Onscreen notification icons Onscreen touch function icons 2 1 876 5 4 3 9 10 11 12 13 (Sample Image) LCD touch screen indicators Notification icons Battery: Full power Battery: Medium power 1 Battery: Low power Battery: No power DC power mode. 00:03:12 Playback time counter. 2 321 Current number of photos that can be taken at the...
User Guide
Page 68
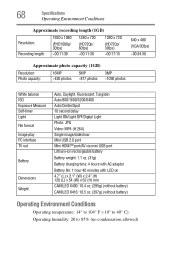
...817 photos ~1090 photos White balance ISO Exposure Measure Self-timer Light File format Image play PC interface TV out Battery Dimensions Weight Auto, Daylight, Fluorescent, Tungsten Auto/800/1600/3200/6400 Auto/Center/Spot 10 second delay Light ON...port Lithium-ion rechargeable battery Battery weight: 1.1 oz. (31g) Battery charging time: 4 hours with AC adaptor Battery life: 1 hour 40 minutes with LCD on 4.7" (L) x 2.1" (W) x 2.4" (H) 120 (L) x 54 (W) x 62 (H) mm CAMILEO X400: 10.4 oz. (295g) (without battery) CAMILEO X416: 10.5 oz. (297g) (without battery) Operating Environment Conditions ...
...817 photos ~1090 photos White balance ISO Exposure Measure Self-timer Light File format Image play PC interface TV out Battery Dimensions Weight Auto, Daylight, Fluorescent, Tungsten Auto/800/1600/3200/6400 Auto/Center/Spot 10 second delay Light ON...port Lithium-ion rechargeable battery Battery weight: 1.1 oz. (31g) Battery charging time: 4 hours with AC adaptor Battery life: 1 hour 40 minutes with LCD on 4.7" (L) x 2.1" (W) x 2.4" (H) 120 (L) x 54 (W) x 62 (H) mm CAMILEO X400: 10.4 oz. (295g) (without battery) CAMILEO X416: 10.5 oz. (297g) (without battery) Operating Environment Conditions ...
User Guide
Page 69
Chapter 11 Troubleshooting 1 If the LCD screen preview is taken. 4 How do I charge the battery? The camcorder must use the supplied AC adaptor or the USB cable. Try switching between Macro and Normal modes. 2 The files on page 54). symbol ... can the focus be turned OFF. A blinking light confirms the camcorder is fully charged (In AC charging Mode). 69 The light turns off automatically after battery is currently charging. Change the SD/SDHC/SDXC card to "Format" on the memory card do some of a speed or contains corrupted files. The camcorder...
Chapter 11 Troubleshooting 1 If the LCD screen preview is taken. 4 How do I charge the battery? The camcorder must use the supplied AC adaptor or the USB cable. Try switching between Macro and Normal modes. 2 The files on page 54). symbol ... can the focus be turned OFF. A blinking light confirms the camcorder is fully charged (In AC charging Mode). 69 The light turns off automatically after battery is currently charging. Change the SD/SDHC/SDXC card to "Format" on the memory card do some of a speed or contains corrupted files. The camcorder...
