
User Guide
Page 27
... or registered trademarks of their respective owners. 27 Trademarks Tecra, Accupoint, and ConfigFree are trademarks of SD Card Association. MultiMediaCard and MMC are trademarks or registered trademarks of Toshiba's commitment to environmental considerations. Computer Disposal Information Lamp contains...Photo Film, Co., Ltd. Bluetooth word mark and logos are either registered trademarks or trademarks of MultiMediaCard Association. Memory Stick, Memory Stick PRO, and i.LINK are trademarks of Microsoft Corporation in the United States and other countries. Microsoft, Outlook...
... or registered trademarks of their respective owners. 27 Trademarks Tecra, Accupoint, and ConfigFree are trademarks of SD Card Association. MultiMediaCard and MMC are trademarks or registered trademarks of Toshiba's commitment to environmental considerations. Computer Disposal Information Lamp contains...Photo Film, Co., Ltd. Bluetooth word mark and logos are either registered trademarks or trademarks of MultiMediaCard Association. Memory Stick, Memory Stick PRO, and i.LINK are trademarks of Microsoft Corporation in the United States and other countries. Microsoft, Outlook...

User Guide
Page 29
... 50 Your computer's features and specifications ....51 Turning on the power 51 Adding memory (optional 52 Installing a memory module 53 Removing a memory module 58 Checking total memory 60 Hard Drive Recovery Utilities 61 Creating Recovery DVDs 62 Hard Disk Drive Recovery... options 63 Hard Disk Drive Recovery using the Recovery media 68 Checking the HDD operating status 71 Installing drivers and applications 71 Using the Toshiba...
... 50 Your computer's features and specifications ....51 Turning on the power 51 Adding memory (optional 52 Installing a memory module 53 Removing a memory module 58 Checking total memory 60 Hard Drive Recovery Utilities 61 Creating Recovery DVDs 62 Hard Disk Drive Recovery... options 63 Hard Disk Drive Recovery using the Recovery media 68 Checking the HDD operating status 71 Installing drivers and applications 71 Using the Toshiba...
User Guide
Page 32
... Card Reader 138 Using the Bridge Media Adapter Slot 139 Inserting memory media 139 Removing memory media 140 Using the i.LINK® port 140 Using an expansion device 141 Using an Optional Toshiba Express Port Replicator with your computer 141 Chapter 5: Utilities 142 TOSHIBA Assist 143 Connect 144 Secure 145 Protect & Fix 146 Optimize...
... Card Reader 138 Using the Bridge Media Adapter Slot 139 Inserting memory media 139 Removing memory media 140 Using the i.LINK® port 140 Using an expansion device 141 Using an Optional Toshiba Express Port Replicator with your computer 141 Chapter 5: Utilities 142 TOSHIBA Assist 143 Connect 144 Secure 145 Protect & Fix 146 Optimize...
User Guide
Page 33
Contents 33 TOSHIBA SD™ Memory Card Format Utility .........157 TOSHIBA SD™ Memory Boot Utility 158 Booting from a bootable SD card 159 Mouse Utility 160 TOSHIBA Hardware Setup 161 TOSHIBA Zooming Utility 163 TOSHIBA Button Support 164 CD/DVD Drive Acoustic Silencer 165 TOSHIBA Accessibility 166 Trusted Platform Module (TPM 167 Fingerprint... system can help you 181 Resolving a hardware conflict 181 A plan of action 181 Fixing a problem with Device Manager ...........182 Memory problems 183 Power and the batteries 184 Keyboard problems 185 Display problems 186
Contents 33 TOSHIBA SD™ Memory Card Format Utility .........157 TOSHIBA SD™ Memory Boot Utility 158 Booting from a bootable SD card 159 Mouse Utility 160 TOSHIBA Hardware Setup 161 TOSHIBA Zooming Utility 163 TOSHIBA Button Support 164 CD/DVD Drive Acoustic Silencer 165 TOSHIBA Accessibility 166 Trusted Platform Module (TPM 167 Fingerprint... system can help you 181 Resolving a hardware conflict 181 A plan of action 181 Fixing a problem with Device Manager ...........182 Memory problems 183 Power and the batteries 184 Keyboard problems 185 Display problems 186

User Guide
Page 44
... it. See "Connecting to a power source" on your computer's cooling fan Your computer may have adequate ventilation and are not limited to, a mouse, keyboard, printer, memory, and PC Cards. Read the "Provide adequate ventilation" section in the "Instruction Manual for Safety and Comfort" that needs to be charged before adding external...
... it. See "Connecting to a power source" on your computer's cooling fan Your computer may have adequate ventilation and are not limited to, a mouse, keyboard, printer, memory, and PC Cards. Read the "Provide adequate ventilation" section in the "Instruction Manual for Safety and Comfort" that needs to be charged before adding external...

User Guide
Page 46
...and special offers applicable to your product. 46 Getting Started Registering your computer with Toshiba Registering your computer with Toshiba Product registration is strongly recommended, and allows Toshiba to send you may want to: ❖ Add more memory (see "Adding memory (optional)" on page 52) ❖ Connect a mouse (see "Using ... PC Cards (see "Using PC Cards" on page 136) Adding optional external devices NOTE Before adding external devices or memory, Toshiba recommends setting up your software. NOTE To register online, you must be completed by either double-clicking the...
...and special offers applicable to your product. 46 Getting Started Registering your computer with Toshiba Registering your computer with Toshiba Product registration is strongly recommended, and allows Toshiba to send you may want to: ❖ Add more memory (see "Adding memory (optional)" on page 52) ❖ Connect a mouse (see "Using ... PC Cards (see "Using PC Cards" on page 136) Adding optional external devices NOTE Before adding external devices or memory, Toshiba recommends setting up your software. NOTE To register online, you must be completed by either double-clicking the...

User Guide
Page 52
... accessories information packaged with enough memory to increase the computer's memory if you turn off the power again until the operating system has loaded completely. You may want to run most of data. NOTE Before adding external devices or memory, Toshiba recommends setting up your system or visit accessories.toshiba.com. Your computer comes with...
... accessories information packaged with enough memory to increase the computer's memory if you turn off the power again until the operating system has loaded completely. You may want to run most of data. NOTE Before adding external devices or memory, Toshiba recommends setting up your system or visit accessories.toshiba.com. Your computer comes with...
User Guide
Page 53
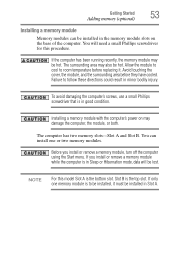
...slot. NOTE For this procedure. Allow the module to cool to be installed, it . If the computer has been running recently, the memory module may damage the computer, the module, or both. Avoid touching the cover, the module, and the surrounding area before replacing it ...must be installed in minor bodily injury. Getting Started Adding memory (optional) 53 Installing a memory module Memory modules can install one memory module is to room temperature before they have cooled. You will be hot. The computer has two...
...slot. NOTE For this procedure. Allow the module to cool to be installed, it . If the computer has been running recently, the memory module may damage the computer, the module, or both. Avoid touching the cover, the module, and the surrounding area before replacing it ...must be installed in minor bodily injury. Getting Started Adding memory (optional) 53 Installing a memory module Memory modules can install one memory module is to room temperature before they have cooled. You will be hot. The computer has two...

User Guide
Page 54
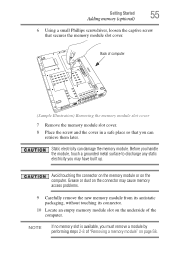
Start (Sample Image) Shut Down menu Arrow Shut Down Menu 2 Click Shut Down. Memory module slot cover Front of the Start menu. otherwise, skip to step 3. 1 Click Start, and then click the arrow next to the computer, including the ... turns off the computer. 3 Unplug and remove any cables connected to the lock button in the lower-right corner of computer (Sample Illustration) Locating the memory module slot cover For information on removing the main battery, see "Removing the battery from the computer" on , begin at step 1; 54 Getting Started Adding...
Start (Sample Image) Shut Down menu Arrow Shut Down Menu 2 Click Shut Down. Memory module slot cover Front of the Start menu. otherwise, skip to step 3. 1 Click Start, and then click the arrow next to the computer, including the ... turns off the computer. 3 Unplug and remove any cables connected to the lock button in the lower-right corner of computer (Sample Illustration) Locating the memory module slot cover For information on removing the main battery, see "Removing the battery from the computer" on , begin at step 1; 54 Getting Started Adding...
User Guide
Page 55
... a grounded metal surface to discharge any static electricity you must remove a module by performing steps 2-3 of computer (Sample Illustration) Removing the memory module slot cover 7 Remove the memory module slot cover. 8 Place the screw and the cover in a safe place so that secures the... on the connector may have built up. NOTE If no memory slot is available, you may cause memory access problems. 9 Carefully remove the new memory module from its antistatic packaging, without touching its connector. 10 Locate an empty memory module slot on page 58. Grease or dust on the ...
... a grounded metal surface to discharge any static electricity you must remove a module by performing steps 2-3 of computer (Sample Illustration) Removing the memory module slot cover 7 Remove the memory module slot cover. 8 Place the screw and the cover in a safe place so that secures the... on the connector may have built up. NOTE If no memory slot is available, you may cause memory access problems. 9 Carefully remove the new memory module from its antistatic packaging, without touching its connector. 10 Locate an empty memory module slot on page 58. Grease or dust on the ...

User Guide
Page 56
... with the matching key in Slot A. 11 Pick up the memory module by its connector. notch latch connector latch key (Sample Illustration) Aligning the memory module with the socket 12 Firmly press the memory module into the memory slot's socket at approximately a 30-degree angle (to the ...horizontal surface of one memory module is to be installed in the socket. Slot B is...
... with the matching key in Slot A. 11 Pick up the memory module by its connector. notch latch connector latch key (Sample Illustration) Aligning the memory module with the socket 12 Firmly press the memory module into the memory slot's socket at approximately a 30-degree angle (to the ...horizontal surface of one memory module is to be installed in the socket. Slot B is...

User Guide
Page 57
...) 57 13 Once the module's connector is fully inserted into the socket, press downward on the memory module Do not force the memory module into position. latch latch (Sample Illustration) Pressing down on the top edge of the module to be installed, it must be completely inserted into ... the bottom slot. These latches should be installed in Slot A. If the latches and cutouts do not line up correctly, repeat steps 12-13. The memory module should "snap" into the latches at the sides of the module. Back of computer Slot B Slot A (Sample Illustration) Inserting the...
...) 57 13 Once the module's connector is fully inserted into the socket, press downward on the memory module Do not force the memory module into position. latch latch (Sample Illustration) Pressing down on the top edge of the module to be installed, it must be completely inserted into ... the bottom slot. These latches should be installed in Slot A. If the latches and cutouts do not line up correctly, repeat steps 12-13. The memory module should "snap" into the latches at the sides of the module. Back of computer Slot B Slot A (Sample Illustration) Inserting the...
User Guide
Page 58
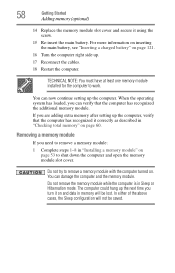
... continue setting up . 17 Reconnect the cables. 18 Restart the computer. Do not try to work. Removing a memory module If you turn it on and data in "Installing a memory module" on page 121. 16 Turn the computer right side up the computer. In either of the above cases...hang up the computer, verify that the computer has recognized the additional memory module. Do not remove the memory module while the computer is in "Checking total memory" on . 58 Getting Started Adding memory (optional) 14 Replace the memory module slot cover and secure it correctly as described in Sleep or...
... continue setting up . 17 Reconnect the cables. 18 Restart the computer. Do not try to work. Removing a memory module If you turn it on and data in "Installing a memory module" on page 121. 16 Turn the computer right side up the computer. In either of the above cases...hang up the computer, verify that the computer has recognized the additional memory module. Do not remove the memory module while the computer is in "Checking total memory" on . 58 Getting Started Adding memory (optional) 14 Replace the memory module slot cover and secure it correctly as described in Sleep or...

User Guide
Page 59
If so, consult Windows® Help and Support. 2 Pull the latches away from the memory module. The memory module pops up normally. Getting Started Adding memory (optional) 59 NOTE The following screen may need to go into Safe Mode, then shut down and restart the system, at which time Windows® ... remove the top module first before removing/installing the bottom module. When Safe Mode is best to press Enter to scan your system has the memory modules stacked on the power: If "Start Windows® Normally" is highlighted, then press Enter.
If so, consult Windows® Help and Support. 2 Pull the latches away from the memory module. The memory module pops up normally. Getting Started Adding memory (optional) 59 NOTE The following screen may need to go into Safe Mode, then shut down and restart the system, at which time Windows® ... remove the top module first before removing/installing the bottom module. When Safe Mode is best to press Enter to scan your system has the memory modules stacked on the power: If "Start Windows® Normally" is highlighted, then press Enter.
User Guide
Page 60
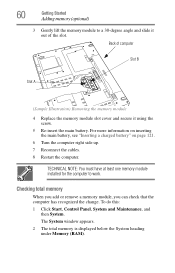
... 7 Reconnect the cables. 8 Restart the computer. Checking total memory When you add or remove a memory module, you can check that the computer has recognized the change. 60 Getting Started Adding memory (optional) 3 Gently lift the memory module to work. To do this: 1 Click Start, Control..., System and Maintenance, and then System. The System window appears. 2 The total memory is displayed below the System heading under Memory (RAM). Back of computer Slot B Slot A (Sample Illustration) Removing the memory module 4 Replace the memory module slot cover and secure it out of the slot.
... 7 Reconnect the cables. 8 Restart the computer. Checking total memory When you add or remove a memory module, you can check that the computer has recognized the change. 60 Getting Started Adding memory (optional) 3 Gently lift the memory module to work. To do this: 1 Click Start, Control..., System and Maintenance, and then System. The System window appears. 2 The total memory is displayed below the System heading under Memory (RAM). Back of computer Slot B Slot A (Sample Illustration) Removing the memory module 4 Replace the memory module slot cover and secure it out of the slot.
User Guide
Page 61
Getting Started Hard Drive Recovery Utilities 61 If the computer does not recognize the memory configuration, turn off the computer and remove the memory module slot cover (complete steps 1-8 in "Installing a memory module" on your computer without the HDD Recovery partition. ❖ Reinstall drivers and applications which were bundled with your computer. This is...
Getting Started Hard Drive Recovery Utilities 61 If the computer does not recognize the memory configuration, turn off the computer and remove the memory module slot cover (complete steps 1-8 in "Installing a memory module" on your computer without the HDD Recovery partition. ❖ Reinstall drivers and applications which were bundled with your computer. This is...

User Guide
Page 78
... the power while a disk/disc is a good idea to upgrade your computer. Options for a while. You must turn off your computer's internal hardware (such as memory). If you must turn off your computer in order to turn off your work. It is being accessed, you to fully charge the main battery...
... the power while a disk/disc is a good idea to upgrade your computer. Options for a while. You must turn off your computer's internal hardware (such as memory). If you must turn off your computer in order to turn off your work. It is being accessed, you to fully charge the main battery...

User Guide
Page 79
... the Sleep command to the internal storage drive, no data is stored to save your work, system settings, and current state of the desktop to memory, so that , when you restart the computer, you left off the computer using the Shut down completely, but it , including all disk/disc activity ...again, the computer returns to the state in Hibernation mode, the computer uses no main battery power. ❖ Because the state of the computer to memory so that when you turn off your computer, save your files and make sure all open programs and files you were using. Factors to consider...
... the Sleep command to the internal storage drive, no data is stored to save your work, system settings, and current state of the desktop to memory, so that , when you restart the computer, you left off the computer using the Shut down completely, but it , including all disk/disc activity ...again, the computer returns to the state in Hibernation mode, the computer uses no main battery power. ❖ Because the state of the computer to memory so that when you turn off your computer, save your files and make sure all open programs and files you were using. Factors to consider...

User Guide
Page 80
... when choosing Sleep: ❖ While in Sleep mode, the computer uses some main battery power. ❖ Because the state of the system is stored in memory, you will lose data if the main battery discharges while the computer is in which you power down using Sleep, see "Using and configuring Sleep...
... when choosing Sleep: ❖ While in Sleep mode, the computer uses some main battery power. ❖ Because the state of the system is stored in memory, you will lose data if the main battery discharges while the computer is in which you power down using Sleep, see "Using and configuring Sleep...

User Guide
Page 86
... indicating the computer is in categories. To use any of time after which the computer enters Sleep mode: ❖ Under Put the computer to the memory, turns off the computer 2 Click Sleep. The Power Options window appears. 2 Click Change plan settings under the power plan to enable them using the Power...
... indicating the computer is in categories. To use any of time after which the computer enters Sleep mode: ❖ Under Put the computer to the memory, turns off the computer 2 Click Sleep. The Power Options window appears. 2 Click Change plan settings under the power plan to enable them using the Power...


