User Manual
Page 65
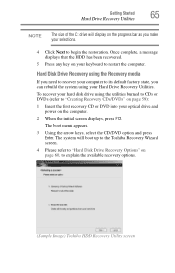
...can rebuild the system using the utilities burned to CDs or DVDs (refer to explain the available recovery options. (Sample Image) Toshiba HDD Recovery Utility screen The boot menu appears. 3 Using the arrow keys, select the CD/DVD option and press Enter. To recover your hard disk drive using ...computer. 2 When the initial screen displays, press F12. Getting Started 65 Hard Drive Recovery Utilities NOTE The size of the C: drive will boot up to the Toshiba Recovery Wizard screen. 4 Please refer to "Hard Disk Drive Recovery Options" on page 60, to "Creating Recovery CDs/DVDs" on page 59...
...can rebuild the system using the utilities burned to CDs or DVDs (refer to explain the available recovery options. (Sample Image) Toshiba HDD Recovery Utility screen The boot menu appears. 3 Using the arrow keys, select the CD/DVD option and press Enter. To recover your hard disk drive using ...computer. 2 When the initial screen displays, press F12. Getting Started 65 Hard Drive Recovery Utilities NOTE The size of the C: drive will boot up to the Toshiba Recovery Wizard screen. 4 Please refer to "Hard Disk Drive Recovery Options" on page 60, to "Creating Recovery CDs/DVDs" on page 59...
User Manual
Page 151
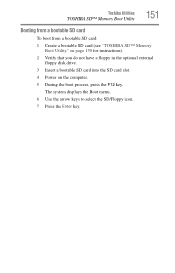
Toshiba Utilities TOSHIBA SD™ Memory Boot Utility 151 Booting from a bootable SD card To boot from a bootable SD card: 1 Create a bootable SD card (see "TOSHIBA SD™ Memory Boot Utility" on page 150 for instructions). 2 Verify that you do not have a floppy in the optional external floppy disk drive. 3 Insert a bootable SD card into the SD card slot. 4 Power on the computer. 5 During the boot process, press the F12 key. The system displays the Boot menu. 6 Use the arrow keys to select the SD/Floppy icon. 7 Press the Enter key.
Toshiba Utilities TOSHIBA SD™ Memory Boot Utility 151 Booting from a bootable SD card To boot from a bootable SD card: 1 Create a bootable SD card (see "TOSHIBA SD™ Memory Boot Utility" on page 150 for instructions). 2 Verify that you do not have a floppy in the optional external floppy disk drive. 3 Insert a bootable SD card into the SD card slot. 4 Power on the computer. 5 During the boot process, press the F12 key. The system displays the Boot menu. 6 Use the arrow keys to select the SD/Floppy icon. 7 Press the Enter key.
User Manual
Page 179
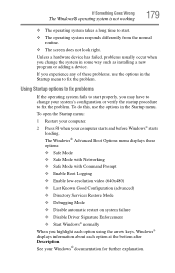
...properly, you experience any of these options: ❖ Safe Mode ❖ Safe Mode with Networking ❖ Safe Mode with Command Prompt ❖ Enable Boot Logging ❖ Enable low-resolution video (640x480) ❖ Last Known Good Configuration (advanced) ❖ Directory Services Restore Mode ❖ Debugging Mode &#...; normally When you change your system's configuration or verify the startup procedure to fix the problem. The Windows® Advanced Boot Options menu displays these problems, use the options in some way such as installing a new program or adding a device.
...properly, you experience any of these options: ❖ Safe Mode ❖ Safe Mode with Networking ❖ Safe Mode with Command Prompt ❖ Enable Boot Logging ❖ Enable low-resolution video (640x480) ❖ Last Known Good Configuration (advanced) ❖ Directory Services Restore Mode ❖ Debugging Mode &#...; normally When you change your system's configuration or verify the startup procedure to fix the problem. The Windows® Advanced Boot Options menu displays these problems, use the options in some way such as installing a new program or adding a device.


