
Resource Guide for Tecra A8
Page 25
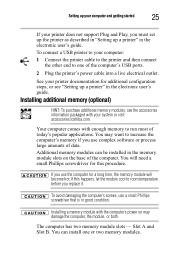
See your system or visit accessories.toshiba.com. Additional memory modules can install one of the computer. You will become hot. Installing a memory module with the computer's power on the base of the computer's USB ports. 2 Plug the printer's power cable into a live ...your computer and getting started 25 If your printer does not support Plug and Play, you use the computer for a long time, the memory module will need a small Phillips screwdriver for additional configuration steps, or see the accessories information packaged with your printer documentation for this happens...
See your system or visit accessories.toshiba.com. Additional memory modules can install one of the computer. You will become hot. Installing a memory module with the computer's power on the base of the computer's USB ports. 2 Plug the printer's power cable into a live ...your computer and getting started 25 If your printer does not support Plug and Play, you use the computer for a long time, the memory module will need a small Phillips screwdriver for additional configuration steps, or see the accessories information packaged with your printer documentation for this happens...
Resource Guide for Tecra A8
Page 26
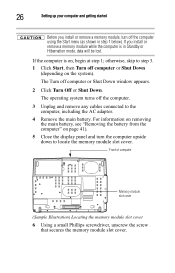
...the battery from the computer" on , begin at step 1; Front of computer Memory module slot cover (Sample Illustration) Locating the memory module slot cover 6 Using a small Phillips screwdriver, unscrew the screw that secures the memory module slot cover. The Turn off the computer. 3 Unplug and remove any ... including the AC adaptor. 4 Remove the main battery. otherwise, skip to locate the memory module slot cover. 26 Setting up your computer and getting started Before you install or remove a memory module while the computer is on page 41). 5 Close the display panel and turn ...
...the battery from the computer" on , begin at step 1; Front of computer Memory module slot cover (Sample Illustration) Locating the memory module slot cover 6 Using a small Phillips screwdriver, unscrew the screw that secures the memory module slot cover. The Turn off the computer. 3 Unplug and remove any ... including the AC adaptor. 4 Remove the main battery. otherwise, skip to locate the memory module slot cover. 26 Setting up your computer and getting started Before you install or remove a memory module while the computer is on page 41). 5 Close the display panel and turn ...
Resource Guide for Tecra A8
Page 27
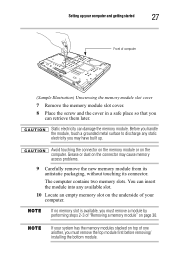
... any available slot. 10 Locate an empty memory slot on the computer. Avoid touching the connector on the memory module or on the underside of your computer. Before you may cause memory access problems. 9 Carefully remove the new memory module from its antistatic packaging, without touching its... have built up your computer and getting started 27 Front of one another, you can damage the memory module. The computer contains two memory slots. Static electricity can retrieve them later. If no memory slot is available, you must remove a module by performing steps 2-3 of "Removing...
... any available slot. 10 Locate an empty memory slot on the computer. Avoid touching the connector on the memory module or on the underside of your computer. Before you may cause memory access problems. 9 Carefully remove the new memory module from its antistatic packaging, without touching its... have built up your computer and getting started 27 Front of one another, you can damage the memory module. The computer contains two memory slots. Static electricity can retrieve them later. If no memory slot is available, you must remove a module by performing steps 2-3 of "Removing...

Resource Guide for Tecra A8
Page 28
...'s socket at the sides of the module. If the latches and cutouts do not line up the memory module by its connector. These latches should "snap" into the latches at approximately a 30-degree angle (to the horizontal surface of the computer). (Sample Illustration) ...
...'s socket at the sides of the module. If the latches and cutouts do not line up the memory module by its connector. These latches should "snap" into the latches at approximately a 30-degree angle (to the horizontal surface of the computer). (Sample Illustration) ...
Resource Guide for Tecra A8
Page 29
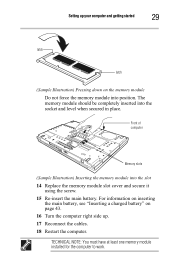
... the computer. TECHNICAL NOTE: You must have at least one memory module installed for the computer to work. The memory module should be completely inserted into position. Front of computer Memory slots (Sample Illustration) Inserting the memory module into the slot 14 Replace the memory module slot cover and secure it using the screw. 15... battery" on page 43. 16 Turn the computer right side up your computer and getting started 29 latch latch (Sample Illustration) Pressing down on the memory module Do not force the memory module into the socket and level when secured in place.
... the computer. TECHNICAL NOTE: You must have at least one memory module installed for the computer to work. The memory module should be completely inserted into position. Front of computer Memory slots (Sample Illustration) Inserting the memory module into the slot 14 Replace the memory module slot cover and secure it using the screw. 15... battery" on page 43. 16 Turn the computer right side up your computer and getting started 29 latch latch (Sample Illustration) Pressing down on the memory module Do not force the memory module into the socket and level when secured in place.

Resource Guide for Tecra A8
Page 30
... information on inserting the main battery, see "Inserting a charged battery" on again. 2 Pull the latches away from the memory module. You can damage the computer and the memory module. Do not try to shut down for the computer to work. The following message appears when you turn on the... cases, the Standby configuration will be saved. Do not remove the memory module while the computer is in "Installing additional memory (optional)" on page 25 to remove a memory module with the computer turned on and data in memory will not be lost. The computer could hang up the next time...
... information on inserting the main battery, see "Inserting a charged battery" on again. 2 Pull the latches away from the memory module. You can damage the computer and the memory module. Do not try to shut down for the computer to work. The following message appears when you turn on the... cases, the Standby configuration will be saved. Do not remove the memory module while the computer is in "Installing additional memory (optional)" on page 25 to remove a memory module with the computer turned on and data in memory will not be lost. The computer could hang up the next time...
Resource Guide for Tecra A8
Page 32
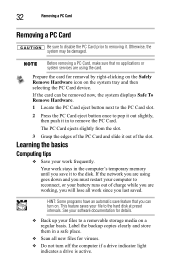
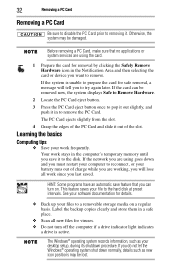
... documentation for removal by right-clicking on the Safely Remove Hardware icon on . Label the backup copies clearly and store them in the computer's temporary memory until you last saved. 32 Removing a PC Card Removing a PC Card Be sure to disable the PC Card prior to removing it out of the...
... documentation for removal by right-clicking on the Safely Remove Hardware icon on . Label the backup copies clearly and store them in the computer's temporary memory until you last saved. 32 Removing a PC Card Removing a PC Card Be sure to disable the PC Card prior to removing it out of the...
Resource Guide for Tecra A8
Page 40
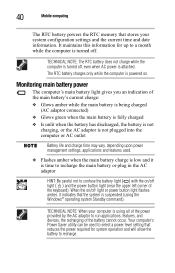
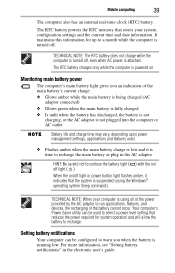
...). Monitoring main battery power The computer's main battery light gives you an indication of the keyboard). 40 Mobile computing The RTC battery powers the RTC memory that reduces the power required for up to run applications, features, and devices, the recharging of the power provided by the AC adaptor to a month...
...). Monitoring main battery power The computer's main battery light gives you an indication of the keyboard). 40 Mobile computing The RTC battery powers the RTC memory that reduces the power required for up to run applications, features, and devices, the recharging of the power provided by the AC adaptor to a month...
Resource Guide for Tecra A8
Page 53
... program has performed an illegal operation 47 F files backing up 32 saving 32 I inserting CD/DVD 37 PC Cards 31 installing main battery 41, 43 memory module 25 K keyboard unexpected characters 48 keyboard problems not working 48 L lights AC power 22 M main battery changing 41 installing 41, 43 removing 41...
... program has performed an illegal operation 47 F files backing up 32 saving 32 I inserting CD/DVD 37 PC Cards 31 installing main battery 41, 43 memory module 25 K keyboard unexpected characters 48 keyboard problems not working 48 L lights AC power 22 M main battery changing 41 installing 41, 43 removing 41...

Resource Guide for Tecra A8
Page 54
...precautions 21 primary button 33, 34 printer connecting 24 problem solving computer hangs when PC Card inserted 51 computer will not start 48 contacting Toshiba 51 display is blank 49 external monitor 49 illegal operation 47 keyboard not responding 48 keyboard produces unexpected characters 48 PC Card checklist 50 ... of stored data 3 R real-time clock (RTC) battery 40 removing CD/DVD with computer off 38 with computer on 38 main battery 41 memory module 30 PC Cards 32 S safety precautions 21 saving files 32 screen problems blank screen 49 secondary button 33, 34 setting battery alarms 41 setting...
...precautions 21 primary button 33, 34 printer connecting 24 problem solving computer hangs when PC Card inserted 51 computer will not start 48 contacting Toshiba 51 display is blank 49 external monitor 49 illegal operation 47 keyboard not responding 48 keyboard produces unexpected characters 48 PC Card checklist 50 ... of stored data 3 R real-time clock (RTC) battery 40 removing CD/DVD with computer off 38 with computer on 38 main battery 41 memory module 30 PC Cards 32 S safety precautions 21 saving files 32 screen problems blank screen 49 secondary button 33, 34 setting battery alarms 41 setting...
Resource Guide for Tecra A8
Page 2
2 Contents Introduction 19 Setting up your computer and getting started 21 Adding memory (optional 25 Your computer's TFT display 31 Inserting a PC Card 31 Removing a PC Card 32 Learning the basics 32 Using the Toshiba Dual Pointing Device 33 Using the optical drive 35 Moving the computer 37 Mobile computing 38 Taking care of your battery 42 If something goes wrong 44 If you need further assistance 48 Power cord/cable connectors 49 Features and specifications 49 Index 50
2 Contents Introduction 19 Setting up your computer and getting started 21 Adding memory (optional 25 Your computer's TFT display 31 Inserting a PC Card 31 Removing a PC Card 32 Learning the basics 32 Using the Toshiba Dual Pointing Device 33 Using the optical drive 35 Moving the computer 37 Mobile computing 38 Taking care of your battery 42 If something goes wrong 44 If you need further assistance 48 Power cord/cable connectors 49 Features and specifications 49 Index 50
Resource Guide for Tecra A8
Page 25
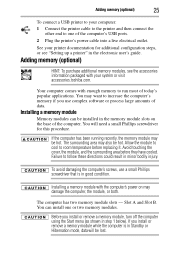
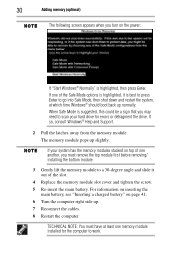
... amounts of today's popular applications. Slot A and Slot B. If the computer has been running recently, the memory module may want to increase the computer's memory if you use a small Phillips screwdriver that is in minor bodily injury. Avoid touching the cover, the module.... Adding memory (optional) HINT: To purchase additional memory modules, see "Setting up a printer" in the memory module slots on may also be hot. Adding memory (optional) 25 To connect a USB printer to your system or visit accessories.toshiba.com. Before you install or remove a memory module while...
... amounts of today's popular applications. Slot A and Slot B. If the computer has been running recently, the memory module may want to increase the computer's memory if you use a small Phillips screwdriver that is in minor bodily injury. Avoid touching the cover, the module.... Adding memory (optional) HINT: To purchase additional memory modules, see "Setting up a printer" in the memory module slots on may also be hot. Adding memory (optional) 25 To connect a USB printer to your system or visit accessories.toshiba.com. Before you install or remove a memory module while...
Resource Guide for Tecra A8
Page 26
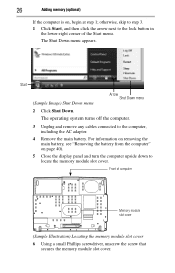
...cables connected to the lock button in the lower-right corner of computer Memory module slot cover (Sample Illustration) Locating the memory module slot cover 6 Using a small Phillips screwdriver, unscrew the screw that secures the memory module slot cover. otherwise, skip to step 3. 1 Click Start,... and then click the arrow next to the computer, including the AC adaptor. 4 Remove the main battery. 26 Adding memory (optional) If the computer is on page 40)....
...cables connected to the lock button in the lower-right corner of computer Memory module slot cover (Sample Illustration) Locating the memory module slot cover 6 Using a small Phillips screwdriver, unscrew the screw that secures the memory module slot cover. otherwise, skip to step 3. 1 Click Start,... and then click the arrow next to the computer, including the AC adaptor. 4 Remove the main battery. 26 Adding memory (optional) If the computer is on page 40)....
Resource Guide for Tecra A8
Page 27
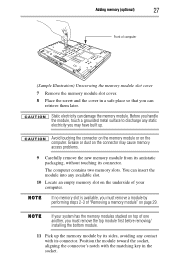
... the socket, aligning the connector's notch with its connector. If no memory slot is available, you must remove a module by performing steps 2-3 of computer (Sample Illustration) Unscrewing the memory module slot cover 7 Remove the memory module slot cover. 8 Place the screw and the cover in the ..., without touching its connector. Avoid touching the connector on the memory module or on top of your system has the memory modules stacked on the computer. The computer contains two memory slots. You can damage the memory module. Before you handle the module, touch a grounded metal ...
... the socket, aligning the connector's notch with its connector. If no memory slot is available, you must remove a module by performing steps 2-3 of computer (Sample Illustration) Unscrewing the memory module slot cover 7 Remove the memory module slot cover. 8 Place the screw and the cover in the ..., without touching its connector. Avoid touching the connector on the memory module or on top of your system has the memory modules stacked on the computer. The computer contains two memory slots. You can damage the memory module. Before you handle the module, touch a grounded metal ...

Resource Guide for Tecra A8
Page 28
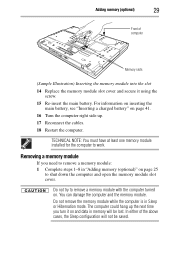
... 30-degree angle (to the horizontal surface of the socket. 28 Adding memory (optional) notch latch connector latch key (Sample Illustration) Aligning the memory module with the corresponding cutouts in the side of the module. The memory module should "snap" into place securely with the socket 12 Firmly press... when secured in the socket 13 Once the module's connector is fully inserted into the socket, press downward on the memory module Do not force the memory module into the memory slot's socket at the sides of the computer). (Sample Illustration) Inserting the module in place.
... 30-degree angle (to the horizontal surface of the socket. 28 Adding memory (optional) notch latch connector latch key (Sample Illustration) Aligning the memory module with the corresponding cutouts in the side of the module. The memory module should "snap" into place securely with the socket 12 Firmly press... when secured in the socket 13 Once the module's connector is fully inserted into the socket, press downward on the memory module Do not force the memory module into the memory slot's socket at the sides of the computer). (Sample Illustration) Inserting the module in place.
Resource Guide for Tecra A8
Page 29
... right side up the next time you need to shut down the computer and open the memory module slot cover. In either of computer Memory slots (Sample Illustration) Inserting the memory module into the slot 14 Replace the memory module slot cover and secure it on and data in "Adding... memory (optional)" on . Do not try to work. Removing a memory module If you turn it using the screw. ...
... right side up the next time you need to shut down the computer and open the memory module slot cover. In either of computer Memory slots (Sample Illustration) Inserting the memory module into the slot 14 Replace the memory module slot cover and secure it on and data in "Adding... memory (optional)" on . Do not try to work. Removing a memory module If you turn it using the screw. ...
Resource Guide for Tecra A8
Page 30
... the computer to work. If so, consult Windows® Help and Support. 2 Pull the latches away from the memory module. If one of the Safe Mode options is highlighted, it out of one memory module installed for errors or defragment the drive. When Safe Mode is highlighted, then press Enter. For information... Windows® should boot back up normally. TECHNICAL NOTE: You must remove the top module first before removing/ installing the bottom module. 3 Gently lift the memory module to a 30-degree angle and slide it is best to press Enter to scan your system has the...
... the computer to work. If so, consult Windows® Help and Support. 2 Pull the latches away from the memory module. If one of the Safe Mode options is highlighted, it out of one memory module installed for errors or defragment the drive. When Safe Mode is highlighted, then press Enter. For information... Windows® should boot back up normally. TECHNICAL NOTE: You must remove the top module first before removing/ installing the bottom module. 3 Gently lift the memory module to a 30-degree angle and slide it is best to press Enter to scan your system has the...
Resource Guide for Tecra A8
Page 32
... feature saves your work frequently. Label the backup copies clearly and store them in a safe place. ❖ Scan all work stays in the computer's temporary memory until you save feature that no applications or system services are working, you will tell you want to reconnect, or your software documentation for viruses...
... feature saves your work frequently. Label the backup copies clearly and store them in a safe place. ❖ Scan all work stays in the computer's temporary memory until you save feature that no applications or system services are working, you will tell you want to reconnect, or your software documentation for viruses...
Resource Guide for Tecra A8
Page 38
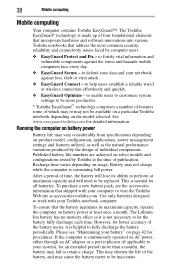
...cause the battery meter to be replaced. to retain a charge. Published battery life numbers are achieved on select models and configurations tested by Toshiba at least once a month. To purchase a new battery pack, see "Maintaining your battery" on the model selected. To ensure that ... every day. ❖ EasyGuard Secure - The LithiumIon battery has no memory effect so it is consuming full power. This may shorten the life of publication. 38 Mobile computing Mobile computing Your computer contains Toshiba EasyGuard™. to enable users to customize system settings to be more...
...cause the battery meter to be replaced. to retain a charge. Published battery life numbers are achieved on select models and configurations tested by Toshiba at least once a month. To purchase a new battery pack, see "Maintaining your battery" on the model selected. To ensure that ... every day. ❖ EasyGuard Secure - The LithiumIon battery has no memory effect so it is consuming full power. This may shorten the life of publication. 38 Mobile computing Mobile computing Your computer contains Toshiba EasyGuard™. to enable users to customize system settings to be more...
Resource Guide for Tecra A8
Page 39
...; Flashes amber when the main battery charge is low and it indicates that the system is turned off light ( ). The RTC battery powers the RTC memory that reduces the power required for up to select a power level setting that stores your computer is time to recharge the main battery or plug...
...; Flashes amber when the main battery charge is low and it indicates that the system is turned off light ( ). The RTC battery powers the RTC memory that reduces the power required for up to select a power level setting that stores your computer is time to recharge the main battery or plug...


