
Tecra A10 User Guide
Page 27
Memory Stick, Memory Stick PRO, and i.LINK are trademarks or registered trademarks of SD Card Association. xD-Picture Card is a trademark of Fuji Photo Film, Co., Ltd. Computer Disposal Information Lamp contains mercury. ConfigFree is a trademark of Toshiba ...Toshiba supports various trade-in and recycling programs. Visit www.ToshibaDirect.com and select Recycling & Trade-in Programs, or enter Recycle in the United States and/or other brand and product names are trademarks or registered trademarks of Adobe Systems Incorporated in the search bar. 27 Trademarks Tecra...
Memory Stick, Memory Stick PRO, and i.LINK are trademarks or registered trademarks of SD Card Association. xD-Picture Card is a trademark of Fuji Photo Film, Co., Ltd. Computer Disposal Information Lamp contains mercury. ConfigFree is a trademark of Toshiba ...Toshiba supports various trade-in and recycling programs. Visit www.ToshibaDirect.com and select Recycling & Trade-in Programs, or enter Recycle in the United States and/or other brand and product names are trademarks or registered trademarks of Adobe Systems Incorporated in the search bar. 27 Trademarks Tecra...
Tecra A10 User Guide
Page 29
... 50 Your computer's features and specifications ....51 Turning on the power 51 Adding memory (optional 52 Installing a memory module 53 Removing a memory module 58 Checking total memory 60 Hard Drive Recovery Utilities 61 Creating Recovery DVDs 62 Hard Disk Drive Recovery... options 63 Hard Disk Drive Recovery using the Recovery media 68 Checking the HDD operating status 71 Installing drivers and applications 71 Using the Toshiba...
... 50 Your computer's features and specifications ....51 Turning on the power 51 Adding memory (optional 52 Installing a memory module 53 Removing a memory module 58 Checking total memory 60 Hard Drive Recovery Utilities 61 Creating Recovery DVDs 62 Hard Disk Drive Recovery... options 63 Hard Disk Drive Recovery using the Recovery media 68 Checking the HDD operating status 71 Installing drivers and applications 71 Using the Toshiba...
Tecra A10 User Guide
Page 32
... Card Reader 138 Using the Bridge Media Adapter Slot 139 Inserting memory media 139 Removing memory media 140 Using the i.LINK® port 140 Using an expansion device 141 Using an Optional Toshiba Express Port Replicator with your computer 141 Chapter 5: Utilities 142 TOSHIBA Assist 143 Connect 144 Secure 145 Protect & Fix 146 Optimize...
... Card Reader 138 Using the Bridge Media Adapter Slot 139 Inserting memory media 139 Removing memory media 140 Using the i.LINK® port 140 Using an expansion device 141 Using an Optional Toshiba Express Port Replicator with your computer 141 Chapter 5: Utilities 142 TOSHIBA Assist 143 Connect 144 Secure 145 Protect & Fix 146 Optimize...
Tecra A10 User Guide
Page 33
Contents 33 TOSHIBA SD™ Memory Card Format Utility...........157 TOSHIBA SD™ Memory Boot Utility 158 Booting from a bootable SD card 159 Mouse Utility 160 TOSHIBA Hardware Setup 161 USB Sleep and Charge Utility 163 Starting the USB Sleep and Charge Utility.......163 USB Sleep and Charge 163 Enabling USB Sleep ...
Contents 33 TOSHIBA SD™ Memory Card Format Utility...........157 TOSHIBA SD™ Memory Boot Utility 158 Booting from a bootable SD card 159 Mouse Utility 160 TOSHIBA Hardware Setup 161 USB Sleep and Charge Utility 163 Starting the USB Sleep and Charge Utility.......163 USB Sleep and Charge 163 Enabling USB Sleep ...
Tecra A10 User Guide
Page 34
34 Contents A plan of action 184 Fixing a problem with Device Manager ...........185 Memory problems 186 Power and the batteries 187 Keyboard problems 188 Display problems 189 Disk or internal storage drive problems ..........191 Optical drive problems ...backup in the Windows® operating system 202 If you need further assistance 206 Before you contact Toshiba 206 Contacting Toshiba 207 Other Toshiba Internet Web sites 208 Toshiba's worldwide offices 208 Appendix A: Hot Keys/TOSHIBA Cards 210 Hot Key Cards 210 Using the Hot Key Cards 211 Application Cards 212 Using the ...
34 Contents A plan of action 184 Fixing a problem with Device Manager ...........185 Memory problems 186 Power and the batteries 187 Keyboard problems 188 Display problems 189 Disk or internal storage drive problems ..........191 Optical drive problems ...backup in the Windows® operating system 202 If you need further assistance 206 Before you contact Toshiba 206 Contacting Toshiba 207 Other Toshiba Internet Web sites 208 Toshiba's worldwide offices 208 Appendix A: Hot Keys/TOSHIBA Cards 210 Hot Key Cards 210 Using the Hot Key Cards 211 Application Cards 212 Using the ...
Tecra A10 User Guide
Page 44
...; Never cover or block the air vents including those located at the base of the computer. To use it. See "Connecting to , a mouse, keyboard, printer, memory, and PC Cards. Always make sure your computer and AC adaptor have a CPU cooling fan that needs to be charged before adding external or internal...
...; Never cover or block the air vents including those located at the base of the computer. To use it. See "Connecting to , a mouse, keyboard, printer, memory, and PC Cards. Always make sure your computer and AC adaptor have a CPU cooling fan that needs to be charged before adding external or internal...
Tecra A10 User Guide
Page 46
... Registration will not diminish Customer rights under the Toshiba standard limited Warranty. Product registration can be connected to the Internet. After starting your computer for the first time you may want to: ❖ Add more memory (see "Adding memory (optional)" on page 52) ❖ Connect...your software" on page 45. See "Setting up your desktop and then double-clicking Toshiba Registration. Adding optional external devices NOTE Before adding external devices or memory, Toshiba recommends setting up your product. NOTE To register online, you must be completed by ...
... Registration will not diminish Customer rights under the Toshiba standard limited Warranty. Product registration can be connected to the Internet. After starting your computer for the first time you may want to: ❖ Add more memory (see "Adding memory (optional)" on page 52) ❖ Connect...your software" on page 45. See "Setting up your desktop and then double-clicking Toshiba Registration. Adding optional external devices NOTE Before adding external devices or memory, Toshiba recommends setting up your product. NOTE To register online, you must be completed by ...
Tecra A10 User Guide
Page 52
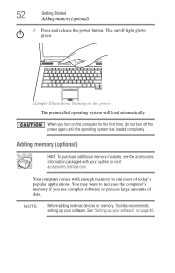
When you use complex software or process large amounts of today's popular applications. 52 Getting Started Adding memory (optional) 3 Press and release the power button. NOTE Before adding external devices or memory, Toshiba recommends setting up your software" on page 45. The on/off the power again until the operating system has loaded completely...
When you use complex software or process large amounts of today's popular applications. 52 Getting Started Adding memory (optional) 3 Press and release the power button. NOTE Before adding external devices or memory, Toshiba recommends setting up your software" on page 45. The on/off the power again until the operating system has loaded completely...
Tecra A10 User Guide
Page 53
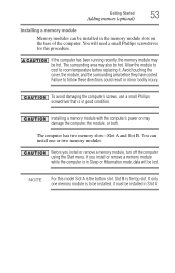
... Avoid touching the cover, the module, and the surrounding area before replacing it must be installed in Slot A. If only one or two memory modules. The surrounding area may be installed in minor bodily injury. Failure to room temperature before they have cooled. You can be hot. ...Allow the module to cool to follow these directions could result in the memory module slots on may damage the computer, the module, or both. To avoid damaging the computer's screws, use a small Phillips screwdriver that...
... Avoid touching the cover, the module, and the surrounding area before replacing it must be installed in Slot A. If only one or two memory modules. The surrounding area may be installed in minor bodily injury. Failure to room temperature before they have cooled. You can be hot. ...Allow the module to cool to follow these directions could result in the memory module slots on may damage the computer, the module, or both. To avoid damaging the computer's screws, use a small Phillips screwdriver that...
Tecra A10 User Guide
Page 54
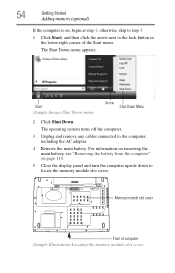
...3. 1 Click Start, and then click the arrow next to the lock button in the lower-right corner of computer (Sample Illustration) Locating the memory module slot cover Memory module slot cover Front of the Start menu. For information on removing the main battery, see "Removing the battery from the computer" on , ...begin at step 1; 54 Getting Started Adding memory (optional) If the computer is on page 119. 5 Close the display panel and turn the computer upside down to locate the...
...3. 1 Click Start, and then click the arrow next to the lock button in the lower-right corner of computer (Sample Illustration) Locating the memory module slot cover Memory module slot cover Front of the Start menu. For information on removing the main battery, see "Removing the battery from the computer" on , ...begin at step 1; 54 Getting Started Adding memory (optional) If the computer is on page 119. 5 Close the display panel and turn the computer upside down to locate the...
Tecra A10 User Guide
Page 55
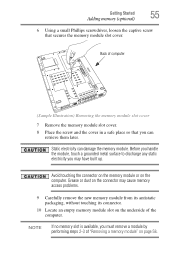
... retrieve them later. Grease or dust on the connector may have built up. NOTE If no memory slot is available, you must remove a module by performing steps 2-3 of "Removing a memory module" on the computer. Before you handle the module, touch a grounded metal surface to discharge...on the underside of computer (Sample Illustration) Removing the memory module slot cover 7 Remove the memory module slot cover. 8 Place the screw and the cover in a safe place so that secures the memory module slot cover. Getting Started Adding memory (optional) 55 6 Using a small Phillips screwdriver, ...
... retrieve them later. Grease or dust on the connector may have built up. NOTE If no memory slot is available, you must remove a module by performing steps 2-3 of "Removing a memory module" on the computer. Before you handle the module, touch a grounded metal surface to discharge...on the underside of computer (Sample Illustration) Removing the memory module slot cover 7 Remove the memory module slot cover. 8 Place the screw and the cover in a safe place so that secures the memory module slot cover. Getting Started Adding memory (optional) 55 6 Using a small Phillips screwdriver, ...
Tecra A10 User Guide
Page 56
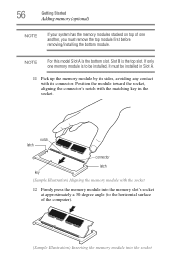
... on top of the computer). (Sample Illustration) Inserting the memory module into the memory slot's socket at approximately a 30-degree angle (to the horizontal surface of one memory module is to be installed in Slot A. 11 Pick up the memory module by its connector. NOTE For this model Slot A ..., avoiding any contact with the matching key in the socket. notch latch connector latch key (Sample Illustration) Aligning the memory module with the socket 12 Firmly press the memory module into the socket Slot B is the bottom slot. If only one another, you must be installed, it must...
... on top of the computer). (Sample Illustration) Inserting the memory module into the memory slot's socket at approximately a 30-degree angle (to the horizontal surface of one memory module is to be installed in Slot A. 11 Pick up the memory module by its connector. NOTE For this model Slot A ..., avoiding any contact with the matching key in the socket. notch latch connector latch key (Sample Illustration) Aligning the memory module with the socket 12 Firmly press the memory module into the socket Slot B is the bottom slot. If only one another, you must be installed, it must...
Tecra A10 User Guide
Page 57
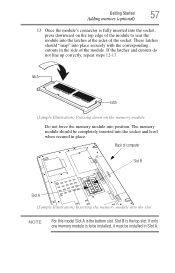
...sides of the module. Slot B is fully inserted into the socket, press downward on the memory module Do not force the memory module into place securely with the corresponding cutouts in Slot A. If only one memory module is the bottom slot. Back of computer Slot B Slot A (Sample Illustration) Inserting... the memory module into the slot NOTE For this model Slot A is to seat the module into the socket and level ...
...sides of the module. Slot B is fully inserted into the socket, press downward on the memory module Do not force the memory module into place securely with the corresponding cutouts in Slot A. If only one memory module is the bottom slot. Back of computer Slot B Slot A (Sample Illustration) Inserting... the memory module into the slot NOTE For this model Slot A is to seat the module into the socket and level ...
Tecra A10 User Guide
Page 58
...the computer to shut down the computer and open the memory module slot cover. Removing a memory module If you can damage the computer and the memory module. When the operating system has loaded, you need to remove a memory module: 1 Complete steps 1-8 in memory will not be lost. The computer could hang up ... 121. 16 Turn the computer right side up the next time you are adding extra memory after setting up the computer. Do not remove the memory module while the computer is in "Checking total memory" on page 53 to work. In either of the above cases, the Sleep configuration ...
...the computer to shut down the computer and open the memory module slot cover. Removing a memory module If you can damage the computer and the memory module. When the operating system has loaded, you need to remove a memory module: 1 Complete steps 1-8 in memory will not be lost. The computer could hang up ... 121. 16 Turn the computer right side up the next time you are adding extra memory after setting up the computer. Do not remove the memory module while the computer is in "Checking total memory" on page 53 to work. In either of the above cases, the Sleep configuration ...
Tecra A10 User Guide
Page 59
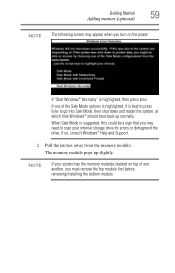
...Support. 2 Pull the latches away from the memory module. If one another, you must remove the top module first before removing/installing the bottom module. NOTE If your internal storage drive for errors or defragment the drive. Getting Started Adding memory (optional) 59 NOTE The following screen may ...appear when you may need to scan your system has the memory modules stacked on the power: If "Start Windows® Normally" is best to ...
...Support. 2 Pull the latches away from the memory module. If one another, you must remove the top module first before removing/installing the bottom module. NOTE If your internal storage drive for errors or defragment the drive. Getting Started Adding memory (optional) 59 NOTE The following screen may ...appear when you may need to scan your system has the memory modules stacked on the power: If "Start Windows® Normally" is best to ...
Tecra A10 User Guide
Page 60
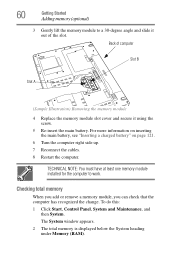
... can check that the computer has recognized the change. The System window appears. 2 The total memory is displayed below the System heading under Memory (RAM). TECHNICAL NOTE: You must have at least one memory module installed for the computer to a 30-degree angle and slide it out of computer Slot ...B Slot A (Sample Illustration) Removing the memory module 4 Replace the memory module slot cover and secure it using the screw. 5 Re-insert the main battery. For more information on inserting the main battery,...
... can check that the computer has recognized the change. The System window appears. 2 The total memory is displayed below the System heading under Memory (RAM). TECHNICAL NOTE: You must have at least one memory module installed for the computer to a 30-degree angle and slide it out of computer Slot ...B Slot A (Sample Illustration) Removing the memory module 4 Replace the memory module slot cover and secure it using the screw. 5 Re-insert the main battery. For more information on inserting the main battery,...
Tecra A10 User Guide
Page 61
... is also strongly recommended that says, "Windows® needs your system. Getting Started Hard Drive Recovery Utilities 61 If the computer does not recognize the memory configuration, turn off the computer and remove the memory module slot cover (complete steps 1-8 in "Installing...
... is also strongly recommended that says, "Windows® needs your system. Getting Started Hard Drive Recovery Utilities 61 If the computer does not recognize the memory configuration, turn off the computer and remove the memory module slot cover (complete steps 1-8 in "Installing...
Tecra A10 User Guide
Page 78
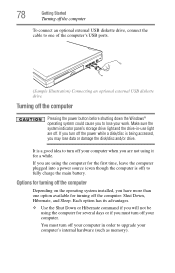
... one of the computer's USB ports. (Sample Illustration) Connecting an optional external USB diskette drive Turning off ) to lose your computer's internal hardware (such as memory).
... one of the computer's USB ports. (Sample Illustration) Connecting an optional external USB diskette drive Turning off ) to lose your computer's internal hardware (such as memory).
Tecra A10 User Guide
Page 79
... save your work, system settings, and current state of the computer to where you left it first saves the current state of the desktop to memory, so that when you turn off your computer, save your files and make sure all disk/disc activity lights are retained indefinitely. Since Hibernation mode...
... save your work, system settings, and current state of the computer to where you left it first saves the current state of the desktop to memory, so that when you turn off your computer, save your files and make sure all disk/disc activity lights are retained indefinitely. Since Hibernation mode...
Tecra A10 User Guide
Page 80
Factors to memory so that, when you restart the computer, you can continue working from Sleep takes less time and consumes less main battery power than restarting after ... when choosing Sleep: ❖ While in Sleep mode, the computer uses some main battery power. ❖ Because the state of the system is stored in memory, you will lose data if the main battery discharges while the computer is in which you left off the computer Sleep mode The Sleep command...
Factors to memory so that, when you restart the computer, you can continue working from Sleep takes less time and consumes less main battery power than restarting after ... when choosing Sleep: ❖ While in Sleep mode, the computer uses some main battery power. ❖ Because the state of the system is stored in memory, you will lose data if the main battery discharges while the computer is in which you left off the computer Sleep mode The Sleep command...


