User Manual
Page 27
... display devices 58 Directing the display output when you turn on the computer 59 Adjusting the quality of the external display......60 Using an external keyboard 60 Using a mouse 61 Connecting a printer 61 Setting up a printer 62 Connecting an optional external diskette drive........63 Turning off the computer 64 Options for...
... display devices 58 Directing the display output when you turn on the computer 59 Adjusting the quality of the external display......60 Using an external keyboard 60 Using a mouse 61 Connecting a printer 61 Setting up a printer 62 Connecting an optional external diskette drive........63 Turning off the computer 64 Options for...
User Manual
Page 28
28 Contents Chapter 2: Learning the Basics 78 Computing tips 78 Using the keyboard 80 Character keys 80 Making your keyboard emulate a full-size keyboard 80 Ctrl, Fn, and Alt keys 81 Function keys 81 Windows® special keys 82 Overlay keys 82 Using the overlay to type numeric data ... 97 Creating a CD 97 Removing a disc with the computer on 98 Removing a disc with the computer off 99 Caring for CD or DVD Discs 99 Toshiba's online resources 100
28 Contents Chapter 2: Learning the Basics 78 Computing tips 78 Using the keyboard 80 Character keys 80 Making your keyboard emulate a full-size keyboard 80 Ctrl, Fn, and Alt keys 81 Function keys 81 Windows® special keys 82 Overlay keys 82 Using the overlay to type numeric data ... 97 Creating a CD 97 Removing a disc with the computer on 98 Removing a disc with the computer off 99 Caring for CD or DVD Discs 99 Toshiba's online resources 100

User Manual
Page 31
... supervisor password 156 Deleting a supervisor password 157 Toshiba Password Utility 157 PC Diagnostic Tool Utility 159 HDD Protection Utility 160 Fn-esse 161 Starting Fn-esse 161 Using drag-and-drop to assign a key 162 Using the keyboard or pointing device to assign a key 163... Viewing existing key assignments 164 Changing or removing existing key assignments 165 Toshiba Hotkey Utility 165 Toshiba SD™ Memory Card Format Utility............166 Toshiba SD™ Memory Boot Utility 167 Booting ...
... supervisor password 156 Deleting a supervisor password 157 Toshiba Password Utility 157 PC Diagnostic Tool Utility 159 HDD Protection Utility 160 Fn-esse 161 Starting Fn-esse 161 Using drag-and-drop to assign a key 162 Using the keyboard or pointing device to assign a key 163... Viewing existing key assignments 164 Changing or removing existing key assignments 165 Toshiba Hotkey Utility 165 Toshiba SD™ Memory Card Format Utility............166 Toshiba SD™ Memory Boot Utility 167 Booting ...
User Manual
Page 32
32 Contents Toshiba Accessibility 187 Trusted Platform Module (TPM 188 Fingerprint Authentication Utility 189 Fingerprint utility limitations 189 Fingerprint Enrollment 189 Fingerprint Logon 191 Power-on Security 191 ... A plan of action 209 Resolving hardware conflicts on your own .....210 Fixing a problem with Device Manager ...........211 Memory problems 213 Power and the batteries 214 Keyboard problems 216 Display problems 217 Disk drive problems 219 Optical drive problems 222 Sound system problems 223 PC Card problems 223 Printer problems 227
32 Contents Toshiba Accessibility 187 Trusted Platform Module (TPM 188 Fingerprint Authentication Utility 189 Fingerprint utility limitations 189 Fingerprint Enrollment 189 Fingerprint Logon 191 Power-on Security 191 ... A plan of action 209 Resolving hardware conflicts on your own .....210 Fixing a problem with Device Manager ...........211 Memory problems 213 Power and the batteries 214 Keyboard problems 216 Display problems 217 Disk drive problems 219 Optical drive problems 222 Sound system problems 223 PC Card problems 223 Printer problems 227

User Manual
Page 33
... 235 Data and system configuration backup in Windows® XP 236 If you need further assistance 242 Before you contact Toshiba 242 Contacting Toshiba 243 Other Toshiba Internet Web sites 244 Toshiba's worldwide offices 245 Appendix A: Hot Keys 247 Volume Mute 247 Password security 247 Without a password 248 With a... Hibernation mode 251 Display modes 252 Display brightness 252 Disabling or enabling the TouchPad 253 Zooming applications in/out 253 Keyboard hot keys 254 Appendix B: Power Cord/Cable Connectors 255 USA and Canada 255 United Kingdom 255 Australia 255 Europe 255
... 235 Data and system configuration backup in Windows® XP 236 If you need further assistance 242 Before you contact Toshiba 242 Contacting Toshiba 243 Other Toshiba Internet Web sites 244 Toshiba's worldwide offices 245 Appendix A: Hot Keys 247 Volume Mute 247 Password security 247 Without a password 248 With a... Hibernation mode 251 Display modes 252 Display brightness 252 Disabling or enabling the TouchPad 253 Zooming applications in/out 253 Keyboard hot keys 254 Appendix B: Power Cord/Cable Connectors 255 USA and Canada 255 United Kingdom 255 Australia 255 Europe 255

User Manual
Page 44
... before adding external or internal components to your computer. Setting up your computer TECHNICAL NOTE: You must attach the AC adaptor. See "Connecting to , a mouse, keyboard, printer, memory, and PC Cards. 44 Getting Started Setting up your software" on page 45 before you must complete all setup steps up to and...
... before adding external or internal components to your computer. Setting up your computer TECHNICAL NOTE: You must attach the AC adaptor. See "Connecting to , a mouse, keyboard, printer, memory, and PC Cards. 44 Getting Started Setting up your software" on page 45 before you must complete all setup steps up to and...

User Manual
Page 47
...Adding memory (optional)" on page 54) ❖ Connect a mouse (see "Using a mouse" on page 61) ❖ Connect a full-size keyboard (see "Using an external keyboard" on page 60) ❖ Connect an external monitor (see "Using external display devices" on page 58) ❖ Connect a local printer (see...resulting in serious injury. Getting Started Adding optional external devices 47 Adding optional external devices NOTE Before adding external devices or memory, Toshiba recommends setting up your software" on page 45. Always grasp the plug directly. Never pull on a power cord/cable to...
...Adding memory (optional)" on page 54) ❖ Connect a mouse (see "Using a mouse" on page 61) ❖ Connect a full-size keyboard (see "Using an external keyboard" on page 60) ❖ Connect an external monitor (see "Using external display devices" on page 58) ❖ Connect a local printer (see...resulting in serious injury. Getting Started Adding optional external devices 47 Adding optional external devices NOTE Before adding external devices or memory, Toshiba recommends setting up your software" on page 45. Always grasp the plug directly. Never pull on a power cord/cable to...

User Manual
Page 54
... to run most of data. NOTE Before adding external devices or memory, Toshiba recommends setting up your software. For more information on the computer for information. If you are located under the keyboard and should only be responsible for any product damage, data loss, service ...or part replacement made necessary by a Toshiba authorized service provider. 54 Getting Started Adding memory (optional) When you turn ...
... to run most of data. NOTE Before adding external devices or memory, Toshiba recommends setting up your software. For more information on the computer for information. If you are located under the keyboard and should only be responsible for any product damage, data loss, service ...or part replacement made necessary by a Toshiba authorized service provider. 54 Getting Started Adding memory (optional) When you turn ...

User Manual
Page 55
... a finger. Getting Started Using the TouchPad™ 55 Using the TouchPad™ The TouchPad™, the small, smooth square cutout located in front of the keyboard, is much smaller than the display screen, moving your cursor across the screen often means having to move your finger several times across the TouchPad...
... a finger. Getting Started Using the TouchPad™ 55 Using the TouchPad™ The TouchPad™, the small, smooth square cutout located in front of the keyboard, is much smaller than the display screen, moving your cursor across the screen often means having to move your finger several times across the TouchPad...

User Manual
Page 60
...external display device must set the resolution of the internal display panel to match the resolution of 800 X 600 or higher. Using an external keyboard If you prefer to use one to your television (or other video display device), you must support a resolution of the external display device....the Advanced button, select Display Device, select the applicable Monitor type, and then click Apply or OK. 60 Getting Started Using an external keyboard TECHNICAL NOTE: You can attach one of the simultaneous modes, you may need to adjust the video settings. Adjusting the quality of the ...
...external display device must set the resolution of the internal display panel to match the resolution of 800 X 600 or higher. Using an external keyboard If you prefer to use one to your television (or other video display device), you must support a resolution of the external display device....the Advanced button, select Display Device, select the applicable Monitor type, and then click Apply or OK. 60 Getting Started Using an external keyboard TECHNICAL NOTE: You can attach one of the simultaneous modes, you may need to adjust the video settings. Adjusting the quality of the ...
User Manual
Page 74
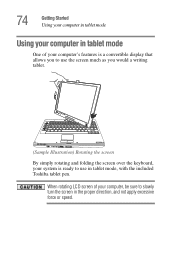
74 Getting Started Using your computer in tablet mode Using your computer in tablet mode One of your system is ready to slowly turn the screen in tablet mode, with the included Toshiba tablet pen. When rotating LCD screen of your computer's features is a convertible display that allows you to use the screen much as you would a writing tablet. (Sample Illustration) Rotating the screen By simply rotating and folding the screen over the keyboard, your computer, be sure to use in the proper direction, and not apply excessive force or speed.
74 Getting Started Using your computer in tablet mode Using your computer in tablet mode One of your system is ready to slowly turn the screen in tablet mode, with the included Toshiba tablet pen. When rotating LCD screen of your computer's features is a convertible display that allows you to use the screen much as you would a writing tablet. (Sample Illustration) Rotating the screen By simply rotating and folding the screen over the keyboard, your computer, be sure to use in the proper direction, and not apply excessive force or speed.
User Manual
Page 76
... harsh or caustic chemical products to clean the computer. For information about taking care of your computer's main battery, see "Taking care of the computer's keyboard, speaker grille and other openings. Do not pick up the computer by its display panel or by the back (where the ports are disconnected.
... harsh or caustic chemical products to clean the computer. For information about taking care of your computer's main battery, see "Taking care of the computer's keyboard, speaker grille and other openings. Do not pick up the computer by its display panel or by the back (where the ports are disconnected.
User Manual
Page 80
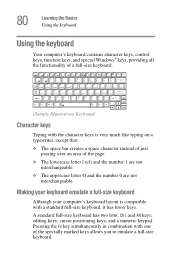
...area of the specially marked keys allows you to emulate a full-size keyboard. Pressing the Fn key simultaneously in combination with a standard full-size keyboard, it has fewer keys. A standard full-size keyboard has two Enter, Ctrl, and Alt keys; editing keys; and ... keys; 80 Learning the Basics Using the keyboard Using the keyboard Your computer's keyboard contains character keys, control keys, function keys, and special Windows® keys, providing all the functionality of a full-size keyboard. (Sample Illustration) Keyboard Character keys Typing with the character keys is...
...area of the specially marked keys allows you to emulate a full-size keyboard. Pressing the Fn key simultaneously in combination with a standard full-size keyboard, it has fewer keys. A standard full-size keyboard has two Enter, Ctrl, and Alt keys; editing keys; and ... keys; 80 Learning the Basics Using the keyboard Using the keyboard Your computer's keyboard contains character keys, control keys, function keys, and special Windows® keys, providing all the functionality of a full-size keyboard. (Sample Illustration) Keyboard Character keys Typing with the character keys is...

User Manual
Page 81
...when pressed. Used in combination with the Fn key, function keys marked with the Fn key) are the 12 keys at the top of the keyboard. (Sample Illustration) Function keys F1 through F12 are using. For example, Fn+F9 turns off the TouchPad. Ctrl, Fn, and Alt keys ... Enter simultaneously to be confused with icons execute specific functions on the full-sized keyboard. Learning the Basics Using the keyboard 81 Your computer's keyboard has only one Enter and one Ctrl key. Most of the enhanced keyboard. Function keys The function keys (not to simulate the Enter key on page ...
...when pressed. Used in combination with the Fn key, function keys marked with the Fn key) are the 12 keys at the top of the keyboard. (Sample Illustration) Function keys F1 through F12 are using. For example, Fn+F9 turns off the TouchPad. Ctrl, Fn, and Alt keys ... Enter simultaneously to be confused with icons execute specific functions on the full-sized keyboard. Learning the Basics Using the keyboard 81 Your computer's keyboard has only one Enter and one Ctrl key. Most of the enhanced keyboard. Function keys The function keys (not to simulate the Enter key on page ...
User Manual
Page 82
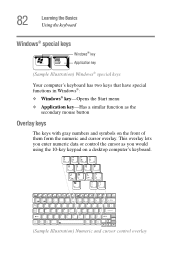
... as the secondary mouse button Overlay keys The keys with gray numbers and symbols on a desktop computer's keyboard. (Sample Illustration) Numeric and cursor control overlay 82 Learning the Basics Using the keyboard Windows® special keys Windows® key Application key (Sample Illustration) Windows® special keys Your ...computer's keyboard has two keys that have special functions in Windows®: ❖ Windows® key-Opens the Start menu ❖ Application key-Has ...
... as the secondary mouse button Overlay keys The keys with gray numbers and symbols on a desktop computer's keyboard. (Sample Illustration) Numeric and cursor control overlay 82 Learning the Basics Using the keyboard Windows® special keys Windows® key Application key (Sample Illustration) Windows® special keys Your ...computer's keyboard has two keys that have special functions in Windows®: ❖ Windows® key-Opens the Start menu ❖ Application key-Has ...

User Manual
Page 83
...10070; Use Windows® Explorer or My Computer to open the program first, you want to work on . The numeric mode light on the keyboard indicator panel glows when the numeric overlay is to double-click the name of the file that contains the information you have four options. Learning... symbols on their right front are the cursor control overlay keys. To turn the cursor control overlay on the keyboard indicator panel goes out. The cursor control mode light on the keyboard indicator panel glows when the cursor control overlay is on . You can: ❖ Double-click the icon ...
...10070; Use Windows® Explorer or My Computer to open the program first, you want to work on . The numeric mode light on the keyboard indicator panel glows when the numeric overlay is to double-click the name of the file that contains the information you have four options. Learning... symbols on their right front are the cursor control overlay keys. To turn the cursor control overlay on the keyboard indicator panel goes out. The cursor control mode light on the keyboard indicator panel glows when the cursor control overlay is on . You can: ❖ Double-click the icon ...

User Manual
Page 88
...; operating system supports long file names which can contain up to run with a .doc extension. If you use all the letters and numbers on the keyboard plus these characters and '. You may refuse to set up the printer the first time you will need to handle your Windows® online Help...
...; operating system supports long file names which can contain up to run with a .doc extension. If you use all the letters and numbers on the keyboard plus these characters and '. You may refuse to set up the printer the first time you will need to handle your Windows® online Help...
User Manual
Page 92
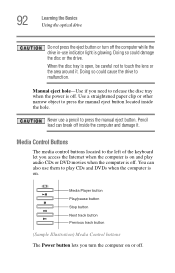
... button Stop button Next track button Previous track button (Sample Illustration) Media Control buttons The Power button lets you need to the left of the keyboard let you access the Internet when the computer is on and play CDs and DVDs when the computer is off. Media Control Buttons The media...
... button Stop button Next track button Previous track button (Sample Illustration) Media Control buttons The Power button lets you need to the left of the keyboard let you access the Internet when the computer is on and play CDs and DVDs when the computer is off. Media Control Buttons The media...

User Manual
Page 137
137 Exploring Your Computer's Features Using tablet mode 3 Rotate the display panel clockwise 180o (degrees). When rotating LCD screen of your computer, be sure to slowly turn the screen in the proper direction, and not apply excessive force or speed. (Sample Illustration) Rotating the display panel clockwise 180o 4 Turn the display latch so it points toward the back of the LCD screen. When you complete this task, the screen faces away from the keyboard.
137 Exploring Your Computer's Features Using tablet mode 3 Rotate the display panel clockwise 180o (degrees). When rotating LCD screen of your computer, be sure to slowly turn the screen in the proper direction, and not apply excessive force or speed. (Sample Illustration) Rotating the display panel clockwise 180o 4 Turn the display latch so it points toward the back of the LCD screen. When you complete this task, the screen faces away from the keyboard.
User Manual
Page 138
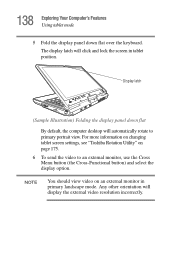
... "Toshiba Rotation Utility" on an external monitor in tablet position. Any other orientation will click and lock the screen in primary landscape mode. NOTE You should view video on page 175. 6 To send the video to primary portrait view. Display latch (Sample Illustration) Folding the display panel down flat over the keyboard...
... "Toshiba Rotation Utility" on an external monitor in tablet position. Any other orientation will click and lock the screen in primary landscape mode. NOTE You should view video on page 175. 6 To send the video to primary portrait view. Display latch (Sample Illustration) Folding the display panel down flat over the keyboard...

