User Guide
Page 29
... ....54 Turning on the power 54 Using the TouchPad 55 Adding memory 58 Installing a memory module 58 Removing a memory module 64 Connecting an external USB keyboard 65 Connecting an external USB mouse 65 Connecting a printer 66 Setting up a printer 67 Using your computer in tablet mode 68 Using external display devices...your computer 75 Cleaning the computer 75 Moving the computer 75 Using a computer lock 76 Chapter 2: Learning the Basics 77 Computing tips 77 Using the keyboard 79 Character keys 79 Making your keyboard emulate a full-size keyboard 79 Ctrl, Fn, and Alt keys 80
... ....54 Turning on the power 54 Using the TouchPad 55 Adding memory 58 Installing a memory module 58 Removing a memory module 64 Connecting an external USB keyboard 65 Connecting an external USB mouse 65 Connecting a printer 66 Setting up a printer 67 Using your computer in tablet mode 68 Using external display devices...your computer 75 Cleaning the computer 75 Moving the computer 75 Using a computer lock 76 Chapter 2: Learning the Basics 77 Computing tips 77 Using the keyboard 79 Character keys 79 Making your keyboard emulate a full-size keyboard 79 Ctrl, Fn, and Alt keys 80
User Guide
Page 34
... A plan of action 203 Resolving hardware conflicts on your own .....204 Fixing a problem with Device Manager ...........205 Memory problems 207 Power and the batteries 208 Keyboard problems 210 Display problems 211
... A plan of action 203 Resolving hardware conflicts on your own .....204 Fixing a problem with Device Manager ...........205 Memory problems 207 Power and the batteries 208 Keyboard problems 210 Display problems 211
User Guide
Page 35
... computing habits 229 Data and system configuration backup in Windows XP 230 If you need further assistance 236 Before you contact Toshiba 236 Contacting Toshiba 237 Other Toshiba Internet Web sites 238 Toshiba's worldwide offices 238 Appendix A: Hot Keys 240 Volume Mute 240 Password security 241 Without a password 241 With a password 241 Maintaining security... mode 243 Standby mode 244 Hibernation mode 245 Display modes 246 Display brightness 246 Wireless device enable/disable 247 Disabling or enabling the TouchPad 247 Keyboard hot keys 248 Zooming applications in/out 248
... computing habits 229 Data and system configuration backup in Windows XP 230 If you need further assistance 236 Before you contact Toshiba 236 Contacting Toshiba 237 Other Toshiba Internet Web sites 238 Toshiba's worldwide offices 238 Appendix A: Hot Keys 240 Volume Mute 240 Password security 241 Without a password 241 With a password 241 Maintaining security... mode 243 Standby mode 244 Hibernation mode 245 Display modes 246 Display brightness 246 Wireless device enable/disable 247 Disabling or enabling the TouchPad 247 Keyboard hot keys 248 Zooming applications in/out 248
User Guide
Page 46
... internal components to your computer. NOTE The cooling fan location will vary depending on page 49. These components include, but are not limited to, a mouse, keyboard, printer, memory, and PC Cards. See "Connecting to a power source" on the computer. Loose items such as notebook and tissue paper, plastic wrappers, or other...
... internal components to your computer. NOTE The cooling fan location will vary depending on page 49. These components include, but are not limited to, a mouse, keyboard, printer, memory, and PC Cards. See "Connecting to a power source" on the computer. Loose items such as notebook and tissue paper, plastic wrappers, or other...
User Guide
Page 48
... memory (see "Adding memory" on page 58) ❖ Connect a mouse (see "Connecting an external USB keyboard" on page 65) ❖ Connect a full-size keyboard (see "Connecting an external USB keyboard" on your desktop or go to the Toshiba web site at that time, you must be completed during the initial start up process of...
... memory (see "Adding memory" on page 58) ❖ Connect a mouse (see "Connecting an external USB keyboard" on page 65) ❖ Connect a full-size keyboard (see "Connecting an external USB keyboard" on your desktop or go to the Toshiba web site at that time, you must be completed during the initial start up process of...
User Guide
Page 55
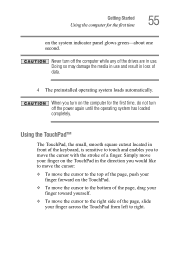
... located in the direction you to right. When you turn on the computer for the first time 55 on the TouchPad in front of the keyboard, is sensitive to touch and enables you would like to move the cursor: ❖ To move the cursor to the top of the page, push...
... located in the direction you to right. When you turn on the computer for the first time 55 on the TouchPad in front of the keyboard, is sensitive to touch and enables you would like to move the cursor: ❖ To move the cursor to the top of the page, push...
User Guide
Page 65
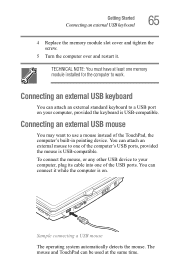
Getting Started Connecting an external USB keyboard 65 4 Replace the memory module slot cover and tighten the screw. 5 Turn the computer over and restart it while the computer is on your computer, ... mouse, or any other USB device to a USB port on . Sample connecting a USB mouse The operating system automatically detects the mouse. Connecting an external USB keyboard You can be used at least one of the USB ports. The mouse and TouchPad can attach an external standard...
Getting Started Connecting an external USB keyboard 65 4 Replace the memory module slot cover and tighten the screw. 5 Turn the computer over and restart it while the computer is on your computer, ... mouse, or any other USB device to a USB port on . Sample connecting a USB mouse The operating system automatically detects the mouse. Connecting an external USB keyboard You can be used at least one of the USB ports. The mouse and TouchPad can attach an external standard...
User Guide
Page 68
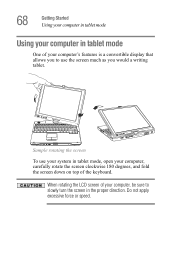
Do not apply excessive force or speed. 68 Getting Started Using your computer in tablet mode Using your computer in the proper direction. Sample rotating the screen To use your system in tablet mode, open your computer, carefully rotate the screen clockwise 180 degrees, and fold the screen down on top of your computer, be sure to use the screen much as you to slowly turn the screen in tablet mode One of the keyboard. When rotating the LCD screen of your computer's features is a convertible display that allows you would a writing tablet.
Do not apply excessive force or speed. 68 Getting Started Using your computer in tablet mode Using your computer in the proper direction. Sample rotating the screen To use your system in tablet mode, open your computer, carefully rotate the screen clockwise 180 degrees, and fold the screen down on top of your computer, be sure to use the screen much as you to slowly turn the screen in tablet mode One of the keyboard. When rotating the LCD screen of your computer's features is a convertible display that allows you would a writing tablet.
User Guide
Page 75
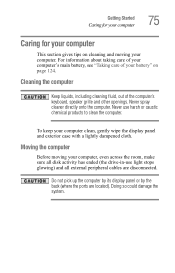
For information about taking care of your computer's main battery, see "Taking care of the computer's keyboard, speaker grille and other openings. To keep your battery" on cleaning and moving your computer, even across the room, make sure all disk activity has ...
For information about taking care of your computer's main battery, see "Taking care of the computer's keyboard, speaker grille and other openings. To keep your battery" on cleaning and moving your computer, even across the room, make sure all disk activity has ...
User Guide
Page 79
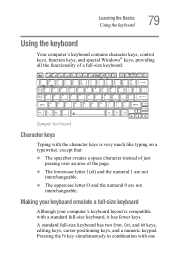
... numeral 1 are not interchangeable. ❖ The uppercase letter O and the numeral 0 are not interchangeable. Making your keyboard emulate a full-size keyboard Although your computer's keyboard layout is compatible with the character keys is very much like typing on a typewriter, except that: ❖ The ...spacebar creates a space character instead of just passing over an area of a full-size keyboard. Pressing the Fn key simultaneously in combination with one A standard full-size keyboard has two Enter, Ctrl, and Alt keys, editing keys, cursor positioning keys, and a numeric...
... numeral 1 are not interchangeable. ❖ The uppercase letter O and the numeral 0 are not interchangeable. Making your keyboard emulate a full-size keyboard Although your computer's keyboard layout is compatible with the character keys is very much like typing on a typewriter, except that: ❖ The ...spacebar creates a space character instead of just passing over an area of a full-size keyboard. Pressing the Fn key simultaneously in combination with one A standard full-size keyboard has two Enter, Ctrl, and Alt keys, editing keys, cursor positioning keys, and a numeric...
User Guide
Page 80
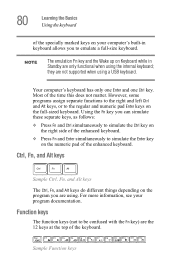
... and Alt keys, or to the regular and numeric pad Enter keys on your program documentation. Most of the enhanced keyboard. ❖ Press Fn and Enter simultaneously to emulate a full-size keyboard. Function keys The function keys (not to simulate the Ctrl key on the right side of the time this does... not matter. NOTE The emulation Fn key and the Wake up on the numeric pad of the enhanced keyboard. Using the Fn key you are only functional when using a USB keyboard. Ctrl, Fn, and Alt keys Ctrl Fn Alt Sample Ctrl, Fn, and Alt keys The Ctrl, Fn, and Alt...
... and Alt keys, or to the regular and numeric pad Enter keys on your program documentation. Most of the enhanced keyboard. ❖ Press Fn and Enter simultaneously to emulate a full-size keyboard. Function keys The function keys (not to simulate the Ctrl key on the right side of the time this does... not matter. NOTE The emulation Fn key and the Wake up on the numeric pad of the enhanced keyboard. Using the Fn key you are only functional when using a USB keyboard. Ctrl, Fn, and Alt keys Ctrl Fn Alt Sample Ctrl, Fn, and Alt keys The Ctrl, Fn, and Alt...
User Guide
Page 81
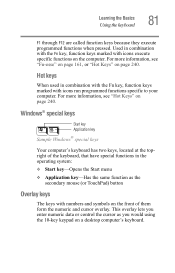
...function keys because they execute programmed functions when pressed. This overlay lets you would using the 10-key keypad on a desktop computer's keyboard. Used in combination with the Fn key, function keys marked with icons run programmed functions specific to your computer. For more information, ...page 240. Windows® special keys Start key Application key Sample Windows® special keys Your computer's keyboard has two keys, located at the topright of the keyboard, that have special functions in combination with the Fn key, function keys marked with icons execute specific ...
...function keys because they execute programmed functions when pressed. This overlay lets you would using the 10-key keypad on a desktop computer's keyboard. Used in combination with the Fn key, function keys marked with icons run programmed functions specific to your computer. For more information, ...page 240. Windows® special keys Start key Application key Sample Windows® special keys Your computer's keyboard has two keys, located at the topright of the keyboard, that have special functions in combination with the Fn key, function keys marked with icons execute specific ...
User Guide
Page 82
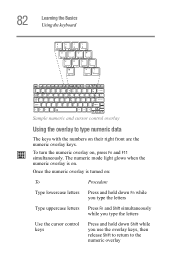
... return to type numeric data The keys with the numbers on their right front are the numeric overlay keys. 82 Learning the Basics Using the keyboard & 7 Home 7 U ∗ 8 8 ( 9 PgUp 9 I O ) 0 ∗ P 4 5 J K End 1 2 M Ins 0 6 - Del . / / Sample numeric and cursor control overlay Using the overlay to the numeric overlay Once the numeric overlay is...
... return to type numeric data The keys with the numbers on their right front are the numeric overlay keys. 82 Learning the Basics Using the keyboard & 7 Home 7 U ∗ 8 8 ( 9 PgUp 9 I O ) 0 ∗ P 4 5 J K End 1 2 M Ins 0 6 - Del . / / Sample numeric and cursor control overlay Using the overlay to the numeric overlay Once the numeric overlay is...
User Guide
Page 83
... Press and hold down Shift while you prefer to the cursor control overlay To turn on the keyboard indicator panel goes out. Starting a program The easiest way to start a program is on the keyboard indicator panel goes out. If you use My Computer or Windows® Explorer. Learning the Basics...to open the program first, you want to work on your desktop The numeric mode light on . The cursor control mode light on the keyboard indicator panel glows when the cursor control overlay is to double-click the name of the file that contains the information you have the following...
... Press and hold down Shift while you prefer to the cursor control overlay To turn on the keyboard indicator panel goes out. Starting a program The easiest way to start a program is on the keyboard indicator panel goes out. If you use My Computer or Windows® Explorer. Learning the Basics...to open the program first, you want to work on your desktop The numeric mode light on . The cursor control mode light on the keyboard indicator panel glows when the cursor control overlay is to double-click the name of the file that contains the information you have the following...

User Guide
Page 140
... switch is on /off switch to your wireless networking device documentation or your wireless communication, slide the wireless on , the wireless indicator light ( ) below the keyboard will be limited. 140 Exploring Your Computer's Features Setting up a wireless connection, refer to the On position.
... switch is on /off switch to your wireless networking device documentation or your wireless communication, slide the wireless on , the wireless indicator light ( ) below the keyboard will be limited. 140 Exploring Your Computer's Features Setting up a wireless connection, refer to the On position.

User Guide
Page 149
... will click and lock the screen in the proper direction. When you complete this task, the screen clicks into place and faces away from the keyboard. Sample rotating the display panel clockwise 180o 4 Flip the display latch so it points toward the back of the display panel. 5 Fold the display panel...
... will click and lock the screen in the proper direction. When you complete this task, the screen clicks into place and faces away from the keyboard. Sample rotating the display panel clockwise 180o 4 Flip the display latch so it points toward the back of the display panel. 5 Fold the display panel...
User Guide
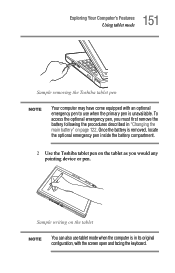
Page 151
... tablet mode when the computer is removed, locate the optional emergency pen inside the battery compartment. 2 Use the Toshiba tablet pen on page 122. 151 Exploring Your Computer's Features Using tablet mode Sample removing the Toshiba tablet pen NOTE Your computer may have come equipped with the screen open and facing the...
... tablet mode when the computer is removed, locate the optional emergency pen inside the battery compartment. 2 Use the Toshiba tablet pen on page 122. 151 Exploring Your Computer's Features Using tablet mode Sample removing the Toshiba tablet pen NOTE Your computer may have come equipped with the screen open and facing the...

User Guide
Page 152
..., you are finished using the tablet, follow the steps below to return the computer to its original configuration: 1 Return the Toshiba tablet pen to its normal position facing the keyboard. 5 Slide the display latch toward the LCD screen. When you to press it (one click). ❖ To launch an... application from the desktop, press the Toshiba tablet pen on the icon (some applications may require you complete this task, the screen...
..., you are finished using the tablet, follow the steps below to return the computer to its original configuration: 1 Return the Toshiba tablet pen to its normal position facing the keyboard. 5 Slide the display latch toward the LCD screen. When you to press it (one click). ❖ To launch an... application from the desktop, press the Toshiba tablet pen on the icon (some applications may require you complete this task, the screen...
User Guide
Page 161
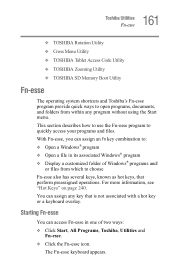
The Fn-esse keyboard appears. 161 Toshiba Utilities Fn-esse ❖ TOSHIBA Rotation Utility ❖ Cross Menu Utility ❖ TOSHIBA Tablet Access Code Utility ❖ TOSHIBA Zooming Utility ❖ TOSHIBA SD Memory Boot Utility Fn-esse The operating system shortcuts and Toshiba's Fn-esse program provide quick ...that is not associated with a hot key or a keyboard overlay. You can access Fn-esse in its associated Windows® program ❖ Display a customized folder of two ways: ❖ Click Start, All Programs, Toshiba, Utilities and Fn-esse. ❖ Click the Fn-...
The Fn-esse keyboard appears. 161 Toshiba Utilities Fn-esse ❖ TOSHIBA Rotation Utility ❖ Cross Menu Utility ❖ TOSHIBA Tablet Access Code Utility ❖ TOSHIBA Zooming Utility ❖ TOSHIBA SD Memory Boot Utility Fn-esse The operating system shortcuts and Toshiba's Fn-esse program provide quick ...that is not associated with a hot key or a keyboard overlay. You can access Fn-esse in its associated Windows® program ❖ Display a customized folder of two ways: ❖ Click Start, All Programs, Toshiba, Utilities and Fn-esse. ❖ Click the Fn-...
User Guide
Page 162
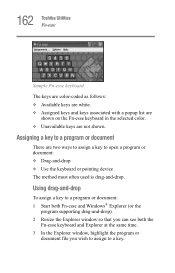
...to assign to open a program or document: ❖ Drag-and-drop ❖ Use the keyboard or pointing device The method most often used is drag-and-drop. 162 Toshiba Utilities Fn-esse Sample Fn-esse keyboard The keys are color-coded as follows: ❖ Available keys are white. ❖ Assigned ...keys and keys associated with a popup list are shown on the Fn-esse keyboard in the selected color. ❖ Unavailable ...
...to assign to open a program or document: ❖ Drag-and-drop ❖ Use the keyboard or pointing device The method most often used is drag-and-drop. 162 Toshiba Utilities Fn-esse Sample Fn-esse keyboard The keys are color-coded as follows: ❖ Available keys are white. ❖ Assigned ...keys and keys associated with a popup list are shown on the Fn-esse keyboard in the selected color. ❖ Unavailable ...

