

User Guide
Page 1
GMAD00278010 03/11 Satellite®/Satellite Pro® C600 Series User's Guide If you need assistance: ❖ Toshiba's Support Web site pcsupport.toshiba.com ❖ Toshiba Customer Support Center Calling within the United States (800) 457-7777 Calling from outside the United States (949) 859-4273 For more information, see "If Something Goes Wrong" on page 162 in this guide.
GMAD00278010 03/11 Satellite®/Satellite Pro® C600 Series User's Guide If you need assistance: ❖ Toshiba's Support Web site pcsupport.toshiba.com ❖ Toshiba Customer Support Center Calling within the United States (800) 457-7777 Calling from outside the United States (949) 859-4273 For more information, see "If Something Goes Wrong" on page 162 in this guide.
User Guide
Page 2
...-up and usage instructions in the applicable user guides and/or manuals enclosed or provided electronically. Model: Satellite®/Satellite Pro® C600 Series Recordable and/or ReWritable Drive(s) and Associated Software Warranty The computer system you may include Recordable and/or... ReWritable optical disc drive(s) and associated software, among the most advanced data storage technologies available. YOU AGREE THAT TOSHIBA,...
...-up and usage instructions in the applicable user guides and/or manuals enclosed or provided electronically. Model: Satellite®/Satellite Pro® C600 Series Recordable and/or ReWritable Drive(s) and Associated Software Warranty The computer system you may include Recordable and/or... ReWritable optical disc drive(s) and associated software, among the most advanced data storage technologies available. YOU AGREE THAT TOSHIBA,...

User Guide
Page 14
... equipment except in the countries/regions in the following table. 14 Approved Countries/Regions for the Intel® Wireless Wi-Fi® Link 5100/5300 Series This equipment is approved to the radio standard by the countries/regions in the following table.
... equipment except in the countries/regions in the following table. 14 Approved Countries/Regions for the Intel® Wireless Wi-Fi® Link 5100/5300 Series This equipment is approved to the radio standard by the countries/regions in the following table.

User Guide
Page 15
.../regions in the following table. Canada USA Approved Countries/Regions for the Intel® Wireless Wi-Fi® Link 622ANHMW and 633ANHMW Series This equipment is approved to the radio standard by the countries/regions in the following table. 15 Paraguay Poland Qatar Russia San Marino ... Spain Switzerland Turkey UAE (United Arab Emirates) USA Vietnam Approved Countries/Regions for the Atheros® Wireless Wi-Fi® Link AR5B95 Series This equipment is approved to the radio standard by the countries/regions in the following table. Do not use this equipment except in the...
.../regions in the following table. Canada USA Approved Countries/Regions for the Intel® Wireless Wi-Fi® Link 622ANHMW and 633ANHMW Series This equipment is approved to the radio standard by the countries/regions in the following table. 15 Paraguay Poland Qatar Russia San Marino ... Spain Switzerland Turkey UAE (United Arab Emirates) USA Vietnam Approved Countries/Regions for the Atheros® Wireless Wi-Fi® Link AR5B95 Series This equipment is approved to the radio standard by the countries/regions in the following table. Do not use this equipment except in the...
User Guide
Page 39
... version (if available), and may not have all program functionality. For more detailed information about your particular model, please visit Toshiba's Web site at the time of contents and the index to perform tasks in Windows® 7. This guide This guide ...(toll charges may use technological measures for a product Series. Introduction This guide 39 NOTE Certain Microsoft® software product(s) included with the various computer software or hardware options, visit Toshiba's Web site at pcsupport.toshiba.com. Your particular model may not include user manuals...
... version (if available), and may not have all program functionality. For more detailed information about your particular model, please visit Toshiba's Web site at the time of contents and the index to perform tasks in Windows® 7. This guide This guide ...(toll charges may use technological measures for a product Series. Introduction This guide 39 NOTE Certain Microsoft® software product(s) included with the various computer software or hardware options, visit Toshiba's Web site at pcsupport.toshiba.com. Your particular model may not include user manuals...
User Guide
Page 41
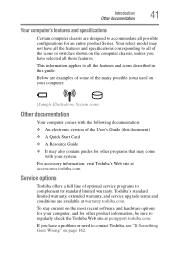
... of the icons or switches shown on the computer chassis, unless you have all the features and specifications corresponding to contact Toshiba, see "If Something Goes Wrong" on your computer: (Sample Illustration) System icons Other documentation Your computer comes with your... computer, and for an entire product Series. Introduction Other documentation 41 Your computer's features and specifications Certain computer chassis are designed to all the features and icons described in...
... of the icons or switches shown on the computer chassis, unless you have all the features and specifications corresponding to contact Toshiba, see "If Something Goes Wrong" on your computer: (Sample Illustration) System icons Other documentation Your computer comes with your... computer, and for an entire product Series. Introduction Other documentation 41 Your computer's features and specifications Certain computer chassis are designed to all the features and icons described in...
User Guide
Page 54
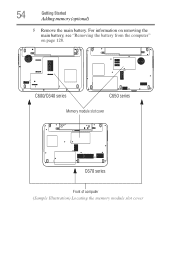
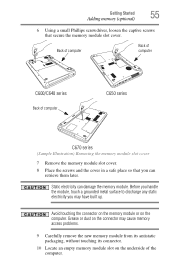
For information on removing the main battery, see "Removing the battery from the computer" on page 128. C600/C640 series C650 series Memory module slot cover C670 series Front of computer (Sample Illustration) Locating the memory module slot cover 54 Getting Started Adding memory (optional) 5 Remove the main battery.
For information on removing the main battery, see "Removing the battery from the computer" on page 128. C600/C640 series C650 series Memory module slot cover C670 series Front of computer (Sample Illustration) Locating the memory module slot cover 54 Getting Started Adding memory (optional) 5 Remove the main battery.
User Guide
Page 55
Back of computer Back of computer C600/C640 series Back of the computer. Getting Started 55 Adding memory (optional) 6 Using a small Phillips screwdriver, loosen the captive screws that you may cause memory access problems. 9 ... the new memory module from its antistatic packaging, without touching its connector. 10 Locate an empty memory module slot on the underside of computer C650 series C670 series (Sample Illustration) Removing the memory module slot cover 7 Remove the memory module slot cover. 8 Place the screws and the cover in a safe place so...
Back of computer Back of computer C600/C640 series Back of the computer. Getting Started 55 Adding memory (optional) 6 Using a small Phillips screwdriver, loosen the captive screws that you may cause memory access problems. 9 ... the new memory module from its antistatic packaging, without touching its connector. 10 Locate an empty memory module slot on the underside of computer C650 series C670 series (Sample Illustration) Removing the memory module slot cover 7 Remove the memory module slot cover. 8 Place the screws and the cover in a safe place so...
User Guide
Page 102
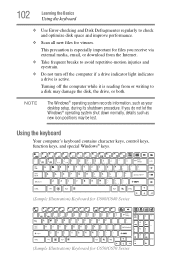
...keyboard Your computer's keyboard contains character keys, control keys, function keys, and special Windows® keys. (Sample Illustration) Keyboard for C600/C640 Series (Sample Illustration) Keyboard for viruses. Turning off the computer if a drive indicator light indicates a drive is reading from or writing to a ... ❖ Take frequent breaks to check and optimize disk space and improve performance. ❖ Scan all new files for C650/C670 Series NOTE The Windows® operating system records information, such as new icon positions may damage the disk, the drive, or both. ...
...keyboard Your computer's keyboard contains character keys, control keys, function keys, and special Windows® keys. (Sample Illustration) Keyboard for C600/C640 Series (Sample Illustration) Keyboard for viruses. Turning off the computer if a drive indicator light indicates a drive is reading from or writing to a ... ❖ Take frequent breaks to check and optimize disk space and improve performance. ❖ Scan all new files for C650/C670 Series NOTE The Windows® operating system records information, such as new icon positions may damage the disk, the drive, or both. ...
User Guide
Page 103
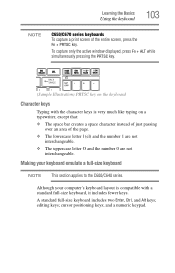
and a numeric keypad. Although your keyboard emulate a full-size keyboard NOTE This section applies to the C600/C640 series. Making your computer's keyboard layout is compatible with the character keys is very much like typing on the keyboard Character keys Typing with a ... of just passing over an area of the entire screen, press the Fn + PRTSC key. Learning the Basics Using the keyboard 103 NOTE C650/C670 series keyboards To capture a print screen of the page. ❖ The lowercase letter l (el) and the number 1 are not interchangeable. ❖ The uppercase letter O ...
and a numeric keypad. Although your keyboard emulate a full-size keyboard NOTE This section applies to the C600/C640 series. Making your computer's keyboard layout is compatible with the character keys is very much like typing on the keyboard Character keys Typing with a ... of just passing over an area of the entire screen, press the Fn + PRTSC key. Learning the Basics Using the keyboard 103 NOTE C650/C670 series keyboards To capture a print screen of the page. ❖ The lowercase letter l (el) and the number 1 are not interchangeable. ❖ The uppercase letter O ...
User Guide
Page 105
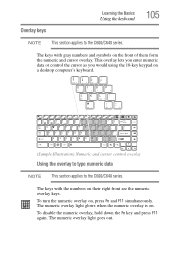
... a desktop computer's keyboard. (Sample Illustration) Numeric and cursor control overlay Using the overlay to type numeric data NOTE This section applies to the C600/C640 series. This overlay lets you enter numeric data or control the cursor as you would using the 10-key keypad on , press Fn and F11 simultaneously... down the Fn key and press F11 again. Overlay keys Learning the Basics Using the keyboard 105 NOTE This section applies to the C600/C640 series.
... a desktop computer's keyboard. (Sample Illustration) Numeric and cursor control overlay Using the overlay to type numeric data NOTE This section applies to the C600/C640 series. This overlay lets you enter numeric data or control the cursor as you would using the 10-key keypad on , press Fn and F11 simultaneously... down the Fn key and press F11 again. Overlay keys Learning the Basics Using the keyboard 105 NOTE This section applies to the C600/C640 series.
User Guide
Page 106
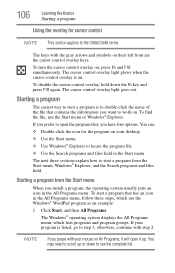
... the program file ❖ Use the Search programs and files field in the Start menu The next three sections explain how to the C600/C640 series. Starting a program from the Start menu, Windows® Explorer, and the Search programs and files field. 106 Learning the Basics Starting a program Using the overlay...
... the program file ❖ Use the Search programs and files field in the Start menu The next three sections explain how to the C600/C640 series. Starting a program from the Start menu, Windows® Explorer, and the Search programs and files field. 106 Learning the Basics Starting a program Using the overlay...

User Guide
Page 123
The computer needs this time to monitor the remaining battery power. C600/C640 series C650/C670 series System indicator lights AC power light/Battery light ON/OFF light (Sample Illustration) Power and battery light locations Determining remaining battery power NOTE Wait a few ...
The computer needs this time to monitor the remaining battery power. C600/C640 series C650/C670 series System indicator lights AC power light/Battery light ON/OFF light (Sample Illustration) Power and battery light locations Determining remaining battery power NOTE Wait a few ...

User Guide
Page 129
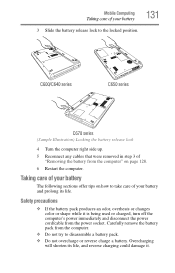
C600/C640 series C650 series C670 series (Sample Illustration) Removing the battery Mobile Computing Changing the main battery 129 5 Slide the battery release lock to release the battery. 7 Pull the discharged battery out of the computer. C600/C640 series C650 series C670 series (Sample Illustration) Unlocking the battery release lock 6 Slide the battery release latch to the unlocked position.
C600/C640 series C650 series C670 series (Sample Illustration) Removing the battery Mobile Computing Changing the main battery 129 5 Slide the battery release lock to release the battery. 7 Pull the discharged battery out of the computer. C600/C640 series C650 series C670 series (Sample Illustration) Unlocking the battery release lock 6 Slide the battery release latch to the unlocked position.

User Guide
Page 130
... battery release lock to do so could possibly result in compliance with reverse polarity. If the battery does not slide into position. C600/C640 series C650 series C670 series (Sample Illustration) Inserting the battery Inserting a charged battery To insert a battery: 1 Wipe the terminals of used battery packs in serious injury. Failure to the...
... battery release lock to do so could possibly result in compliance with reverse polarity. If the battery does not slide into position. C600/C640 series C650 series C670 series (Sample Illustration) Inserting the battery Inserting a charged battery To insert a battery: 1 Wipe the terminals of used battery packs in serious injury. Failure to the...
User Guide
Page 131
C600/C640 series C650 series C670 series (Sample Illustration) Locking the battery release lock 4 Turn the computer right side up. 5 Reconnect any cables that were removed in step 3 of "Removing the battery ...
C600/C640 series C650 series C670 series (Sample Illustration) Locking the battery release lock 4 Turn the computer right side up. 5 Reconnect any cables that were removed in step 3 of "Removing the battery ...

User Guide
Page 142
.... 2 Push the media into the adapter until it locks in place. The Memory card reader may also support other types of media. C600/C640 series C650 series C670 series (Sample Illustration) Inserting memory media When inserting memory media, do not touch the metal contacts. Inserting memory media The following instructions apply to static...
.... 2 Push the media into the adapter until it locks in place. The Memory card reader may also support other types of media. C600/C640 series C650 series C670 series (Sample Illustration) Inserting memory media When inserting memory media, do not touch the metal contacts. Inserting memory media The following instructions apply to static...

User Guide
Page 143
... now, the system displays Safe to try again later. Even when the Windows® message "copying..." If the media can be destroyed. C600/C640 series C650 series C670 series (Sample Illustration) Removing memory media Do not remove memory media while data is unable to prepare the media for the indicator light to release...
... now, the system displays Safe to try again later. Even when the Windows® message "copying..." If the media can be destroyed. C600/C640 series C650 series C670 series (Sample Illustration) Removing memory media Do not remove memory media while data is unable to prepare the media for the indicator light to release...
User Guide
Page 171
... control overlay light, or Fn + F11 to any key to the keyboard itself. Keyboard problems If Something Goes Wrong Keyboard problems 171 NOTE C650/C670 series keyboard To capture a print screen of keyboard.
... control overlay light, or Fn + F11 to any key to the keyboard itself. Keyboard problems If Something Goes Wrong Keyboard problems 171 NOTE C650/C670 series keyboard To capture a print screen of keyboard.
User Guide
Page 200
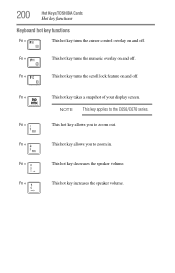
200 Hot Keys/TOSHIBA Cards Hot key functions Keyboard hot key functions Fn + This hot key turns the cursor control overlay on and off. Fn + This hot key allows you to zoom out. Fn + This hot key increases the speaker volume. Fn + This hot key takes a snapshot of your display screen. Fn + This hot key turns the numeric overlay on and off . Fn + This hot key turns the scroll lock feature on and off . NOTE This key applies to zoom in. Fn + This hot key decreases the speaker volume. Fn + This hot key allows you to the C650/C670 series.
200 Hot Keys/TOSHIBA Cards Hot key functions Keyboard hot key functions Fn + This hot key turns the cursor control overlay on and off. Fn + This hot key allows you to zoom out. Fn + This hot key increases the speaker volume. Fn + This hot key takes a snapshot of your display screen. Fn + This hot key turns the numeric overlay on and off . Fn + This hot key turns the scroll lock feature on and off . NOTE This key applies to zoom in. Fn + This hot key decreases the speaker volume. Fn + This hot key allows you to the C650/C670 series.


