
User Manual
Page 25
... environment........46 Keeping yourself comfortable 47 Precautions 50 Setting up your computer 52 Setting up your software 52 Registering your computer with Toshiba ..........53 Adding external devices 54 Connecting the AC adapter 55 Charging the main battery 57 Using the computer for the first time... 58 Turning on the power 59 Using the TouchPad 60 Control buttons 61 Disabling or enabling the TouchPad 61 Installing additional memory (optional 62 Removing a memory module 66 Connecting a mouse 66 Connecting a printer 67 Setting up a printer 68 Turning off the computer 71 Caring ...
... environment........46 Keeping yourself comfortable 47 Precautions 50 Setting up your computer 52 Setting up your software 52 Registering your computer with Toshiba ..........53 Adding external devices 54 Connecting the AC adapter 55 Charging the main battery 57 Using the computer for the first time... 58 Turning on the power 59 Using the TouchPad 60 Control buttons 61 Disabling or enabling the TouchPad 61 Installing additional memory (optional 62 Removing a memory module 66 Connecting a mouse 66 Connecting a printer 67 Setting up a printer 68 Turning off the computer 71 Caring ...

User Manual
Page 29
... can help you 174 Resolving a hardware conflict 174 A plan of action 175 Resolving hardware conflicts on your own .....175 Fixing a problem with Device Manager ...........176 Memory card problems 178
... can help you 174 Resolving a hardware conflict 174 A plan of action 175 Resolving hardware conflicts on your own .....175 Fixing a problem with Device Manager ...........176 Memory card problems 178

User Manual
Page 39
... it can continue to perform at maximum speed. The i.LINK® port, also known as the IEEE 1394 port, allows transfers of large quantities of memory. The PC Card eject button releases PC Cards from overheating so that it to your computer for more information. The USB port lets you to... prevent possible CPU overheating, do not block the cooling vents when the computer is in use. The SD® card slot holds a stamp-size flash memory card with various capacities of data between the computer and an external device, such as your desk. Finding Your Way Around Right side 39 The...
... it can continue to perform at maximum speed. The i.LINK® port, also known as the IEEE 1394 port, allows transfers of large quantities of memory. The PC Card eject button releases PC Cards from overheating so that it to your computer for more information. The USB port lets you to... prevent possible CPU overheating, do not block the cooling vents when the computer is in use. The SD® card slot holds a stamp-size flash memory card with various capacities of data between the computer and an external device, such as your desk. Finding Your Way Around Right side 39 The...

User Manual
Page 44
... of typing the letter printed on page 79. Underside Battery module Battery module release Expansion memory slot cover Modem cover Wi Fi cover The expansion memory slot cover protects the two expansion memory slots where you insert additional memory. When this light is on, pressing an overlay key moves the cursor in the direction...
... of typing the letter printed on page 79. Underside Battery module Battery module release Expansion memory slot cover Modem cover Wi Fi cover The expansion memory slot cover protects the two expansion memory slots where you insert additional memory. When this light is on, pressing an overlay key moves the cursor in the direction...

User Manual
Page 45
The battery pack contains the battery. The release secures the battery to the computer, preventing it from dislodging from the computer case. For information about replacing the battery, see "Changing the main battery" on page 62 for detailed information. Finding Your Way Around Underside 45 See "Installing additional memory (optional)" on page 111.
The battery pack contains the battery. The release secures the battery to the computer, preventing it from dislodging from the computer case. For information about replacing the battery, see "Changing the main battery" on page 62 for detailed information. Finding Your Way Around Underside 45 See "Installing additional memory (optional)" on page 111.

User Manual
Page 52
... external power or to charge the battery, you must complete all set up your software. 1 From the welcome screen, click Next to , a mouse, keyboard, printer, memory, and PC cards. 52 Getting Started Setting up your computer Setting up your computer TECHNICAL NOTE: You must attach the AC adapter. To use it...
... external power or to charge the battery, you must complete all set up your software. 1 From the welcome screen, click Next to , a mouse, keyboard, printer, memory, and PC cards. 52 Getting Started Setting up your computer Setting up your computer TECHNICAL NOTE: You must attach the AC adapter. To use it...

User Manual
Page 54
Adding external devices NOTE Before adding external devices, Toshiba recommends setting up your computer's modem must be connected to a voice-grade telephone line. 54 Getting Started Setting up your computer NOTE To register online, your software first. Before starting to : ❖ Add more memory (see "Installing additional memory (optional)" on page 62) ❖ Connect...
Adding external devices NOTE Before adding external devices, Toshiba recommends setting up your computer's modem must be connected to a voice-grade telephone line. 54 Getting Started Setting up your computer NOTE To register online, your software first. Before starting to : ❖ Add more memory (see "Installing additional memory (optional)" on page 62) ❖ Connect...

User Manual
Page 62
...or Hibernation mode, data will become hot. There are two memory slots. Your system may want to increase the computer's memory if you use the computer for other product information, be used to regularly check the Toshiba Web site at pcsupport.toshiba.com). NOTE The Fn + F9 shortcut can be sure... to enable or disable the TouchPad (see "Hot Keys" on page 199). If you replace them. Your computer comes with enough memory to room temperature before you use ...
...or Hibernation mode, data will become hot. There are two memory slots. Your system may want to increase the computer's memory if you use the computer for other product information, be used to regularly check the Toshiba Web site at pcsupport.toshiba.com). NOTE The Fn + F9 shortcut can be sure... to enable or disable the TouchPad (see "Hot Keys" on page 199). If you replace them. Your computer comes with enough memory to room temperature before you use ...

User Manual
Page 63
... off the computer. 2 Unplug and remove any cables connected to the computer. 3 Close the display panel and turn the computer upside down " on page 94. Memory slot cover Base of a Satellite P10/P15 series computer 4 Using a standard Phillips no . 1 screwdriver to use a standard Phillips no. 1 screwdriver that secure the expansion...
... off the computer. 2 Unplug and remove any cables connected to the computer. 3 Close the display panel and turn the computer upside down " on page 94. Memory slot cover Base of a Satellite P10/P15 series computer 4 Using a standard Phillips no . 1 screwdriver to use a standard Phillips no. 1 screwdriver that secure the expansion...

User Manual
Page 64
... connector down at an angle and press down until the clips snap into position. 64 Getting Started Installing additional memory (optional) Removing the memory slot cover 5 Put the screws and the cover in place. Before you handle the module, touch a grounded metal surface to touch its gold ...connector bar (on the side you insert into the computer). 6 Remove the memory module from its antistatic packaging. 7 Holding the memory module by its edges so that you may have built up. The memory module should be careful not to discharge any static electricity you can damage the...
... connector down at an angle and press down until the clips snap into position. 64 Getting Started Installing additional memory (optional) Removing the memory slot cover 5 Put the screws and the cover in place. Before you handle the module, touch a grounded metal surface to touch its gold ...connector bar (on the side you insert into the computer). 6 Remove the memory module from its antistatic packaging. 7 Holding the memory module by its edges so that you may have built up. The memory module should be careful not to discharge any static electricity you can damage the...

User Manual
Page 65
...Control Panel and click Performance and Maintenance. Click System to view the recognized memory. 13 If the computer does not recognize the memory, shut down the computer, remove the memory slot cover, and make sure the memory module is seated properly, as described in step 8. Grease or dust on ...the connectors may cause memory access problems. 9 Replace the expansion memory slot cover. 10 Replace the screws...
...Control Panel and click Performance and Maintenance. Click System to view the recognized memory. 13 If the computer does not recognize the memory, shut down the computer, remove the memory slot cover, and make sure the memory module is seated properly, as described in step 8. Grease or dust on ...the connectors may cause memory access problems. 9 Replace the expansion memory slot cover. 10 Replace the screws...

User Manual
Page 66
...10 through 6 in "Installing additional memory (optional)" on page 62. To connect a USB mouse, plug the mouse cable into one of the TouchPad, the computer's built-in pointing device. Removing the memory module 3 Gently pull the memory module diagonally to use a mouse ...instead of the USB ports. 66 Getting Started Installing additional memory (optional) Removing a memory module 1 Follow steps 1 through 12 in "Installing additional memory (optional)" on page 62. 2 Gently...
...10 through 6 in "Installing additional memory (optional)" on page 62. To connect a USB mouse, plug the mouse cable into one of the TouchPad, the computer's built-in pointing device. Removing the memory module 3 Gently pull the memory module diagonally to use a mouse ...instead of the USB ports. 66 Getting Started Installing additional memory (optional) Removing a memory module 1 Follow steps 1 through 12 in "Installing additional memory (optional)" on page 62. 2 Gently...

User Manual
Page 67
... cable. To achieve the connection, you need a suitable USB cable, which may come with your printer is an IEEE 1284 cable. Getting Started Installing additional memory (optional) 67 Connecting a printer Your printer documentation may require you to install the printer software before physically connecting the printer to your printer. If one...
... cable. To achieve the connection, you need a suitable USB cable, which may come with your printer is an IEEE 1284 cable. Getting Started Installing additional memory (optional) 67 Connecting a printer Your printer documentation may require you to install the printer software before physically connecting the printer to your printer. If one...
User Manual
Page 71
... you have work in progress and are not connected to a network, use the Windows® Standby or Hibernate commands to save your system settings to memory so that, when you turn off your computer when you left off ) to print a test page. 12 If your program, you to fully charge the...
... you have work in progress and are not connected to a network, use the Windows® Standby or Hibernate commands to save your system settings to memory so that, when you turn off your computer when you left off ) to print a test page. 12 If your program, you to fully charge the...
User Manual
Page 75
... Basics This chapter lists some computing tips and provides important information about basic features. You will lose all unsaved work temporarily stays in the computer's memory until you save feature which you when the battery is running low. HINT: Some programs have an automatic save it to warn you can be...
... Basics This chapter lists some computing tips and provides important information about basic features. You will lose all unsaved work temporarily stays in the computer's memory until you save feature which you when the battery is running low. HINT: Some programs have an automatic save it to warn you can be...
User Manual
Page 95
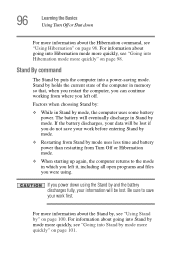
...which you were using. Factors when choosing Hibernation mode: ❖ While in Hibernation mode, the computer uses no battery power. ❖ Because the state of memory. ❖ When starting up hibernation "Hibernation command" on page 95 and "Using Hibernation" on the hard disk, no data is lost if the battery discharges... Hibernation mode uses a little more time and battery power than restoring it from the hard disk instead of the system is being retrieved from memory. For more information about setting up again, the computer returns to the state in which you left it.
...which you were using. Factors when choosing Hibernation mode: ❖ While in Hibernation mode, the computer uses no battery power. ❖ Because the state of memory. ❖ When starting up hibernation "Hibernation command" on page 95 and "Using Hibernation" on the hard disk, no data is lost if the battery discharges... Hibernation mode uses a little more time and battery power than restoring it from the hard disk instead of the system is being retrieved from memory. For more information about setting up again, the computer returns to the state in which you left it.
User Manual
Page 96
... you power down For more information about going into Hibernation mode more quickly, see "Using Hibernation" on page 98. Be sure to the mode in memory so that, when you restart the computer, you can continue working from Stand by " on page 101. 96 Learning the Basics Using Turn Off or...
... you power down For more information about going into Hibernation mode more quickly, see "Using Hibernation" on page 98. Be sure to the mode in memory so that, when you restart the computer, you can continue working from Stand by " on page 101. 96 Learning the Basics Using Turn Off or...
User Manual
Page 100
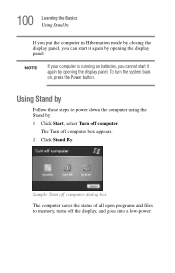
... in Hibernation mode by closing the display panel, you cannot start it again by opening the display panel. Using Stand by Follow these steps to memory, turns off computer box appears. 2 Click Stand By.
... in Hibernation mode by closing the display panel, you cannot start it again by opening the display panel. Using Stand by Follow these steps to memory, turns off computer box appears. 2 Click Stand By.
User Manual
Page 104
... than a month) the battery may vary depending on applications, power management settings and features utilized. The RTC battery powers the RTC memory, which stores your system configuration settings and the current time and date for up to stay current on the most recent software and...continuously operated on usage. In addition, the computer has an internal real-time clock (RTC) battery. NOTE For optimum DVD performance, Toshiba recommends that the battery maintains its ability to perform at maximum capacity and will lose its maximum capacity, operate the computer on battery power...
... than a month) the battery may vary depending on applications, power management settings and features utilized. The RTC battery powers the RTC memory, which stores your system configuration settings and the current time and date for up to stay current on the most recent software and...continuously operated on usage. In addition, the computer has an internal real-time clock (RTC) battery. NOTE For optimum DVD performance, Toshiba recommends that the battery maintains its ability to perform at maximum capacity and will lose its maximum capacity, operate the computer on battery power...

User Manual
Page 164
... Card slot and supports Type II PC Cards. You can connect an external USB-compatible keyboard and a USB-compatible mouse to the PCMCIA (Personal Computer Memory Card International Association) standard. Even if your PC Card comes with your notebook as a translator between the PC Card and the computer, and that makes...
... Card slot and supports Type II PC Cards. You can connect an external USB-compatible keyboard and a USB-compatible mouse to the PCMCIA (Personal Computer Memory Card International Association) standard. Even if your PC Card comes with your notebook as a translator between the PC Card and the computer, and that makes...


