User Manual
Page 52
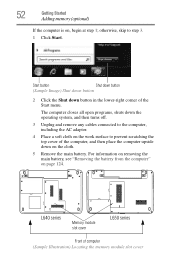
... 1; otherwise, skip to the computer, including the AC adaptor. 4 Place a soft cloth on the cloth. 5 Remove the main battery. Start button Shut down button (Sample Image) Shut down button 2 Click the Shut down on the work surface to prevent scratching the top cover of the computer, and then place the computer...
... 1; otherwise, skip to the computer, including the AC adaptor. 4 Place a soft cloth on the cloth. 5 Remove the main battery. Start button Shut down button (Sample Image) Shut down button 2 Click the Shut down on the work surface to prevent scratching the top cover of the computer, and then place the computer...
User Manual
Page 59
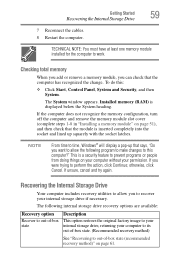
... your computer to its out-of-box state. (Recommended recovery method) See "Recovering to out-of -box state Description This option restores the original factory image to perform the action, click Continue; Recovering the Internal Storage Drive Your computer includes recovery utilities to allow the following internal storage drive recovery options...
... your computer to its out-of-box state. (Recommended recovery method) See "Recovering to out-of -box state Description This option restores the original factory image to perform the action, click Continue; Recovering the Internal Storage Drive Your computer includes recovery utilities to allow the following internal storage drive recovery options...
User Manual
Page 60
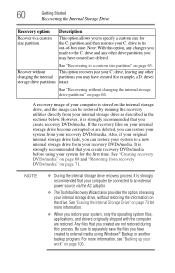
...more information. ❖ When you restore your computer is strongly recommended that you created are restored. Note: With this process. A recovery image of your system, only the operating system files, applications, and drivers originally shipped with the computer are not restored during this option, any...partitions you may have created to external media using your C: drive to an external power source via the AC adaptor. ❖ The Toshiba Recovery Wizard also provides the option of -box state. If the recovery files on the drive. Also, if your original internal storage...
...more information. ❖ When you restore your computer is strongly recommended that you created are restored. Note: With this process. A recovery image of your system, only the operating system files, applications, and drivers originally shipped with the computer are not restored during this option, any...partitions you may have created to external media using your C: drive to an external power source via the AC adaptor. ❖ The Toshiba Recovery Wizard also provides the option of -box state. If the recovery files on the drive. Also, if your original internal storage...
User Manual
Page 61
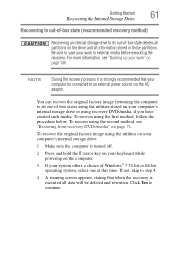
To recover the original factory image using the utilities on your computer's internal storage drive: 1 Make sure the computer is turned off. 2 Press and hold the 0 (zero) key on your keyboard ... internal storage drive to its out-of-box state) using recovery DVDs/media, if you have created such media. You can recover the original factory image (returning the computer to its out-of Windows® 7 32-bit or 64-bit operating system, select one at this time. To recover using the...
To recover the original factory image using the utilities on your computer's internal storage drive: 1 Make sure the computer is turned off. 2 Press and hold the 0 (zero) key on your keyboard ... internal storage drive to its out-of-box state) using recovery DVDs/media, if you have created such media. You can recover the original factory image (returning the computer to its out-of Windows® 7 32-bit or 64-bit operating system, select one at this time. To recover using the...
User Manual
Page 62
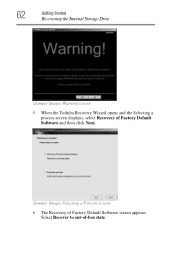
Select Recover to out-of Factory Default Software screen appears. 62 Getting Started Recovering the Internal Storage Drive (Sample Image) Warning screen 5 When the Toshiba Recovery Wizard opens and the Selecting a process screen displays, select Recovery of Factory Default Software and then click Next. (Sample Image) Selecting a Process screen 6 The Recovery of -box state.
Select Recover to out-of Factory Default Software screen appears. 62 Getting Started Recovering the Internal Storage Drive (Sample Image) Warning screen 5 When the Toshiba Recovery Wizard opens and the Selecting a process screen displays, select Recovery of Factory Default Software and then click Next. (Sample Image) Selecting a Process screen 6 The Recovery of -box state.
User Manual
Page 63
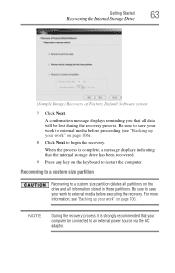
... your work" on page 106). 8 Click Next to an external power source via the AC adaptor. Getting Started 63 Recovering the Internal Storage Drive (Sample Image) Recovery of Factory Default Software screen 7 Click Next. A confirmation message displays reminding you that your work to external media before executing the recovery.
... your work" on page 106). 8 Click Next to an external power source via the AC adaptor. Getting Started 63 Recovering the Internal Storage Drive (Sample Image) Recovery of Factory Default Software screen 7 Click Next. A confirmation message displays reminding you that your work to external media before executing the recovery.
User Manual
Page 64
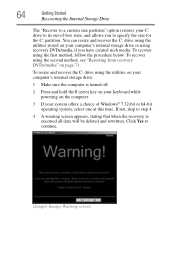
... the recovery is turned off. 2 Press and hold the 0 (zero) key on your keyboard while powering on the computer. 3 If your C: drive to continue. (Sample Image) Warning screen
... the recovery is turned off. 2 Press and hold the 0 (zero) key on your keyboard while powering on the computer. 3 If your C: drive to continue. (Sample Image) Warning screen
User Manual
Page 65
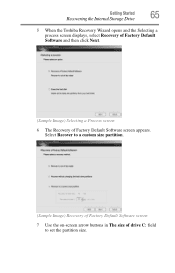
Select Recover to set the partition size. Getting Started 65 Recovering the Internal Storage Drive 5 When the Toshiba Recovery Wizard opens and the Selecting a process screen displays, select Recovery of Factory Default Software and then click Next. (Sample Image) Selecting a Process screen 6 The Recovery of drive C: field to a custom size partition. (Sample Image) Recovery of Factory Default Software screen 7 Use the on-screen arrow buttons in The size of Factory Default Software screen appears.
Select Recover to set the partition size. Getting Started 65 Recovering the Internal Storage Drive 5 When the Toshiba Recovery Wizard opens and the Selecting a process screen displays, select Recovery of Factory Default Software and then click Next. (Sample Image) Selecting a Process screen 6 The Recovery of drive C: field to a custom size partition. (Sample Image) Recovery of Factory Default Software screen 7 Use the on-screen arrow buttons in The size of Factory Default Software screen appears.

User Manual
Page 67
Click Yes to continue. (Sample Image) Warning screen 5 When the Toshiba Recovery Wizard opens and the Selecting a process screen displays, select Recovery of Factory Default Software and then click Next. (Sample Image) Selecting a Process screen Getting Started 67 Recovering the Internal Storage Drive 4 A warning screen appears stating that when the recovery is executed all data will be deleted and rewritten.
Click Yes to continue. (Sample Image) Warning screen 5 When the Toshiba Recovery Wizard opens and the Selecting a process screen displays, select Recovery of Factory Default Software and then click Next. (Sample Image) Selecting a Process screen Getting Started 67 Recovering the Internal Storage Drive 4 A warning screen appears stating that when the recovery is executed all data will be deleted and rewritten.
User Manual
Page 68
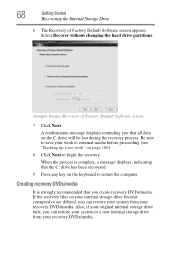
... become corrupted or are deleted, you that all data on the keyboard to restart the computer. Select Recover without changing the hard drive partitions. (Sample Image) Recovery of Factory Default Software screen appears. 68 Getting Started Recovering the Internal Storage Drive 6 The Recovery of Factory Default Software screen 7 Click Next. When...
... become corrupted or are deleted, you that all data on the keyboard to restart the computer. Select Recover without changing the hard drive partitions. (Sample Image) Recovery of Factory Default Software screen appears. 68 Getting Started Recovering the Internal Storage Drive 6 The Recovery of Factory Default Software screen 7 Click Next. When...
User Manual
Page 69
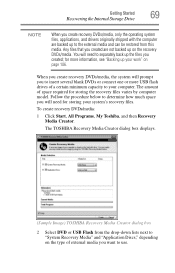
... flash drives of space required for storing the recovery files varies by computer model. To create recovery DVDs/media: 1 Click Start, All Programs, My Toshiba, and then Recovery Media Creator. The TOSHIBA Recovery Media Creator dialog box displays. (Sample Image) TOSHIBA Recovery Media Creator dialog box 2 Select DVD or USB Flash from this media.
... flash drives of space required for storing the recovery files varies by computer model. To create recovery DVDs/media: 1 Click Start, All Programs, My Toshiba, and then Recovery Media Creator. The TOSHIBA Recovery Media Creator dialog box displays. (Sample Image) TOSHIBA Recovery Media Creator dialog box 2 Select DVD or USB Flash from this media.
User Manual
Page 72
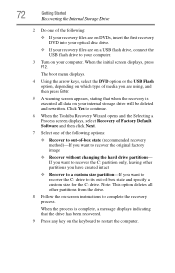
...displays. 4 Using the arrow keys, select the DVD option or the USB Flash option, depending on -screen instructions to recover the original factory image ❖ Recover without changing the hard drive partitions- If you want to recover the C: partition only, leaving other partitions from the drive. 8... Follow the on which type of media you want to recover the C: drive to restart the computer. Click Yes to continue. 6 When the Toshiba Recovery Wizard opens and the Selecting a Process screen displays, select Recovery of Factory Default Software and then click Next. 7 Select one of -box ...
...displays. 4 Using the arrow keys, select the DVD option or the USB Flash option, depending on -screen instructions to recover the original factory image ❖ Recover without changing the hard drive partitions- If you want to recover the C: partition only, leaving other partitions from the drive. 8... Follow the on which type of media you want to recover the C: drive to restart the computer. Click Yes to continue. 6 When the Toshiba Recovery Wizard opens and the Selecting a Process screen displays, select Recovery of Factory Default Software and then click Next. 7 Select one of -box ...
User Manual
Page 74
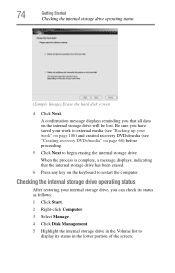
... on page 68) before proceeding. 5 Click Next to begin erasing the internal storage drive. 74 Getting Started Checking the internal storage drive operating status (Sample Image) Erase the hard disk screen 4 Click Next. A confirmation message displays reminding you can check its status as follows: 1 Click Start. 2 Right-click Computer. 3 Select Manage...
... on page 68) before proceeding. 5 Click Next to begin erasing the internal storage drive. 74 Getting Started Checking the internal storage drive operating status (Sample Image) Erase the hard disk screen 4 Click Next. A confirmation message displays reminding you can check its status as follows: 1 Click Start. 2 Right-click Computer. 3 Select Manage...
User Manual
Page 81
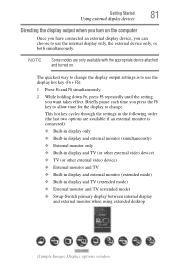
... (extended mode) ❖ External monitor and TV (extended mode) ❖ Swap-Switch primary display between internal display and external monitor when using extended desktop (Sample Image) Display options window The quickest way to change the display output settings is connected): ❖ Built-in display only ❖ Built-in display and external...
... (extended mode) ❖ External monitor and TV (extended mode) ❖ Swap-Switch primary display between internal display and external monitor when using extended desktop (Sample Image) Display options window The quickest way to change the display output settings is connected): ❖ Built-in display only ❖ Built-in display and external...
User Manual
Page 83
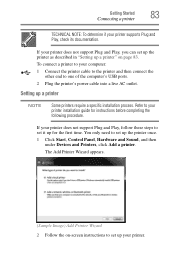
.... You only need to one of the computer's USB ports. 2 Plug the printer's power cable into a live AC outlet. The Add Printer Wizard appears. (Sample Image) Add Printer Wizard 2 Follow the on page 83.
.... You only need to one of the computer's USB ports. 2 Plug the printer's power cable into a live AC outlet. The Add Printer Wizard appears. (Sample Image) Add Printer Wizard 2 Follow the on page 83.
User Manual
Page 86
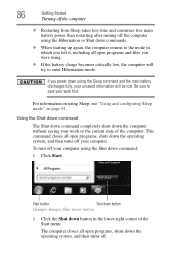
... Shut down command completely shuts down the computer without saving your unsaved information will try to enter Hibernation mode. Start button Shut down button (Sample Image) Shut down button 2 Click the Shut down button in which you left it, including all open programs and files you power down using the Sleep...
... Shut down command completely shuts down the computer without saving your unsaved information will try to enter Hibernation mode. Start button Shut down button (Sample Image) Shut down button 2 Click the Shut down button in which you left it, including all open programs and files you power down using the Sleep...
User Manual
Page 87
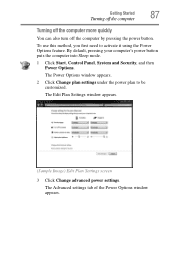
... window appears. 2 Click Change plan settings under the power plan to activate it using the Power Options feature. The Edit Plan Settings window appears. (Sample Image) Edit Plan Settings screen 3 Click Change advanced power settings. The Advanced settings tab of the Power Options window appears. Getting Started 87 Turning off the...
... window appears. 2 Click Change plan settings under the power plan to activate it using the Power Options feature. The Edit Plan Settings window appears. (Sample Image) Edit Plan Settings screen 3 Click Change advanced power settings. The Advanced settings tab of the Power Options window appears. Getting Started 87 Turning off the...
User Manual
Page 88
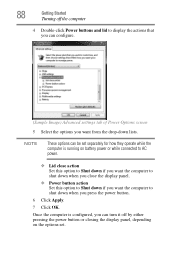
... running on the options set. NOTE These options can be set separately for how they operate while the computer is configured, you can configure. (Sample Image) Advanced settings tab of Power Options screen 5 Select the options you want the computer to display the actions that you can turn it off by...
... running on the options set. NOTE These options can be set separately for how they operate while the computer is configured, you can configure. (Sample Image) Advanced settings tab of Power Options screen 5 Select the options you want the computer to display the actions that you can turn it off by...

User Manual
Page 89
... the lower-right corner of time after which the computer automatically goes into Hibernation mode by closing the display panel. Hibernate Start button Arrow (Sample Image) Shut down button in the pop-up again, press the power button until the ON/OFF light glows white. Getting Started 89 Turning off...
... the lower-right corner of time after which the computer automatically goes into Hibernation mode by closing the display panel. Hibernate Start button Arrow (Sample Image) Shut down button in the pop-up again, press the power button until the ON/OFF light glows white. Getting Started 89 Turning off...
User Manual
Page 90
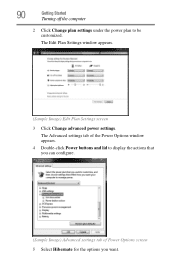
The Advanced settings tab of the Power Options window appears. 4 Double-click Power buttons and lid to be customized. 90 Getting Started Turning off the computer 2 Click Change plan settings under the power plan to display the actions that you can configure. (Sample Image) Advanced settings tab of Power Options screen 5 Select Hibernate for the options you want. The Edit Plan Settings window appears. (Sample Image) Edit Plan Settings screen 3 Click Change advanced power settings.
The Advanced settings tab of the Power Options window appears. 4 Double-click Power buttons and lid to be customized. 90 Getting Started Turning off the computer 2 Click Change plan settings under the power plan to display the actions that you can configure. (Sample Image) Advanced settings tab of Power Options screen 5 Select Hibernate for the options you want. The Edit Plan Settings window appears. (Sample Image) Edit Plan Settings screen 3 Click Change advanced power settings.


