
User Manual
Page 10
...management strategies that focus on the market in or recycle your local government for our products. For information on the battery. 10 EU Declaration of Conformity TOSHIBA declares that this product conforms to the following Standards: Supplementary *The product complies with a black bar symbol. If... the product's battery or accumulator contains more than the specified values of the Low Voltage Directive 73/23/EEC, the EMC...
...management strategies that focus on the market in or recycle your local government for our products. For information on the battery. 10 EU Declaration of Conformity TOSHIBA declares that this product conforms to the following Standards: Supplementary *The product complies with a black bar symbol. If... the product's battery or accumulator contains more than the specified values of the Low Voltage Directive 73/23/EEC, the EMC...
User Manual
Page 22
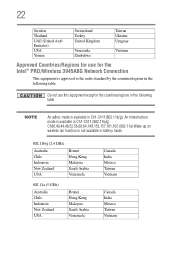
... to the radio standard by the countries/regions in the following table. Do not use for use this equipment except in the countries/regions in battery mode. 802.11b/g (2.4 GHz) Australia Chile Indonesia New Zealand USA Brunei Hong Kong Malaysia Saudi Arabia Venezuela 802.11a (5 GHz) Australia Chile Indonesia New Zealand...
... to the radio standard by the countries/regions in the following table. Do not use for use this equipment except in the countries/regions in battery mode. 802.11b/g (2.4 GHz) Australia Chile Indonesia New Zealand USA Brunei Hong Kong Malaysia Saudi Arabia Venezuela 802.11a (5 GHz) Australia Chile Indonesia New Zealand...
User Manual
Page 30
Contents Introduction 37 This guide 39 Safety icons 40 Other icons used 40 Your computer's features and specifications ....41 Other documentation 41 Service options 41 Chapter 1: Getting Started 42 Selecting a place to work 42 Setting up a work environment 42 Keeping yourself comfortable 43 Precautions 43 Important information on your computer's cooling fan 45 Setting up your computer 45 Connecting to a power source 46 Charging the main battery 48 Using the computer for the first time 49 Opening the display panel 49 30
Contents Introduction 37 This guide 39 Safety icons 40 Other icons used 40 Your computer's features and specifications ....41 Other documentation 41 Service options 41 Chapter 1: Getting Started 42 Selecting a place to work 42 Setting up a work environment 42 Keeping yourself comfortable 43 Precautions 43 Important information on your computer's cooling fan 45 Setting up your computer 45 Connecting to a power source 46 Charging the main battery 48 Using the computer for the first time 49 Opening the display panel 49 30

User Manual
Page 33
... Caring for optical discs 107 Toshiba's online resources 107 Chapter 3: Mobile Computing 108 Toshiba's energy-saver design 108 Running the computer on battery power 109 Battery Notice 109 Power management 110 Using additional batteries 110 Charging batteries 110 Charging the main battery 111 Charging the RTC battery 111 Monitoring main battery power 112 Determining remaining battery power 113 What to...
... Caring for optical discs 107 Toshiba's online resources 107 Chapter 3: Mobile Computing 108 Toshiba's energy-saver design 108 Running the computer on battery power 109 Battery Notice 109 Power management 110 Using additional batteries 110 Charging batteries 110 Charging the main battery 111 Charging the RTC battery 111 Monitoring main battery power 112 Determining remaining battery power 113 What to...
User Manual
Page 35
...Windows® operating system can help you 166 Fixing a problem with Device Manager 167 Checking device properties 167 Memory problems 168 Power and the batteries 168 Keyboard problems 170 Display problems 170 Disk or storage drive problems 172 Error-checking 172 Optical drive problems 174 Sound system problems 175 Printer...computing habits 179 Data and system configuration backup in the Windows® operating system 180 If you need further assistance 184 Before you contact Toshiba 184 Contacting Toshiba 184 Other Toshiba Internet Web sites 185 Toshiba's worldwide offices 185
...Windows® operating system can help you 166 Fixing a problem with Device Manager 167 Checking device properties 167 Memory problems 168 Power and the batteries 168 Keyboard problems 170 Display problems 170 Disk or storage drive problems 172 Error-checking 172 Optical drive problems 174 Sound system problems 175 Printer...computing habits 179 Data and system configuration backup in the Windows® operating system 180 If you need further assistance 184 Before you contact Toshiba 184 Contacting Toshiba 184 Other Toshiba Internet Web sites 185 Toshiba's worldwide offices 185

User Manual
Page 37
...your work and entertainment can wake the computer from Sleep mode by pressing the power button. Toshiba is set to enter the low-power Sleep mode which shuts down the system and display ...will provide the most stable operating environment and optimum system performance for energy efficiency. Introduction Welcome to the world of the Toshiba User's Guide for more information on the computer and the following information applies. Your computer model may be ENERGY STAR®...power management settings to meet the latest ENERGY STAR® guidelines for both AC power and battery modes.
...your work and entertainment can wake the computer from Sleep mode by pressing the power button. Toshiba is set to enter the low-power Sleep mode which shuts down the system and display ...will provide the most stable operating environment and optimum system performance for energy efficiency. Introduction Welcome to the world of the Toshiba User's Guide for more information on the computer and the following information applies. Your computer model may be ENERGY STAR®...power management settings to meet the latest ENERGY STAR® guidelines for both AC power and battery modes.
User Manual
Page 43
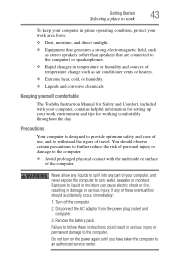
... the computer to rain, water, seawater or moisture. If any part of personal injury or damage to an authorized service center. Remove the battery pack. Keeping yourself comfortable The Toshiba Instruction Manual for Safety and Comfort, included with the underside or surface of travel. Exposure to the computer. Turn off the computer...
... the computer to rain, water, seawater or moisture. If any part of personal injury or damage to an authorized service center. Remove the battery pack. Keeping yourself comfortable The Toshiba Instruction Manual for Safety and Comfort, included with the underside or surface of travel. Exposure to the computer. Turn off the computer...
User Manual
Page 45
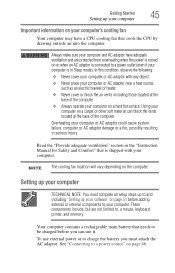
...keyboard, printer, and memory. Read the "Provide adequate ventilation" section in serious injury. To use it. See "Connecting to charge the battery you can block the vents located at the base of the computer. Using your computer's cooling fan Your computer may have adequate ventilation and ...soft material can use external power or to a power source" on your computer on the computer. Your computer contains a rechargeable main battery that is connected to your computer Important information on page 46. Always make sure your computer and AC adaptor have a CPU cooling ...
...keyboard, printer, and memory. Read the "Provide adequate ventilation" section in serious injury. To use it. See "Connecting to charge the battery you can block the vents located at the base of the computer. Using your computer's cooling fan Your computer may have adequate ventilation and ...soft material can use external power or to a power source" on your computer on the computer. Your computer contains a rechargeable main battery that is connected to your computer Important information on page 46. Always make sure your computer and AC adaptor have a CPU cooling ...

User Manual
Page 46
...and AC adaptor to connect the computer to a live electrical outlet, or to operate. Failure to the computer. TOSHIBA assumes no liability for any damage caused by TOSHIBA to avoid any risk of fire or other damage to do so may have been provided with your computer carefully ...socket. Always confirm that may result in a fire or electric shock, possibly resulting in serious injury. Always use the TOSHIBA AC adaptor that was provided with your computer and the TOSHIBA Battery Charger (that the power plug (and extension cable plug if used) has been fully inserted into the socket, to...
...and AC adaptor to connect the computer to a live electrical outlet, or to operate. Failure to the computer. TOSHIBA assumes no liability for any damage caused by TOSHIBA to avoid any risk of fire or other damage to do so may have been provided with your computer carefully ...socket. Always confirm that may result in a fire or electric shock, possibly resulting in serious injury. Always use the TOSHIBA AC adaptor that was provided with your computer and the TOSHIBA Battery Charger (that the power plug (and extension cable plug if used) has been fully inserted into the socket, to...

User Manual
Page 48
... charged for system operation and will be completely charged and ready to recharge. Your computer's Power Options utility can damage the battery. After that reduces the power required for the first time, avoid leaving the computer plugged in the AC adaptor NOTE If the AC power light ...flashes amber during charging, either the main battery is malfunctioning, or it is not receiving correct input from the AC power supply. Disconnect the AC power cord/cable and remove the main...
... charged for system operation and will be completely charged and ready to recharge. Your computer's Power Options utility can damage the battery. After that reduces the power required for the first time, avoid leaving the computer plugged in the AC adaptor NOTE If the AC power light ...flashes amber during charging, either the main battery is malfunctioning, or it is not receiving correct input from the AC power supply. Disconnect the AC power cord/cable and remove the main...
User Manual
Page 49
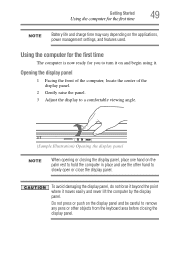
... not force it beyond the point where it . Using the computer for the first time The computer is now ready for the first time NOTE Battery life and charge time may vary depending on the applications, power management settings, and features used. Getting Started 49 Using the computer for you to...
... not force it beyond the point where it . Using the computer for the first time The computer is now ready for the first time NOTE Battery life and charge time may vary depending on the applications, power management settings, and features used. Getting Started 49 Using the computer for you to...
User Manual
Page 50
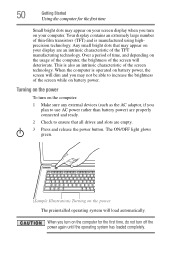
...technology. Turning on the power To turn on your display are an intrinsic characteristic of the screen technology. When the computer is operated on battery power, the screen will dim and you turn on the computer for the first time Small bright dots may appear on your screen display...adaptor, if you plan to increase the brightness of the screen will load automatically. The ON/OFF light glows green. (Sample Illustration) Turning on battery power. Over a period of time, and depending on the usage of the computer, the brightness of the screen while on the power The ...
...technology. Turning on the power To turn on your display are an intrinsic characteristic of the screen technology. When the computer is operated on battery power, the screen will dim and you turn on the computer for the first time Small bright dots may appear on your screen display...adaptor, if you plan to increase the brightness of the screen will load automatically. The ON/OFF light glows green. (Sample Illustration) Turning on battery power. Over a period of time, and depending on the usage of the computer, the brightness of the screen while on the power The ...
User Manual
Page 53
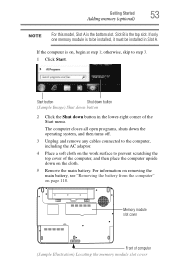
... then turns off. 3 Unplug and remove any cables connected to the computer, including the AC adaptor. 4 Place a soft cloth on the cloth. 5 Remove the main battery. otherwise, skip to prevent scratching the top cover of the computer, and then place the computer upside down button in Slot A. Getting Started 53 Adding..., it must be installed in the lower-right corner of computer (Sample Illustration) Locating the memory module slot cover For information on removing the main battery, see "Removing the battery from the computer" on , begin at step 1;
... then turns off. 3 Unplug and remove any cables connected to the computer, including the AC adaptor. 4 Place a soft cloth on the cloth. 5 Remove the main battery. otherwise, skip to prevent scratching the top cover of the computer, and then place the computer upside down button in Slot A. Getting Started 53 Adding..., it must be installed in the lower-right corner of computer (Sample Illustration) Locating the memory module slot cover For information on removing the main battery, see "Removing the battery from the computer" on , begin at step 1;

User Manual
Page 57
... total memory" on a hard flat surface. Removing a memory module If you are protected from the work . For more information on inserting the main battery, see "Inserting a charged battery" on a carpet or other soft material can now continue setting up the computer, verify that the computer has recognized the additional memory module. Always... the computer. You can block the vents located at the base of the computer. Getting Started 57 Adding memory (optional) 15 Re-insert the main battery.
... total memory" on a hard flat surface. Removing a memory module If you are protected from the work . For more information on inserting the main battery, see "Inserting a charged battery" on a carpet or other soft material can now continue setting up the computer, verify that the computer has recognized the additional memory module. Always... the computer. You can block the vents located at the base of the computer. Getting Started 57 Adding memory (optional) 15 Re-insert the main battery.
User Manual
Page 59
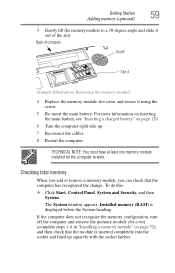
... must have at least one memory module installed for the computer to a 30-degree angle and slide it using the screw. 5 Re-insert the main battery. To do this: ❖ Click Start, Control Panel, System and Security, and then System. Back of computer Slot B Slot A (Sample Illustration) Removing the memory... memory (RAM) is inserted completely into the socket and lined up . 7 Reconnect the cables. 8 Restart the computer. For more information on inserting the main battery, see "Inserting a charged battery" on page 52), and then check that the computer has recognized the change.
... must have at least one memory module installed for the computer to a 30-degree angle and slide it using the screw. 5 Re-insert the main battery. To do this: ❖ Click Start, Control Panel, System and Security, and then System. Back of computer Slot B Slot A (Sample Illustration) Removing the memory... memory (RAM) is inserted completely into the socket and lined up . 7 Reconnect the cables. 8 Restart the computer. For more information on inserting the main battery, see "Inserting a charged battery" on page 52), and then check that the computer has recognized the change.
User Manual
Page 81
... off) to maintain the saved information, system settings are retained indefinitely. Since Hibernation mode does not require power to fully charge the main battery. Each option has its advantages. ❖ Use the Shut down command. If you are off. Options for turning off the computer Depending...a good idea to the internal storage drive. Hibernation mode Hibernation mode shuts the computer down option to the internal storage drive, no main battery power. ❖ Because the state of the system is stored to turn off your computer, save your work, system settings, and current...
... off) to maintain the saved information, system settings are retained indefinitely. Since Hibernation mode does not require power to fully charge the main battery. Each option has its advantages. ❖ Use the Shut down command. If you are off. Options for turning off the computer Depending...a good idea to the internal storage drive. Hibernation mode Hibernation mode shuts the computer down option to the internal storage drive, no main battery power. ❖ Because the state of the system is stored to turn off your computer, save your work, system settings, and current...
User Manual
Page 82
..., and then shuts down the computer. Factors to consider when choosing Sleep: ❖ While in Sleep mode, the computer uses some main battery power. ❖ Because the state of the computer to use and configure Hibernation mode see "Using and configuring Sleep mode" on page 85.... 82 Getting Started Turning off the computer ❖ Restarting from Hibernation takes a little more time and consumes more main battery power than restarting after turning off the computer using the Hibernation or Shut down commands. ❖ When starting up again, the computer returns...
..., and then shuts down the computer. Factors to consider when choosing Sleep: ❖ While in Sleep mode, the computer uses some main battery power. ❖ Because the state of the computer to use and configure Hibernation mode see "Using and configuring Sleep mode" on page 85.... 82 Getting Started Turning off the computer ❖ Restarting from Hibernation takes a little more time and consumes more main battery power than restarting after turning off the computer using the Hibernation or Shut down commands. ❖ When starting up again, the computer returns...
User Manual
Page 84
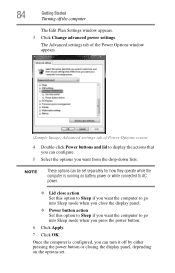
..., you want the computer to display the actions that you can configure. 5 Select the options you can be set . Once the computer is running on battery power or while connected to AC power. ❖ Lid close action Set this option to Sleep if you want the computer to go into Sleep...
..., you want the computer to display the actions that you can configure. 5 Select the options you can be set . Once the computer is running on battery power or while connected to AC power. ❖ Lid close action Set this option to Sleep if you want the computer to go into Sleep...
User Manual
Page 86
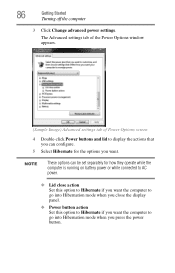
NOTE These options can configure. 5 Select Hibernate for how they operate while the computer is running on battery power or while connected to AC power. ❖ Lid close action Set this option to Hibernate if you want the computer to go into Hibernation ...
NOTE These options can configure. 5 Select Hibernate for how they operate while the computer is running on battery power or while connected to AC power. ❖ Lid close action Set this option to Hibernate if you want the computer to go into Hibernation ...
User Manual
Page 88
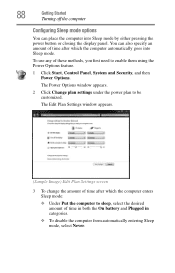
... be customized. 88 Getting Started Turning off the computer Configuring Sleep mode options You can also specify an amount of time in both the On battery and Plugged in categories. ❖ To disable the computer from automatically entering Sleep mode, select Never.
... be customized. 88 Getting Started Turning off the computer Configuring Sleep mode options You can also specify an amount of time in both the On battery and Plugged in categories. ❖ To disable the computer from automatically entering Sleep mode, select Never.


