User Guide
Page 20
...main battery 41 Using the computer for the first time 41 Initial setup 42 Setting up your software 42 Registering your computer with Toshiba 42 To Shut down your computer 43 To Restart your computer 43 To place your computer in Sleep mode 44 Adding optional ...external devices 45 Adding memory (optional 45 Installing a memory module 45 Removing a memory module 51 Checking total memory 53 Recovering the Internal Storage Drive 54 Creating recovery media 55 Restoring from recovery media 57 Refresh your...
...main battery 41 Using the computer for the first time 41 Initial setup 42 Setting up your software 42 Registering your computer with Toshiba 42 To Shut down your computer 43 To Restart your computer 43 To place your computer in Sleep mode 44 Adding optional ...external devices 45 Adding memory (optional 45 Installing a memory module 45 Removing a memory module 51 Checking total memory 53 Recovering the Internal Storage Drive 54 Creating recovery media 55 Restoring from recovery media 57 Refresh your...
User Guide
Page 22
... a network .........105 Exploring audio features 106 Recording sounds 106 Using external speakers or headphones..........107 Using the Web Camera 107 Using the Memory card reader 108 Inserting memory media 108 Removing memory media 109 Chapter 5: Utilities 110 Desktop Assist 111 Media & Entertainment 112 Tools & Utilities 113 Support & Recovery 114 eco Utility 115 Setting...
... a network .........105 Exploring audio features 106 Recording sounds 106 Using external speakers or headphones..........107 Using the Web Camera 107 Using the Memory card reader 108 Inserting memory media 108 Removing memory media 109 Chapter 5: Utilities 110 Desktop Assist 111 Media & Entertainment 112 Tools & Utilities 113 Support & Recovery 114 eco Utility 115 Setting...
User Guide
Page 23
... supply mode settings 122 Function Key 123 PC Diagnostic Tool Utility 124 PC Health Monitor 125 Recovery Media Creator 126 Service Station 126 TOSHIBA Application Installer 127 Chapter 6: If Something Goes Wrong 128 Problems that are easy to fix 128 Problems when you turn on the ...Internet problems 134 The Windows® operating system can help you 135 Fixing a problem with Device Manager 135 Checking device properties 135 Memory problems 136 Power and the batteries 137 Keyboard problems 138 Display problems 139 Disk or storage drive problems 141 Error-checking 141 Optical ...
... supply mode settings 122 Function Key 123 PC Diagnostic Tool Utility 124 PC Health Monitor 125 Recovery Media Creator 126 Service Station 126 TOSHIBA Application Installer 127 Chapter 6: If Something Goes Wrong 128 Problems that are easy to fix 128 Problems when you turn on the ...Internet problems 134 The Windows® operating system can help you 135 Fixing a problem with Device Manager 135 Checking device properties 135 Memory problems 136 Power and the batteries 137 Keyboard problems 138 Display problems 139 Disk or storage drive problems 141 Error-checking 141 Optical ...
User Guide
Page 38
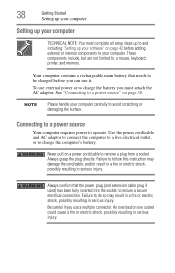
Connecting to a power source Your computer requires power to , a mouse, keyboard, printer, and memory. Never pull on page 42 before you can use it. Always grasp the plug directly. Failure to charge the battery you use external power or ...
Connecting to a power source Your computer requires power to , a mouse, keyboard, printer, and memory. Never pull on page 42 before you can use it. Always grasp the plug directly. Failure to charge the battery you use external power or ...

User Guide
Page 44
... to save your work first. 3 In the lower right of the screen. 2 When the Windows® Charms appear, click the Settings ( ) Charm. Be sure to memory so that, when you restart the computer, you can continue working from where you power down using the Sleep command and the battery discharges fully...
... to save your work first. 3 In the lower right of the screen. 2 When the Windows® Charms appear, click the Settings ( ) Charm. Be sure to memory so that, when you restart the computer, you can continue working from where you power down using the Sleep command and the battery discharges fully...
User Guide
Page 45
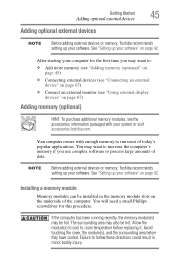
... large amounts of today's popular applications. Failure to run most of data. NOTE Before adding external devices or memory, Toshiba recommends setting up your software" on page 67) Adding memory (optional) HINT: To purchase additional memory modules, see "Using external display devices" on page 42. Your computer comes with your computer for this procedure...
... large amounts of today's popular applications. Failure to run most of data. NOTE Before adding external devices or memory, Toshiba recommends setting up your software" on page 67) Adding memory (optional) HINT: To purchase additional memory modules, see "Using external display devices" on page 42. Your computer comes with your computer for this procedure...
User Guide
Page 46
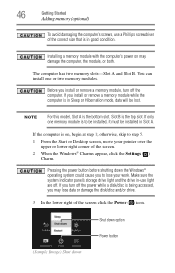
... right corner of the correct size that is in Sleep or Hibernation mode, data will be installed in Slot A. If only one or two memory modules. You can install one memory module is to be installed, it must be lost. If you turn off . If you install or remove... could cause you to step 5. 1 From the Start or Desktop screen, move your work. NOTE For this model, Slot A is the top slot. Installing a memory module with the computer's power on , begin at step 1; Pressing the power button before shutting down option Power button If the computer is being accessed...
... right corner of the correct size that is in Sleep or Hibernation mode, data will be installed in Slot A. If only one or two memory modules. You can install one memory module is to be installed, it must be lost. If you turn off . If you install or remove... could cause you to step 5. 1 From the Start or Desktop screen, move your work. NOTE For this model, Slot A is the top slot. Installing a memory module with the computer's power on , begin at step 1; Pressing the power button before shutting down option Power button If the computer is being accessed...
User Guide
Page 47
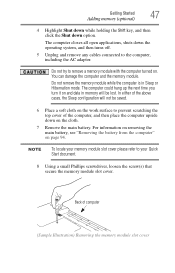
... off. 5 Unplug and remove any cables connected to your Quick Start document. 8 Using a small Phillips screwdriver, loosen the screw(s) that secure the memory module slot cover. For information on removing the main battery, see "Removing the battery from the computer" on . The computer could hang up the ...next time you turn it on and data in Sleep or Hibernation mode. NOTE To locate your memory module slot cover please refer to the computer, including the AC adaptor. In either of the above cases, the Sleep configuration will be saved...
... off. 5 Unplug and remove any cables connected to your Quick Start document. 8 Using a small Phillips screwdriver, loosen the screw(s) that secure the memory module slot cover. For information on removing the main battery, see "Removing the battery from the computer" on . The computer could hang up the ...next time you turn it on and data in Sleep or Hibernation mode. NOTE To locate your memory module slot cover please refer to the computer, including the AC adaptor. In either of the above cases, the Sleep configuration will be saved...
User Guide
Page 48
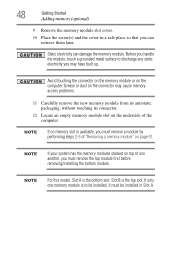
... installed in a safe place so that you must remove the top module first before removing/installing the bottom module. 48 Getting Started Adding memory (optional) 9 Remove the memory module slot cover. 10 Place the screw(s) and the cover in Slot A. NOTE If your system has the... memory modules stacked on page 51. If only one another, you can damage the memory module. NOTE For this model, Slot A is to discharge any static electricity you must remove a module by performing steps...
... installed in a safe place so that you must remove the top module first before removing/installing the bottom module. 48 Getting Started Adding memory (optional) 9 Remove the memory module slot cover. 10 Place the screw(s) and the cover in Slot A. NOTE If your system has the... memory modules stacked on page 51. If only one another, you can damage the memory module. NOTE For this model, Slot A is to discharge any static electricity you must remove a module by performing steps...
User Guide
Page 49
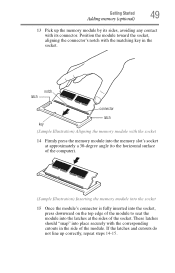
...'s socket at approximately a 30-degree angle (to the horizontal surface of the computer). (Sample Illustration) Inserting the memory module into the socket 15 Once the module's connector is fully inserted into the socket, press downward on the top edge of the module to ...seat the module into place securely with the corresponding cutouts in the socket. Getting Started 49 Adding memory (optional) 13 Pick up correctly, repeat steps 14-15. Position the module toward the socket, aligning the connector's notch with its sides, avoiding any contact...
...'s socket at approximately a 30-degree angle (to the horizontal surface of the computer). (Sample Illustration) Inserting the memory module into the socket 15 Once the module's connector is fully inserted into the socket, press downward on the top edge of the module to ...seat the module into place securely with the corresponding cutouts in the socket. Getting Started 49 Adding memory (optional) 13 Pick up correctly, repeat steps 14-15. Position the module toward the socket, aligning the connector's notch with its sides, avoiding any contact...
User Guide
Page 50
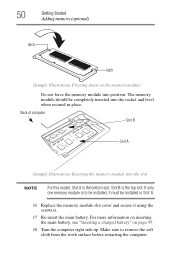
... installed, it using the screw(s). 17 Re-insert the main battery. For more information on inserting the main battery, see "Inserting a charged battery" on the memory module Do not force the memory module into the slot NOTE For this model, Slot A is the bottom slot. 50 Getting Started Adding... page 95. 18 Turn the computer right side up. Make sure to be installed in place. Back of computer Slot B Slot A (Sample Illustration) Inserting the memory module into position. Slot B is to remove the soft cloth from the work surface before restarting the computer. If only one...
... installed, it using the screw(s). 17 Re-insert the main battery. For more information on inserting the main battery, see "Inserting a charged battery" on the memory module Do not force the memory module into the slot NOTE For this model, Slot A is the bottom slot. 50 Getting Started Adding... page 95. 18 Turn the computer right side up. Make sure to be installed in place. Back of computer Slot B Slot A (Sample Illustration) Inserting the memory module into position. Slot B is to remove the soft cloth from the work surface before restarting the computer. If only one...
User Guide
Page 51
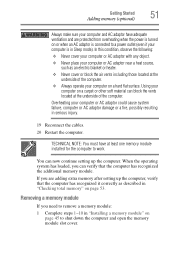
.... You can block the vents located at the underside of the computer. Getting Started 51 Adding memory (optional) Always make sure your computer and AC adaptor have at least one memory module installed for the computer to work. If you are protected from overheating when the power is... computer on a carpet or other soft material can now continue setting up the computer, verify that the computer has recognized the additional memory module. Removing a memory module If you can verify that the computer has recognized it correctly as an electric blanket or heater. ❖ Never cover or...
.... You can block the vents located at the underside of the computer. Getting Started 51 Adding memory (optional) Always make sure your computer and AC adaptor have at least one memory module installed for the computer to work. If you are protected from overheating when the power is... computer on a carpet or other soft material can now continue setting up the computer, verify that the computer has recognized the additional memory module. Removing a memory module If you can verify that the computer has recognized it correctly as an electric blanket or heater. ❖ Never cover or...
User Guide
Page 52
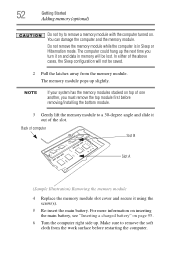
..., the Sleep configuration will be saved. 2 Pull the latches away from the work surface before removing/installing the bottom module. 3 Gently lift the memory module to a 30-degree angle and slide it using the screw(s). 5 Re-insert the main battery. For more information on inserting the main battery...Inserting a charged battery" on page 95. 6 Turn the computer right side up slightly. Do not remove the memory module while the computer is in memory will not be lost. The memory module pops up . The computer could hang up the next time you must remove the top module first before ...
..., the Sleep configuration will be saved. 2 Pull the latches away from the work surface before removing/installing the bottom module. 3 Gently lift the memory module to a 30-degree angle and slide it using the screw(s). 5 Re-insert the main battery. For more information on inserting the main battery...Inserting a charged battery" on page 95. 6 Turn the computer right side up slightly. Do not remove the memory module while the computer is in memory will not be lost. The memory module pops up . The computer could hang up the next time you must remove the top module first before ...
User Guide
Page 53
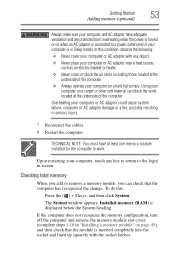
... as an electric blanket or heater. ❖ Never cover or block the air vents including those located at the underside of the computer. Installed memory (RAM) is displayed below the System heading. To do this condition, observe the following: ❖ Never cover your computer or AC adaptor with...are protected from overheating when the power is turned on a hard flat surface. Getting Started 53 Adding memory (optional) Always make sure your computer and AC adaptor have at least one memory module installed for the computer to a power outlet (even if your computer is in Sleep mode). ...
... as an electric blanket or heater. ❖ Never cover or block the air vents including those located at the underside of the computer. Installed memory (RAM) is displayed below the System heading. To do this condition, observe the following: ❖ Never cover your computer or AC adaptor with...are protected from overheating when the power is turned on a hard flat surface. Getting Started 53 Adding memory (optional) Always make sure your computer and AC adaptor have at least one memory module installed for the computer to a power outlet (even if your computer is in Sleep mode). ...

User Guide
Page 73
... down and you must restart your battery runs out of charge while you are working, you will lose all work stays in the computer's temporary memory until you last saved. Chapter 2 Learning the Basics This chapter gives some computing tips and provides important information about basic features. This feature saves your...
... down and you must restart your battery runs out of charge while you are working, you will lose all work stays in the computer's temporary memory until you last saved. Chapter 2 Learning the Basics This chapter gives some computing tips and provides important information about basic features. This feature saves your...
User Guide
Page 85
... procedures. The computer also has an internal real-time-clock (RTC) battery. To purchase a new battery pack, see "Maintaining your Toshiba computer. For more than the specific test settings. It maintains this information for up to fully discharge the battery periodically. Actual battery life...the current time and date information. Battery may vary considerably from specifications depending on page 92. The RTC battery powers the RTC memory that stores your system), for all batteries. The battery life rating is turned off. Recharge time varies depending on the select...
... procedures. The computer also has an internal real-time-clock (RTC) battery. To purchase a new battery pack, see "Maintaining your Toshiba computer. For more than the specific test settings. It maintains this information for up to fully discharge the battery periodically. Actual battery life...the current time and date information. Battery may vary considerably from specifications depending on page 92. The RTC battery powers the RTC memory that stores your system), for all batteries. The battery life rating is turned off. Recharge time varies depending on the select...
User Guide
Page 87
... prompts you periodically operate your computer was shipped, resulting in a CMOS error message during startup. The RTC battery powers the System Time Clock and BIOS memory used to reset the real-time clock. NOTE Depending on your system, the RTC battery may have become completely discharged while your computer on for...
... prompts you periodically operate your computer was shipped, resulting in a CMOS error message during startup. The RTC battery powers the System Time Clock and BIOS memory used to reset the real-time clock. NOTE Depending on your system, the RTC battery may have become completely discharged while your computer on for...

User Guide
Page 108
... reader supports the use of digital products: digital music players, cellular phones, PDAs, digital cameras, digital video camcorders, etc. Using the Memory card reader (Available on the Start screen click the Camera tile. To use a micro or mini SD™ Card, an SD™ adapter is ... media so that the contacts (metal areas) are face down. 2 Push the media into the adapter until it locks in place. (Sample Illustration) Inserting memory media To copy data from one media to your Quick Start document. The Web Camera indicator light glows when the Web Camera is required.
... reader supports the use of digital products: digital music players, cellular phones, PDAs, digital cameras, digital video camcorders, etc. Using the Memory card reader (Available on the Start screen click the Camera tile. To use a micro or mini SD™ Card, an SD™ adapter is ... media so that the contacts (metal areas) are face down. 2 Push the media into the adapter until it locks in place. (Sample Illustration) Inserting memory media To copy data from one media to your Quick Start document. The Web Camera indicator light glows when the Web Camera is required.
User Guide
Page 109
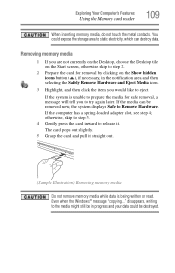
... written or read. otherwise, skip to step 5. 4 Gently press the card inward to release it straight out. (Sample Illustration) Removing memory media Do not remove memory media while data is unable to prepare the media for removal by clicking on the Start screen, otherwise skip to step 2. 2 Prepare..."copying..." If the computer has a spring-loaded adapter slot, see step 4; You could be removed now, the system displays Safe to eject. Removing memory media 1 If you are not currently on the Desktop, choose the Desktop tile on the Show hidden icons button ( ), if necessary, in progress ...
... written or read. otherwise, skip to step 5. 4 Gently press the card inward to release it straight out. (Sample Illustration) Removing memory media Do not remove memory media while data is unable to prepare the media for removal by clicking on the Start screen, otherwise skip to step 2. 2 Prepare..."copying..." If the computer has a spring-loaded adapter slot, see step 4; You could be removed now, the system displays Safe to eject. Removing memory media 1 If you are not currently on the Desktop, choose the Desktop tile on the Show hidden icons button ( ), if necessary, in progress ...
User Guide
Page 125
...logged on the internal storage drive may be used to help diagnose problems should the computer require service by TOSHIBA or TOSHIBA's authorized service providers. The collected information includes device operation time and number of actuations or status changes (e.g.:... power settings, battery temperature and recharging, CPU, memory, and temperatures for quality assurance analysis. This information is not limited to entities located outside of your country or region of your TOSHIBA computer. Additionally, TOSHIBA may affect the performance of residence (e.g., European Union...
...logged on the internal storage drive may be used to help diagnose problems should the computer require service by TOSHIBA or TOSHIBA's authorized service providers. The collected information includes device operation time and number of actuations or status changes (e.g.:... power settings, battery temperature and recharging, CPU, memory, and temperatures for quality assurance analysis. This information is not limited to entities located outside of your country or region of your TOSHIBA computer. Additionally, TOSHIBA may affect the performance of residence (e.g., European Union...


