
User Manual
Page 28
... the BD Association. MultiMediaCard and MMC are owned by Toshiba is a registered trademark of Toshiba America Information Systems, Inc. 28 Trademarks Satellite and eco Utility are either registered trademarks or trademarks of...Toshiba Corporation. Adobe and Photoshop are either registered trademarks or trademarks of Microsoft Corporation in the United States and/or other countries. and any use of Synaptics, Inc. Other trademarks and trade names are trademarks or registered trademarks of their respective companies. Memory Stick, Memory Stick PRO, Memory Stick PRO Duo, and Memory...
... the BD Association. MultiMediaCard and MMC are owned by Toshiba is a registered trademark of Toshiba America Information Systems, Inc. 28 Trademarks Satellite and eco Utility are either registered trademarks or trademarks of...Toshiba Corporation. Adobe and Photoshop are either registered trademarks or trademarks of Microsoft Corporation in the United States and/or other countries. and any use of Synaptics, Inc. Other trademarks and trade names are trademarks or registered trademarks of their respective companies. Memory Stick, Memory Stick PRO, Memory Stick PRO Duo, and Memory...
User Manual
Page 30
... display panel 49 Turning on the power 50 Setting up your software 50 Registering your computer with Toshiba 51 Adding optional external devices 51 Adding memory (optional 52 Installing a memory module 52 Removing a memory module 58 Checking total memory 61 Recovering the Internal Storage Drive 61 Recovering to out-of-box state (recommended recovery method...
... display panel 49 Turning on the power 50 Setting up your software 50 Registering your computer with Toshiba 51 Adding optional external devices 51 Adding memory (optional 52 Installing a memory module 52 Removing a memory module 58 Checking total memory 61 Recovering the Internal Storage Drive 61 Recovering to out-of-box state (recommended recovery method...
User Manual
Page 33
... ExpressCard 144 Removing an ExpressCard 145 Using the Memory card reader 145 Inserting memory media 146 Removing memory media 146 Using the eSATA/USB combo port 147 Using the Ambient Light Sensor (ALS 148 Chapter 5: Utilities 149 TOSHIBA Assist 150 Connect 151 Secure 152 Protect & ...Fix 153 Optimize 154 TOSHIBA Application Installer 155 Setting passwords 156...
... ExpressCard 144 Removing an ExpressCard 145 Using the Memory card reader 145 Inserting memory media 146 Removing memory media 146 Using the eSATA/USB combo port 147 Using the Ambient Light Sensor (ALS 148 Chapter 5: Utilities 149 TOSHIBA Assist 150 Connect 151 Secure 152 Protect & ...Fix 153 Optimize 154 TOSHIBA Application Installer 155 Setting passwords 156...
User Manual
Page 35
Contents 35 Fixing a problem with Device Manager 185 Checking device properties 185 Memory problems 186 Power and the batteries 186 Keyboard problems 188 Display problems 188 Disk or storage drive problems 190 Error-checking 190 Optical disc ... backup in the Windows® operating system 201 If you need further assistance 206 Before you contact Toshiba 206 Contacting Toshiba 206 Other Toshiba Internet Web sites 207 Toshiba's worldwide offices 208 Appendix A: Hot Keys/TOSHIBA Cards 210 Hot Key Cards 210 Using the Hot Key Cards 211 Application Cards 212 Using the Application...
Contents 35 Fixing a problem with Device Manager 185 Checking device properties 185 Memory problems 186 Power and the batteries 186 Keyboard problems 188 Display problems 188 Disk or storage drive problems 190 Error-checking 190 Optical disc ... backup in the Windows® operating system 201 If you need further assistance 206 Before you contact Toshiba 206 Contacting Toshiba 206 Other Toshiba Internet Web sites 207 Toshiba's worldwide offices 208 Appendix A: Hot Keys/TOSHIBA Cards 210 Hot Key Cards 210 Using the Hot Key Cards 211 Application Cards 212 Using the Application...

User Manual
Page 45
... those located at the base of the computer. ❖ Always operate your computer on or when an AC adaptor is connected to , a mouse, keyboard, printer, memory, and ExpressCard®. Your computer contains a rechargeable main battery that cools the CPU by drawing outside air into the computer. Overheating your computer and AC...
... those located at the base of the computer. ❖ Always operate your computer on or when an AC adaptor is connected to , a mouse, keyboard, printer, memory, and ExpressCard®. Your computer contains a rechargeable main battery that cools the CPU by drawing outside air into the computer. Overheating your computer and AC...
User Manual
Page 51
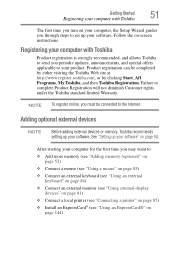
... external devices NOTE Before adding external devices or memory, Toshiba recommends setting up your software" on -screen instructions. Failure to your product. See "Setting up your software. Follow the on page 50. Registering your computer with Toshiba The first time you turn on page 144)... After starting your computer for the first time you may want to: ❖ Add more memory (see "Adding memory (optional)" on page 52) ❖ Connect a mouse (see ...
... external devices NOTE Before adding external devices or memory, Toshiba recommends setting up your software" on -screen instructions. Failure to your product. See "Setting up your software. Follow the on page 50. Registering your computer with Toshiba The first time you turn on page 144)... After starting your computer for the first time you may want to: ❖ Add more memory (see "Adding memory (optional)" on page 52) ❖ Connect a mouse (see ...

User Manual
Page 52
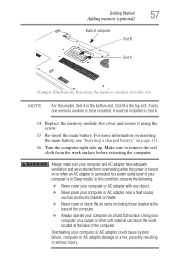
... slots on the base of the computer. NOTE Before adding external devices or memory, Toshiba recommends setting up your software" on page 50. You will need a small Phillips screwdriver for this procedure. Avoid touching the cover,...software or process large amounts of today's popular applications. See "Setting up your system or visit accessories.toshiba.com. 52 Getting Started Adding memory (optional) Adding memory (optional) HINT: To purchase additional memory modules, see the accessories information packaged with the computer's power on may damage the computer, the module...
... slots on the base of the computer. NOTE Before adding external devices or memory, Toshiba recommends setting up your software" on page 50. You will need a small Phillips screwdriver for this procedure. Avoid touching the cover,...software or process large amounts of today's popular applications. See "Setting up your system or visit accessories.toshiba.com. 52 Getting Started Adding memory (optional) Adding memory (optional) HINT: To purchase additional memory modules, see the accessories information packaged with the computer's power on may damage the computer, the module...
User Manual
Page 53
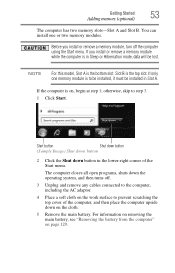
... this model, Slot A is to the computer, including the AC adaptor. 4 Place a soft cloth on page 129. If only one or two memory modules. Start button Shut down button (Sample Image) Shut down button 2 Click the Shut down button in Slot A. otherwise, skip to prevent scratching ...the top cover of the Start menu. Before you install or remove a memory module while the computer is on the cloth. 5 Remove the main battery. The computer closes all open programs, shuts down on , begin at ...
... this model, Slot A is to the computer, including the AC adaptor. 4 Place a soft cloth on page 129. If only one or two memory modules. Start button Shut down button (Sample Image) Shut down button 2 Click the Shut down button in Slot A. otherwise, skip to prevent scratching ...the top cover of the Start menu. Before you install or remove a memory module while the computer is on the cloth. 5 Remove the main battery. The computer closes all open programs, shuts down on , begin at ...
User Manual
Page 54
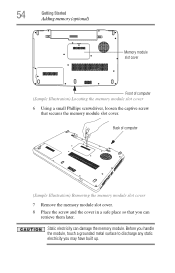
... slot cover Front of computer (Sample Illustration) Removing the memory module slot cover 7 Remove the memory module slot cover. 8 Place the screw and the cover in a safe place so that secures the memory module slot cover. Static electricity can retrieve them later. Before you handle ...the module, touch a grounded metal surface to discharge any static electricity you can damage the memory module. Back of computer (Sample Illustration) Locating the memory module slot cover 6 Using a small Phillips screwdriver, loosen the captive screw that you may have built up....
... slot cover Front of computer (Sample Illustration) Removing the memory module slot cover 7 Remove the memory module slot cover. 8 Place the screw and the cover in a safe place so that secures the memory module slot cover. Static electricity can retrieve them later. Before you handle ...the module, touch a grounded metal surface to discharge any static electricity you can damage the memory module. Back of computer (Sample Illustration) Locating the memory module slot cover 6 Using a small Phillips screwdriver, loosen the captive screw that you may have built up....

User Manual
Page 55
...connector's notch with the socket Getting Started 55 Adding memory (optional) Avoid touching the connector on the memory module or on page 58. Grease or dust on the connector may cause memory access problems. 9 Carefully remove the new memory module from its antistatic packaging, without touching its ... you must remove the top module first before removing/installing the bottom module. NOTE If your system has the memory modules stacked on the underside of one memory module is the bottom slot. Slot B is available, you must remove a module by its sides, avoiding any...
...connector's notch with the socket Getting Started 55 Adding memory (optional) Avoid touching the connector on the memory module or on page 58. Grease or dust on the connector may cause memory access problems. 9 Carefully remove the new memory module from its antistatic packaging, without touching its ... you must remove the top module first before removing/installing the bottom module. NOTE If your system has the memory modules stacked on the underside of one memory module is the bottom slot. Slot B is available, you must remove a module by its sides, avoiding any...
User Manual
Page 56
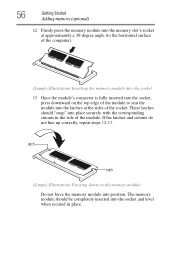
... into the socket 13 Once the module's connector is fully inserted into the socket, press downward on the memory module Do not force the memory module into the socket and level when secured in the side of the socket. These latches should be completely inserted into position. latch latch (Sample ... module into the latches at the sides of the module. If the latches and cutouts do not line up correctly, repeat steps 12-13. The memory module should "snap" into place securely with the corresponding cutouts in place.
... into the socket 13 Once the module's connector is fully inserted into the socket, press downward on the memory module Do not force the memory module into the socket and level when secured in the side of the socket. These latches should be completely inserted into position. latch latch (Sample ... module into the latches at the sides of the module. If the latches and cutouts do not line up correctly, repeat steps 12-13. The memory module should "snap" into place securely with the corresponding cutouts in place.
User Manual
Page 57
... Using your computer or AC adaptor could cause system failure, computer or AC adaptor damage or a fire, possibly resulting in Slot A. 14 Replace the memory module slot cover and secure it must be installed, it using the screw. 15 Re-insert the main battery. Slot B is the bottom slot. If... only one memory module is connected to be installed in serious injury. Always make sure your computer and AC adaptor have adequate ventilation and are protected from the...
... Using your computer or AC adaptor could cause system failure, computer or AC adaptor damage or a fire, possibly resulting in Slot A. 14 Replace the memory module slot cover and secure it must be installed, it using the screw. 15 Re-insert the main battery. Slot B is the bottom slot. If... only one memory module is connected to be installed in serious injury. Always make sure your computer and AC adaptor have adequate ventilation and are protected from the...

User Manual
Page 58
...Hibernation mode. You can now continue setting up the next time you can damage the computer and the memory module. When the operating system has loaded, you turn it correctly as described in memory will not be lost. If you need to work. Do not try to remove...the Sleep configuration will be saved. The computer could hang up the computer. Do not remove the memory module while the computer is in "Installing a memory module" on . Removing a memory module If you are adding extra memory after setting up the computer, verify that the computer has recognized the additional...
...Hibernation mode. You can now continue setting up the next time you can damage the computer and the memory module. When the operating system has loaded, you turn it correctly as described in memory will not be lost. If you need to work. Do not try to remove...the Sleep configuration will be saved. The computer could hang up the computer. Do not remove the memory module while the computer is in "Installing a memory module" on . Removing a memory module If you are adding extra memory after setting up the computer, verify that the computer has recognized the additional...
User Manual
Page 59
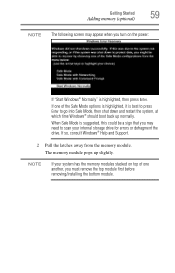
... pops up normally. If one another, you may need to scan your system has the memory modules stacked on the power: If "Start Windows® Normally" is best to press Enter to go into Safe Mode, then shut down and restart ... storage drive for errors or defragment the drive. If so, consult Windows® Help and Support. 2 Pull the latches away from the memory module. Getting Started 59 Adding memory (optional) NOTE The following screen may appear when you turn on top of one of the Safe Mode options is highlighted, it is...
... pops up normally. If one another, you may need to scan your system has the memory modules stacked on the power: If "Start Windows® Normally" is best to press Enter to go into Safe Mode, then shut down and restart ... storage drive for errors or defragment the drive. If so, consult Windows® Help and Support. 2 Pull the latches away from the memory module. Getting Started 59 Adding memory (optional) NOTE The following screen may appear when you turn on top of one of the Safe Mode options is highlighted, it is...
User Manual
Page 60
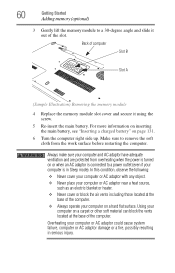
60 Getting Started Adding memory (optional) 3 Gently lift the memory module to a power outlet (even if your computer is in serious injury. Always make sure your computer or AC adaptor could cause system failure, computer ... heater. ❖ Never cover or block the air vents including those located at the base of computer Slot B Slot A (Sample Illustration) Removing the memory module 4 Replace the memory module slot cover and secure it out of the computer. ❖ Always operate your computer on page 131. 6 Turn the computer right side up...
60 Getting Started Adding memory (optional) 3 Gently lift the memory module to a power outlet (even if your computer is in serious injury. Always make sure your computer or AC adaptor could cause system failure, computer ... heater. ❖ Never cover or block the air vents including those located at the base of computer Slot B Slot A (Sample Illustration) Removing the memory module 4 Replace the memory module slot cover and secure it out of the computer. ❖ Always operate your computer on page 131. 6 Turn the computer right side up...

User Manual
Page 61
..., click Continue; This is a security feature to recover your permission. If unsure, cancel and try again. The System window appears. Installed memory (RAM) is inserted completely into the socket and lined up that the computer has recognized the change. If you can check that says, ...computer to its out-of-box state. (Recommended recovery method) See "Recovering to work. TECHNICAL NOTE: You must have at least one memory module installed for the computer to out-of-box state (recommended recovery method)" on your computer without your internal storage drive if necessary. ...
..., click Continue; This is a security feature to recover your permission. If unsure, cancel and try again. The System window appears. Installed memory (RAM) is inserted completely into the socket and lined up that the computer has recognized the change. If you can check that says, ...computer to its out-of-box state. (Recommended recovery method) See "Recovering to work. TECHNICAL NOTE: You must have at least one memory module installed for the computer to out-of-box state (recommended recovery method)" on your computer without your internal storage drive if necessary. ...
User Manual
Page 87
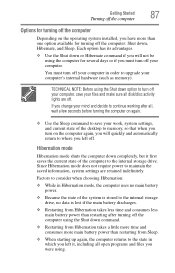
... ❖ When starting up again, the computer returns to maintain the saved information, system settings are off your computer's internal hardware (such as memory). Hibernation mode Hibernation mode shuts the computer down completely, but it , including all , wait a few seconds before turning the computer on again.... Factors to consider when choosing Hibernation: ❖ While in which you left it first saves the current state of the desktop to memory, so that when you left off the computer: Shut down, Hibernate, and Sleep. Each option has its advantages. ❖ Use ...
... ❖ When starting up again, the computer returns to maintain the saved information, system settings are off your computer's internal hardware (such as memory). Hibernation mode Hibernation mode shuts the computer down completely, but it , including all , wait a few seconds before turning the computer on again.... Factors to consider when choosing Hibernation: ❖ While in which you left it first saves the current state of the desktop to memory, so that when you left off the computer: Shut down, Hibernate, and Sleep. Each option has its advantages. ❖ Use ...
User Manual
Page 88
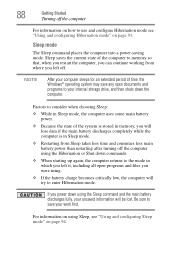
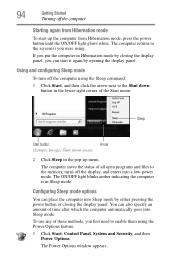
...10070; Restarting from Sleep takes less time and consumes less main battery power than restarting after turning off the computer For information on how to memory so that, when you restart the computer, you can continue working from where you power down using the Sleep command and the main battery ...; Because the state of time, the Windows® operating system may save your computer sleeps for an extended period of the system is stored in memory, you will be lost. For information on using Sleep, see "Using and configuring Hibernation mode" on page 94. NOTE After your work first....
...10070; Restarting from Sleep takes less time and consumes less main battery power than restarting after turning off the computer For information on how to memory so that, when you restart the computer, you can continue working from where you power down using the Sleep command and the main battery ...; Because the state of time, the Windows® operating system may save your computer sleeps for an extended period of the system is stored in memory, you will be lost. For information on using Sleep, see "Using and configuring Hibernation mode" on page 94. NOTE After your work first....
User Manual
Page 94
... use any of these methods, you first need to the screen(s) you can also specify an amount of all open programs and files to the memory, turns off the display, and enters into Sleep mode.
... use any of these methods, you first need to the screen(s) you can also specify an amount of all open programs and files to the memory, turns off the display, and enters into Sleep mode.
User Manual
Page 99
... your computer to reconnect, or your battery runs out of charge while you are working, you will lose all work stays in the computer's temporary memory until you last saved. See your work frequently. Your work since you save feature that can be activated. See "Saving your software documentation for further...
... your computer to reconnect, or your battery runs out of charge while you are working, you will lose all work stays in the computer's temporary memory until you last saved. See your work frequently. Your work since you save feature that can be activated. See "Saving your software documentation for further...


