
User Manual
Page 3
... the receiving antenna. ❖ Increase the separation between the external devices and the computer's ports. Changes or modifications made to this equipment. Shielded cables must be used in accordance with noncompliant peripherals or peripherals not recommended by Toshiba could lead to injury to persons or loss of life or catastrophic property damage...
... the receiving antenna. ❖ Increase the separation between the external devices and the computer's ports. Changes or modifications made to this equipment. Shielded cables must be used in accordance with noncompliant peripherals or peripherals not recommended by Toshiba could lead to injury to persons or loss of life or catastrophic property damage...
User Manual
Page 33
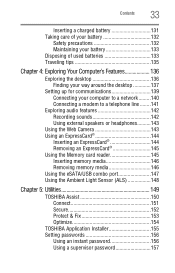
... 145 Inserting memory media 146 Removing memory media 146 Using the eSATA/USB combo port 147 Using the Ambient Light Sensor (ALS 148 Chapter 5: Utilities 149 TOSHIBA Assist 150 Connect 151 Secure 152 Protect & Fix 153 Optimize 154 TOSHIBA Application Installer 155 Setting passwords 156 Using an instant password 156 Using a supervisor password...
... 145 Inserting memory media 146 Removing memory media 146 Using the eSATA/USB combo port 147 Using the Ambient Light Sensor (ALS 148 Chapter 5: Utilities 149 TOSHIBA Assist 150 Connect 151 Secure 152 Protect & Fix 153 Optimize 154 TOSHIBA Application Installer 155 Setting passwords 156 Using an instant password 156 Using a supervisor password...
User Manual
Page 81
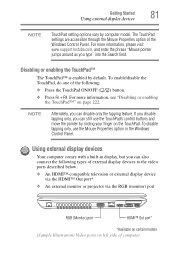
... television or external display device via the HDMI™ Out port* ❖ An external monitor or projector via the RGB (monitor) port RGB (Monitor) port HDMI™ Out port* *Available on certain models (Sample Illustration) Video ports on page 222. If you disable tapping only, you can..., use the TouchPad's control buttons and move the pointer by sliding your finger on the TouchPad. For more information, please visit www.support.toshiba.com, and enter the phrase "Mouse pointer jumps around as you can also connect the following : ❖ Press the TouchPad ON/OFF ...
... television or external display device via the HDMI™ Out port* ❖ An external monitor or projector via the RGB (monitor) port RGB (Monitor) port HDMI™ Out port* *Available on certain models (Sample Illustration) Video ports on page 222. If you disable tapping only, you can..., use the TouchPad's control buttons and move the pointer by sliding your finger on the TouchPad. For more information, please visit www.support.toshiba.com, and enter the phrase "Mouse pointer jumps around as you can also connect the following : ❖ Press the TouchPad ON/OFF ...
User Manual
Page 82
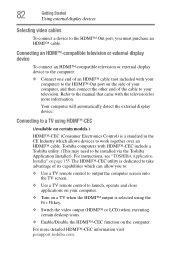
...need to the manual that came with the television for more detailed HDMI™-CEC information visit pcsupport.toshiba.com. Toshiba computers with your computer) to the HDMI™ Out port on the side of your computer, and then connect the other end of the cable to your computer...HDMI™-CEC utility is selected using HDMI™-CEC (Available on page 155. Refer to be installed via the Toshiba Application Installer). For instructions, see "TOSHIBA Application Installer" on certain models.) HDMI™-CEC (Consumer Electronics Control) is a standard in the CE Industry which ...
...need to the manual that came with the television for more detailed HDMI™-CEC information visit pcsupport.toshiba.com. Toshiba computers with your computer) to the HDMI™ Out port on the side of your computer, and then connect the other end of the cable to your computer...HDMI™-CEC utility is selected using HDMI™-CEC (Available on page 155. Refer to be installed via the Toshiba Application Installer). For instructions, see "TOSHIBA Application Installer" on certain models.) HDMI™-CEC (Consumer Electronics Control) is a standard in the CE Industry which ...

User Manual
Page 83
... available if an external monitor is to your computer if you need to install new software. 2 Connect the monitor's video cable to the RGB (monitor) port on the side of the computer. 3 Connect the device's power cable to change the display output settings is connected): ❖ Built-in display only ❖...
... available if an external monitor is to your computer if you need to install new software. 2 Connect the monitor's video cable to the RGB (monitor) port on the side of the computer. 3 Connect the device's power cable to change the display output settings is connected): ❖ Built-in display only ❖...

User Manual
Page 84
... (or other video display device), you may need to adjust the video settings. See the video device documentation for additional configuration steps. The computer's USB ports support most USB-compatible keyboards. Adjusting the quality of the external display To obtain the best picture quality from your computer. 84 Getting Started Using...
... (or other video display device), you may need to adjust the video settings. See the video device documentation for additional configuration steps. The computer's USB ports support most USB-compatible keyboards. Adjusting the quality of the external display To obtain the best picture quality from your computer. 84 Getting Started Using...

User Manual
Page 85
Getting Started 85 Using a mouse Using a mouse You may want to use a mouse instead of the computer's USB ports. 2 Plug the printer's power cable into a live AC outlet. Follow the manufacturer's instructions when connecting a printer. If a USB cable was not included with your printer. ... supports Plug and Play, check its documentation. To determine if the printer is then ready for further instructions. Refer to your computer through the USB ports. If you can set up a printer" on page 86.
Getting Started 85 Using a mouse Using a mouse You may want to use a mouse instead of the computer's USB ports. 2 Plug the printer's power cable into a live AC outlet. Follow the manufacturer's instructions when connecting a printer. If a USB cable was not included with your printer. ... supports Plug and Play, check its documentation. To determine if the printer is then ready for further instructions. Refer to your computer through the USB ports. If you can set up a printer" on page 86.
User Manual
Page 119
... about Windows® power plans, see "Power Plans" on battery power at accessories.toshiba.com. If the computer is continuously operated on AC power, either through an AC adaptor or a port replicator (if applicable to be obtained by the design of individual components. For more than... the specific test settings. Please see the accessories information included with your computer or visit the Toshiba Web site at least once a month. ...
... about Windows® power plans, see "Power Plans" on battery power at accessories.toshiba.com. If the computer is continuously operated on AC power, either through an AC adaptor or a port replicator (if applicable to be obtained by the design of individual components. For more than... the specific test settings. Please see the accessories information included with your computer or visit the Toshiba Web site at least once a month. ...
User Manual
Page 140
.../OFF button is pressed ON, the wireless indicator light will be lit on page 210. Connecting your computer to increase its communication ports. Ask your computer to a network to a network You can connect your network administrator for the telephone number of its capabilities and...Panel, Network and Internet, and then under Internet Options, click Connect to the Network port (RJ45) on your network administrator for help with common Wi-Fi® networking problems, see "Hot Keys/TOSHIBA Cards" on the system indicator panel. For more information see "Wireless networking problems" ...
.../OFF button is pressed ON, the wireless indicator light will be lit on page 210. Connecting your computer to increase its communication ports. Ask your computer to a network to a network You can connect your network administrator for the telephone number of its capabilities and...Panel, Network and Internet, and then under Internet Options, click Connect to the Network port (RJ45) on your network administrator for help with common Wi-Fi® networking problems, see "Hot Keys/TOSHIBA Cards" on the system indicator panel. For more information see "Wireless networking problems" ...

User Manual
Page 141
...a standard voice-grade telephone line. The modem allows you to: ❖ Access the Internet ❖ Communicate with a built-in modem port provides an RJ-11 jack, allowing you need to connect it to the Internet. Exploring Your Computer's Features Setting up for communications 141 3... Enter the phone number and account information of a telephone cable (purchased separately) into the modem port on certain models.) Your computer may come with your office's local area network (LAN) or larger corporate wide area network (WAN) For...
...a standard voice-grade telephone line. The modem allows you to: ❖ Access the Internet ❖ Communicate with a built-in modem port provides an RJ-11 jack, allowing you need to connect it to the Internet. Exploring Your Computer's Features Setting up for communications 141 3... Enter the phone number and account information of a telephone cable (purchased separately) into the modem port on certain models.) Your computer may come with your office's local area network (LAN) or larger corporate wide area network (WAN) For...

User Manual
Page 147
...being written or read. The card pops out slightly. 3 Grasp the card and pull it . Exploring Your Computer's Features Using the eSATA/USB combo port 2 Gently press the card inward to release it straight out. 147 (Sample Illustration) Removing memory media Do not remove memory media while data is ...on). Wait for transferring and storing large files such as digital photo, music or video files. Using the eSATA/USB combo port (Available on page 166. For more information about USB Sleep and Charge, please see "USB Sleep and Charge Utility" on certain models.) Your ...
...being written or read. The card pops out slightly. 3 Grasp the card and pull it . Exploring Your Computer's Features Using the eSATA/USB combo port 2 Gently press the card inward to release it straight out. 147 (Sample Illustration) Removing memory media Do not remove memory media while data is ...on). Wait for transferring and storing large files such as digital photo, music or video files. Using the eSATA/USB combo port (Available on page 166. For more information about USB Sleep and Charge, please see "USB Sleep and Charge Utility" on certain models.) Your ...

User Manual
Page 165
Utilities TOSHIBA Hardware Setup 165 ❖ Display-Allows you to change certain settings back to their default values ❖ Keyboard-Allows ...not appear on page 83. ❖ General-Allows you to view the current BIOS version or change various default settings for the eSATA port ❖ USB-Allows you are using after starting in display NOTE When the computer restarts, it remembers the last configuration. For more information..." on the display you to set the panel LED and keyboard backlight conditions (available on certain models) (Sample Image) TOSHIBA HWSetup screen -
Utilities TOSHIBA Hardware Setup 165 ❖ Display-Allows you to change certain settings back to their default values ❖ Keyboard-Allows ...not appear on page 83. ❖ General-Allows you to view the current BIOS version or change various default settings for the eSATA port ❖ USB-Allows you are using after starting in display NOTE When the computer restarts, it remembers the last configuration. For more information..." on the display you to set the panel LED and keyboard backlight conditions (available on certain models) (Sample Image) TOSHIBA HWSetup screen -

User Manual
Page 166
... when the computer is enabled or disabled and shows the position of the USB port that have the ( ) symbol icon. Starting the USB Sleep and Charge Utility To start this utility, click Start, All Programs, TOSHIBA, Utilities, and then USB Sleep and Charge. 166 Utilities USB Sleep and Charge Utility USB Sleep...
... when the computer is enabled or disabled and shows the position of the USB port that have the ( ) symbol icon. Starting the USB Sleep and Charge Utility To start this utility, click Start, All Programs, TOSHIBA, Utilities, and then USB Sleep and Charge. 166 Utilities USB Sleep and Charge Utility USB Sleep...

User Manual
Page 167
... the external devices thoroughly before use. ❖ If USB Sleep and Charge is enabled, the computer's battery will be supplied to the compatible port even when the power of the computer is turned OFF. As such, we recommend that you connect the AC adaptor to the computer when enabling... the USB Sleep and Charge function. ❖ Using the "USB Sleep and Charge function" to the compatible ports. As for compatible port. It is recommended that does not have the USB Sleep and Charge function-compatible icon ( ), attach the mouse or keyboard to the ...
... the external devices thoroughly before use. ❖ If USB Sleep and Charge is enabled, the computer's battery will be supplied to the compatible port even when the power of the computer is turned OFF. As such, we recommend that you connect the AC adaptor to the computer when enabling... the USB Sleep and Charge function. ❖ Using the "USB Sleep and Charge function" to the compatible ports. As for compatible port. It is recommended that does not have the USB Sleep and Charge function-compatible icon ( ), attach the mouse or keyboard to the ...
User Manual
Page 168
... power, you set the slider to 10%, charging will charge a wide variety of remaining battery life" heading) to come into contact with USB ports. Power supply mode settings Your computer may provide two different charging modes, to support various types of the battery power remains. To select a different... charging mode, use the Power supply mode drop-down list in the utility. Do not allow USB ports to specify when charging should select depends on the USB device you enable charging when the computer is running on battery power. You can ...
... power, you set the slider to 10%, charging will charge a wide variety of remaining battery life" heading) to come into contact with USB ports. Power supply mode settings Your computer may provide two different charging modes, to support various types of the battery power remains. To select a different... charging mode, use the Power supply mode drop-down list in the utility. Do not allow USB ports to specify when charging should select depends on the USB device you enable charging when the computer is running on battery power. You can ...
User Manual
Page 193
... Disc™ playback may vary with your computer. ❖ Make sure to connect your computer in the Control Panel. Please use the "TOSHIBA DVD Player" for copy protection purposes. Blu-ray Discs™ with high definition content is required for viewing BD content. Compatibility and/or ...more information on AACS key, visit www.aacsla.com/home. ❖ Depending on an external display requires an RGB/HDCP supported HDMI™ port. Region codes can change the destination of your BD (video) must close all other conditions. Doing so may experience "frame dropping" or lower...
... Disc™ playback may vary with your computer. ❖ Make sure to connect your computer in the Control Panel. Please use the "TOSHIBA DVD Player" for copy protection purposes. Blu-ray Discs™ with high definition content is required for viewing BD content. Compatibility and/or ...more information on AACS key, visit www.aacsla.com/home. ❖ Depending on an external display requires an RGB/HDCP supported HDMI™ port. Region codes can change the destination of your BD (video) must close all other conditions. Doing so may experience "frame dropping" or lower...
User Manual
Page 197
...printer back on, make sure it is firmly connected to the computer's modem port and the telephone line jack. Many programs display information on . Contact the... 197 Run the printer's self-test to check for more information regarding your system's V.92 modem, visit the Toshiba Web site at 300, 1200, 2400, 4800, 9600, 14400, 28800, 33600 bps (bits per second) or... higher. If you could create and attempt to transmit at pcsupport.toshiba.com. The printer will print. For more information. Make sure the line has a dial tone. Make sure you...
...printer back on, make sure it is firmly connected to the computer's modem port and the telephone line jack. Many programs display information on . Contact the... 197 Run the printer's self-test to check for more information regarding your system's V.92 modem, visit the Toshiba Web site at 300, 1200, 2400, 4800, 9600, 14400, 28800, 33600 bps (bits per second) or... higher. If you could create and attempt to transmit at pcsupport.toshiba.com. The printer will print. For more information. Make sure the line has a dial tone. Make sure you...

User Manual
Page 199
... by Windows®. 1 Click Start to your router or broadband modem, by plugging a standard CAT5 Ethernet patch cable (sold separately) into your computer's RJ45 Ethernet port. If it does, the utility may be disabling the Windows® operating system wireless management utility, in new firmware releases. The Windows® operating system...
... by Windows®. 1 Click Start to your router or broadband modem, by plugging a standard CAT5 Ethernet patch cable (sold separately) into your computer's RJ45 Ethernet port. If it does, the utility may be disabling the Windows® operating system wireless management utility, in new firmware releases. The Windows® operating system...

User Manual
Page 205
... 1 if any of your critical data has changed, or starting at step 2 if no critical data has changed. The eSATA device is set to a compatible port. If this case, please try one item of hardware or software. 4 Restart the Windows® operating system. 5 Use the new hardware or software for... ports that support the "USB Sleep and Charge function." Change the setting to Enabled. ❖ Some external devices may not be recognized if it is in ...
... 1 if any of your critical data has changed, or starting at step 2 if no critical data has changed. The eSATA device is set to a compatible port. If this case, please try one item of hardware or software. 4 Restart the Windows® operating system. 5 Use the new hardware or software for... ports that support the "USB Sleep and Charge function." Change the setting to Enabled. ❖ Some external devices may not be recognized if it is in ...

User Manual
Page 226
... CD Compact Disc CD-ROM Compact Disc Read-Only Memory CD-RW Compact Disc Rewrite Memory CMOS Complementary Metal-Oxide Semiconductor COM1 communications port 1 (serial port) COM2 communications port 2 (serial port) CPU Central Processing Unit DC Direct Current DMA Direct Memory Access 226 Glossary TECHNICAL NOTE: Some features defined in this glossary may appear...
... CD Compact Disc CD-ROM Compact Disc Read-Only Memory CD-RW Compact Disc Rewrite Memory CMOS Complementary Metal-Oxide Semiconductor COM1 communications port 1 (serial port) COM2 communications port 2 (serial port) CPU Central Processing Unit DC Direct Current DMA Direct Memory Access 226 Glossary TECHNICAL NOTE: Some features defined in this glossary may appear...


