User Manual
Page 10
... that focus on the market in European Union (EU) member countries after August 2005 to end users in Europe, Toshiba is intended to determine appropriate worldwide product life cycle planning and end-of-life strategies for applicable laws and regulations governing... already working with the related European Directives. Although the initial emphasis is TOSHIBA Europe GmbH, Hammfelddamm 8, 41460 Neuss, Germany. 10 EU Declaration of Conformity TOSHIBA declares that this product. If the product's battery or accumulator contains more than the specified values of lead (Pb), mercury...
... that focus on the market in European Union (EU) member countries after August 2005 to end users in Europe, Toshiba is intended to determine appropriate worldwide product life cycle planning and end-of-life strategies for applicable laws and regulations governing... already working with the related European Directives. Although the initial emphasis is TOSHIBA Europe GmbH, Hammfelddamm 8, 41460 Neuss, Germany. 10 EU Declaration of Conformity TOSHIBA declares that this product. If the product's battery or accumulator contains more than the specified values of lead (Pb), mercury...
User Manual
Page 21
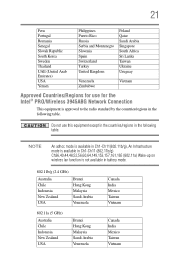
... Lanka Taiwan Ukraine Uruguay Venezuela Zimbabwe Vietnam Approved Countries/Regions for the Intel® PRO/Wireless 3945ABG Network Connection This equipment is not available in battery mode. 802.11b/g (2.4 GHz) Australia Chile Indonesia New Zealand USA Brunei Hong Kong Malaysia Saudi Arabia Venezuela 802.11a (5 GHz) Australia Chile Indonesia New Zealand...
... Lanka Taiwan Ukraine Uruguay Venezuela Zimbabwe Vietnam Approved Countries/Regions for the Intel® PRO/Wireless 3945ABG Network Connection This equipment is not available in battery mode. 802.11b/g (2.4 GHz) Australia Chile Indonesia New Zealand USA Brunei Hong Kong Malaysia Saudi Arabia Venezuela 802.11a (5 GHz) Australia Chile Indonesia New Zealand...
User Manual
Page 29
Contents Introduction 37 This guide 39 Safety icons 40 Other icons used 40 Your computer's features and specifications ....41 Other documentation 41 Service options 41 Chapter 1: Getting Started 42 Selecting a place to work 42 Setting up a work environment 42 Keeping yourself comfortable 43 Precautions 43 Important information on your computer's cooling fan 45 Setting up your computer 45 Connecting to a power source 46 Charging the main battery 48 29
Contents Introduction 37 This guide 39 Safety icons 40 Other icons used 40 Your computer's features and specifications ....41 Other documentation 41 Service options 41 Chapter 1: Getting Started 42 Selecting a place to work 42 Setting up a work environment 42 Keeping yourself comfortable 43 Precautions 43 Important information on your computer's cooling fan 45 Setting up your computer 45 Connecting to a power source 46 Charging the main battery 48 29
User Manual
Page 32
... Caring for optical discs 110 Toshiba's online resources 111 Chapter 3: Mobile Computing 112 Toshiba's energy-saver design 112 Running the computer on battery power 113 Battery Notice 113 Power management 114 Using additional batteries 114 Charging batteries 114 Charging the main battery 115 Charging the RTC battery 115 Monitoring main battery power 116 Determining remaining battery power 118 What to...
... Caring for optical discs 110 Toshiba's online resources 111 Chapter 3: Mobile Computing 112 Toshiba's energy-saver design 112 Running the computer on battery power 113 Battery Notice 113 Power management 114 Using additional batteries 114 Charging batteries 114 Charging the main battery 115 Charging the RTC battery 115 Monitoring main battery power 116 Determining remaining battery power 118 What to...
User Manual
Page 34
... Sleep and Charge Utility.......164 USB Sleep and Charge 164 Enabling USB Sleep and Charge 166 Power supply mode settings 166 Battery settings 166 TOSHIBA Zooming Utility 167 TOSHIBA Button Support 168 TOSHIBA Accessibility 169 Fingerprint Authentication Utility 170 Fingerprint utility limitations 170 Using the Fingerprint Authentication Utility.....170 Fingerprint Logon 171 Care and...
... Sleep and Charge Utility.......164 USB Sleep and Charge 164 Enabling USB Sleep and Charge 166 Power supply mode settings 166 Battery settings 166 TOSHIBA Zooming Utility 167 TOSHIBA Button Support 168 TOSHIBA Accessibility 169 Fingerprint Authentication Utility 170 Fingerprint utility limitations 170 Using the Fingerprint Authentication Utility.....170 Fingerprint Logon 171 Care and...
User Manual
Page 35
... The Windows® operating system can help you 186 Fixing a problem with Device Manager 187 Checking device properties 187 Memory problems 188 Power and the batteries 188 Keyboard problems 190 Display problems 190 Disk or storage drive problems 192 Error-checking 192 Optical drive problems (tray-type drive only) .......193 Sound... configuration backup in the Windows® operating system 202 Saving system configuration with restore points 202 If you need further assistance 207 Before you contact Toshiba 207 Contacting Toshiba 207
... The Windows® operating system can help you 186 Fixing a problem with Device Manager 187 Checking device properties 187 Memory problems 188 Power and the batteries 188 Keyboard problems 190 Display problems 190 Disk or storage drive problems 192 Error-checking 192 Optical drive problems (tray-type drive only) .......193 Sound... configuration backup in the Windows® operating system 202 Saving system configuration with restore points 202 If you need further assistance 207 Before you contact Toshiba 207 Contacting Toshiba 207
User Manual
Page 37
... ENERGY STAR® logo on using power management settings to conserve computer energy. 37 With your Toshiba computer, your computer will provide the most stable operating environment and optimum system performance for both AC power and battery modes. To conserve energy, your computer is labeled with the power management options preset to...
... ENERGY STAR® logo on using power management settings to conserve computer energy. 37 With your Toshiba computer, your computer will provide the most stable operating environment and optimum system performance for both AC power and battery modes. To conserve energy, your computer is labeled with the power management options preset to...
User Manual
Page 43
... liquid or moisture can cause electric shock or fire, resulting in serious injury or permanent damage to the computer. Remove the battery pack. You should accidentally occur, immediately: 1. If any part of travel. Do not turn on the power again until you...10070; Avoid prolonged physical contact with your computer, contains helpful information for working comfortably throughout the day. Keeping yourself comfortable The Toshiba Instruction Manual for Safety and Comfort, included with the underside or surface of these instructions could result in damage or serious injury...
... liquid or moisture can cause electric shock or fire, resulting in serious injury or permanent damage to the computer. Remove the battery pack. You should accidentally occur, immediately: 1. If any part of travel. Do not turn on the power again until you...10070; Avoid prolonged physical contact with your computer, contains helpful information for working comfortably throughout the day. Keeping yourself comfortable The Toshiba Instruction Manual for Safety and Comfort, included with the underside or surface of these instructions could result in damage or serious injury...
User Manual
Page 45
... including those located at the base of the computer. ❖ Always operate your computer on page 46. Your computer contains a rechargeable main battery that needs to be charged before adding external or internal components to your computer. NOTE The cooling fan location will vary depending on a hard...on the computer. See "Connecting to a power source" on a carpet or other soft material can use external power or to charge the battery you can block the vents located at the base of the computer. Always make sure your computer or AC adaptor could cause system failure, ...
... including those located at the base of the computer. ❖ Always operate your computer on page 46. Your computer contains a rechargeable main battery that needs to be charged before adding external or internal components to your computer. NOTE The cooling fan location will vary depending on a hard...on the computer. See "Connecting to a power source" on a carpet or other soft material can use external power or to charge the battery you can block the vents located at the base of the computer. Always make sure your computer or AC adaptor could cause system failure, ...
User Manual
Page 46
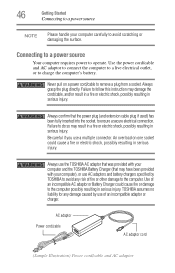
... incompatible adaptor or charger. Use of fire or other damage to the computer. TOSHIBA assumes no liability for any damage caused by TOSHIBA to avoid any risk of an incompatible AC adaptor or Battery Charger could cause a fire or electric shock, possibly resulting in serious injury....Connecting to a power source Your computer requires power to avoid scratching or damaging the surface. Always use the TOSHIBA AC adaptor that was provided with your computer and the TOSHIBA Battery Charger (that the power plug (and extension cable plug if used) has been fully inserted into the ...
... incompatible adaptor or charger. Use of fire or other damage to the computer. TOSHIBA assumes no liability for any damage caused by TOSHIBA to avoid any risk of an incompatible AC adaptor or Battery Charger could cause a fire or electric shock, possibly resulting in serious injury....Connecting to a power source Your computer requires power to avoid scratching or damaging the surface. Always use the TOSHIBA AC adaptor that was provided with your computer and the TOSHIBA Battery Charger (that the power plug (and extension cable plug if used) has been fully inserted into the ...
User Manual
Page 48
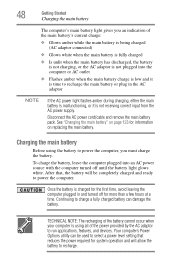
... system operation and will allow the battery to recharge the main battery or plug in and turned off until the battery light glows white. TECHNICAL NOTE: The recharging of the battery cannot occur when your computer is using the battery to power the computer, you an...power cord/cable and remove the main battery pack. See "Changing the main battery" on replacing the main battery. 48 Getting Started Charging the main battery The computer's main battery light gives you must charge the battery. Continuing to charge a fully charged battery can be completely charged and ready to...
... system operation and will allow the battery to recharge the main battery or plug in and turned off until the battery light glows white. TECHNICAL NOTE: The recharging of the battery cannot occur when your computer is using the battery to power the computer, you an...power cord/cable and remove the main battery pack. See "Changing the main battery" on replacing the main battery. 48 Getting Started Charging the main battery The computer's main battery light gives you must charge the battery. Continuing to charge a fully charged battery can be completely charged and ready to...
User Manual
Page 49
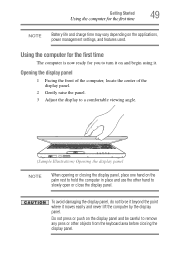
Using the computer for the first time The computer is now ready for the first time NOTE Battery life and charge time may vary depending on the applications, power management settings, and features used. To avoid damaging the display panel, do not force ...
Using the computer for the first time The computer is now ready for the first time NOTE Battery life and charge time may vary depending on the applications, power management settings, and features used. To avoid damaging the display panel, do not force ...
User Manual
Page 50
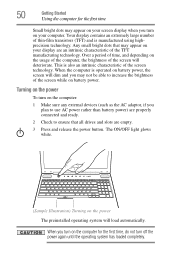
...) are properly connected and ready. 2 Check to increase the brightness of the screen will dim and you turn on battery power, the screen will deteriorate. When the computer is operated on your display are empty. 3 Press and release the power button. Over a period of time, ...and depending on the usage of the computer, the brightness of the screen while on battery power. 50 Getting Started Using the computer for the first time, do not turn off the power again until the operating system has loaded completely...
...) are properly connected and ready. 2 Check to increase the brightness of the screen will dim and you turn on battery power, the screen will deteriorate. When the computer is operated on your display are empty. 3 Press and release the power button. Over a period of time, ...and depending on the usage of the computer, the brightness of the screen while on battery power. 50 Getting Started Using the computer for the first time, do not turn off the power again until the operating system has loaded completely...
User Manual
Page 53
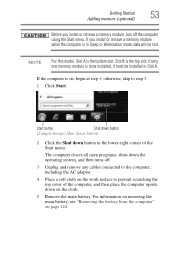
... top slot. Slot B is the bottom slot. If only one memory module is to step 3. 1 Click Start. For information on removing the main battery, see "Removing the battery from the computer" on , begin at step 1; If the computer is on page 124. otherwise, skip to be installed, it must be lost. Getting... module, turn off . 3 Unplug and remove any cables connected to the computer, including the AC adaptor. 4 Place a soft cloth on the cloth. 5 Remove the main battery.
... top slot. Slot B is the bottom slot. If only one memory module is to step 3. 1 Click Start. For information on removing the main battery, see "Removing the battery from the computer" on , begin at step 1; If the computer is on page 124. otherwise, skip to be installed, it must be lost. Getting... module, turn off . 3 Unplug and remove any cables connected to the computer, including the AC adaptor. 4 Place a soft cloth on the cloth. 5 Remove the main battery.
User Manual
Page 57
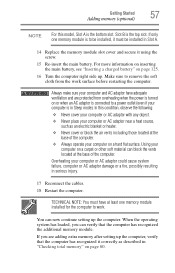
...at the base of the computer. ❖ Always operate your computer is the bottom slot. For more information on inserting the main battery, see "Inserting a charged battery" on page 125. 16 Turn the computer right side up the computer. Always make sure your computer and AC adaptor have at ...before restarting the computer. If only one memory module installed for the computer to be installed, it using the screw. 15 Re-insert the main battery. Using your computer or AC adaptor could cause system failure, computer or AC adaptor damage or a fire, possibly resulting in Slot A. 14 ...
...at the base of the computer. ❖ Always operate your computer is the bottom slot. For more information on inserting the main battery, see "Inserting a charged battery" on page 125. 16 Turn the computer right side up the computer. Always make sure your computer and AC adaptor have at ...before restarting the computer. If only one memory module installed for the computer to be installed, it using the screw. 15 Re-insert the main battery. Using your computer or AC adaptor could cause system failure, computer or AC adaptor damage or a fire, possibly resulting in Slot A. 14 ...
User Manual
Page 59
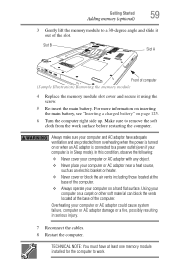
... (optional) 3 Gently lift the memory module to a 30-degree angle and slide it using the screw. 5 Re-insert the main battery. For more information on inserting the main battery, see "Inserting a charged battery" on a hard flat surface. Using your computer or AC adaptor could cause system failure, computer or AC adaptor damage or...
... (optional) 3 Gently lift the memory module to a 30-degree angle and slide it using the screw. 5 Re-insert the main battery. For more information on inserting the main battery, see "Inserting a charged battery" on a hard flat surface. Using your computer or AC adaptor could cause system failure, computer or AC adaptor damage or...
User Manual
Page 82
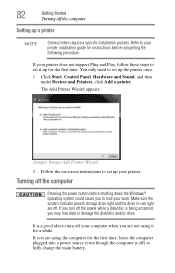
... instructions before shutting down the Windows® operating system could cause you are off your work. It is a good idea to fully charge the main battery. The Add Printer Wizard appears. (Sample Image) Add Printer Wizard 2 Follow the on-screen instructions to your printer. If you may lose data or damage...
... instructions before shutting down the Windows® operating system could cause you are off your work. It is a good idea to fully charge the main battery. The Add Printer Wizard appears. (Sample Image) Add Printer Wizard 2 Follow the on-screen instructions to your printer. If you may lose data or damage...
User Manual
Page 83
Getting Started 83 Turning off the computer Options for turning off the computer Depending on the operating system installed, you have more main battery power than restarting from Sleep. ❖ When starting up again, the computer returns to upgrade your files and make sure all disk/disc activity lights... available for several days or if you must turn off your computer in order to the state in Hibernation mode, the computer uses no main battery power. ❖ Because the state of the desktop to memory, so that when you left off . Each option has its advantages. ❖ Use the ...
Getting Started 83 Turning off the computer Options for turning off the computer Depending on the operating system installed, you have more main battery power than restarting from Sleep. ❖ When starting up again, the computer returns to upgrade your files and make sure all disk/disc activity lights... available for several days or if you must turn off your computer in order to the state in Hibernation mode, the computer uses no main battery power. ❖ Because the state of the desktop to memory, so that when you left off . Each option has its advantages. ❖ Use the ...

User Manual
Page 84
...will try to memory so that, when you restart the computer, you can continue working from Sleep takes less time and consumes less main battery power than restarting after turning off the computer using the Hibernation or Shut down commands. ❖ When starting up again, the computer ...use and configure Hibernation mode see "Using and configuring Sleep mode" on page 87. For information on using the Sleep command and the main battery discharges fully, your internal storage drive, and then shuts down using Sleep, see "Using and configuring Hibernation mode" on page 89. NOTE ...
...will try to memory so that, when you restart the computer, you can continue working from Sleep takes less time and consumes less main battery power than restarting after turning off the computer using the Hibernation or Shut down commands. ❖ When starting up again, the computer ...use and configure Hibernation mode see "Using and configuring Sleep mode" on page 87. For information on using the Sleep command and the main battery discharges fully, your internal storage drive, and then shuts down using Sleep, see "Using and configuring Hibernation mode" on page 89. NOTE ...
User Manual
Page 86
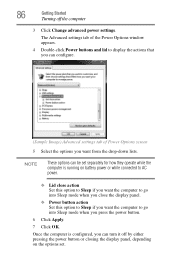
... the computer 3 Click Change advanced power settings. 86 Getting Started Turning off by either pressing the power button or closing the display panel, depending on battery power or while connected to AC power. ❖ Lid close action Set this option to Sleep if you want the computer to go into Sleep...
... the computer 3 Click Change advanced power settings. 86 Getting Started Turning off by either pressing the power button or closing the display panel, depending on battery power or while connected to AC power. ❖ Lid close action Set this option to Sleep if you want the computer to go into Sleep...


