User Manual
Page 30
... computer for the first time 49 Opening the display panel 49 Turning on the power 50 Setting up your software 51 Registering your computer with Toshiba 51 Adding optional external devices 51 Adding memory (optional 52 Installing a memory module 52 Removing a memory module 58 Checking total memory 60 Recovering the Internal... display device 78 Directing the display output when you turn on the computer 79 Adjusting the quality of the external display......80 Using an external keyboard 81 Using a mouse 81 Connecting a printer 81 Setting up a printer 82
... computer for the first time 49 Opening the display panel 49 Turning on the power 50 Setting up your software 51 Registering your computer with Toshiba 51 Adding optional external devices 51 Adding memory (optional 52 Installing a memory module 52 Removing a memory module 58 Checking total memory 60 Recovering the Internal... display device 78 Directing the display output when you turn on the computer 79 Adjusting the quality of the external display......80 Using an external keyboard 81 Using a mouse 81 Connecting a printer 81 Setting up a printer 82
User Manual
Page 31
... your computer 92 Cleaning the computer 92 Moving the computer 93 Using a computer lock 93 Chapter 2: Learning the Basics 94 Computing tips 94 Using the keyboard 95 Character keys 96 Ctrl, Fn, and Alt keys 96 Function keys 96 Special Windows® keys 97 Backlit... keyboard 97 Starting a program 97 Starting a program from the Start menu...........98 Starting a program from Windows® Explorer 98 Starting a program using the Search programs and ...
... your computer 92 Cleaning the computer 92 Moving the computer 93 Using a computer lock 93 Chapter 2: Learning the Basics 94 Computing tips 94 Using the keyboard 95 Character keys 96 Ctrl, Fn, and Alt keys 96 Function keys 96 Special Windows® keys 97 Backlit... keyboard 97 Starting a program 97 Starting a program from the Start menu...........98 Starting a program from Windows® Explorer 98 Starting a program using the Search programs and ...
User Manual
Page 35
...® operating system can help you 186 Fixing a problem with Device Manager 187 Checking device properties 187 Memory problems 188 Power and the batteries 188 Keyboard problems 190 Display problems 190 Disk or storage drive problems 192 Error-checking 192 Optical drive problems (tray-type drive only) .......193 Sound system problems... configuration backup in the Windows® operating system 202 Saving system configuration with restore points 202 If you need further assistance 207 Before you contact Toshiba 207 Contacting Toshiba 207
...® operating system can help you 186 Fixing a problem with Device Manager 187 Checking device properties 187 Memory problems 188 Power and the batteries 188 Keyboard problems 190 Display problems 190 Disk or storage drive problems 192 Error-checking 192 Optical drive problems (tray-type drive only) .......193 Sound system problems... configuration backup in the Windows® operating system 202 Saving system configuration with restore points 202 If you need further assistance 207 Before you contact Toshiba 207 Contacting Toshiba 207
User Manual
Page 36
36 Contents Other Toshiba Internet Web sites 208 Toshiba's worldwide offices 208 Appendix A: Hot Keys/TOSHIBA Cards 210 Hot Key Cards 210 Using the Hot Key Cards 211 Application Cards 212 Using the Application Cards 213 Card Case 214 Hot key ... mode 219 Output (Display switch 220 Display brightness 221 Disabling or enabling wireless devices............222 Disabling or enabling the TouchPad 223 Zoom (Display resolution 224 Keyboard hot key functions 225 Appendix B: Power Cord/Cable Connectors 226 Glossary 227 Index 241
36 Contents Other Toshiba Internet Web sites 208 Toshiba's worldwide offices 208 Appendix A: Hot Keys/TOSHIBA Cards 210 Hot Key Cards 210 Using the Hot Key Cards 211 Application Cards 212 Using the Application Cards 213 Card Case 214 Hot key ... mode 219 Output (Display switch 220 Display brightness 221 Disabling or enabling wireless devices............222 Disabling or enabling the TouchPad 223 Zoom (Display resolution 224 Keyboard hot key functions 225 Appendix B: Power Cord/Cable Connectors 226 Glossary 227 Index 241
User Manual
Page 45
... cools the CPU by drawing outside air into the computer. Always make sure your computer on or when an AC adaptor is connected to , a mouse, keyboard, printer, memory, and ExpressCards®. Setting up your computer TECHNICAL NOTE: You must attach the AC adaptor. In this condition, observe the following: ❖ Never...
... cools the CPU by drawing outside air into the computer. Always make sure your computer on or when an AC adaptor is connected to , a mouse, keyboard, printer, memory, and ExpressCards®. Setting up your computer TECHNICAL NOTE: You must attach the AC adaptor. In this condition, observe the following: ❖ Never...
User Manual
Page 49
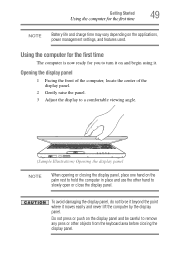
... Battery life and charge time may vary depending on the palm rest to hold the computer in place and use the other objects from the keyboard area before closing the display panel, place one hand on the applications, power management settings, and features used. Opening the display panel 1 Facing the front...
... Battery life and charge time may vary depending on the palm rest to hold the computer in place and use the other objects from the keyboard area before closing the display panel, place one hand on the applications, power management settings, and features used. Opening the display panel 1 Facing the front...
User Manual
Page 51
...(optional)" on page 52) ❖ Connect a mouse (see "Using a mouse" on page 81) ❖ Connect an external keyboard (see "Using an external keyboard" on page 81) ❖ Connect an external monitor (see "Using external display devices" on page 77) ❖ Connect a local... printer (see "Connecting a printer" on your computer, the Setup Wizard guides you may vary according to complete Product Registration will not diminish Customer rights under the Toshiba...
...(optional)" on page 52) ❖ Connect a mouse (see "Using a mouse" on page 81) ❖ Connect an external keyboard (see "Using an external keyboard" on page 81) ❖ Connect an external monitor (see "Using external display devices" on page 77) ❖ Connect a local... printer (see "Connecting a printer" on your computer, the Setup Wizard guides you may vary according to complete Product Registration will not diminish Customer rights under the Toshiba...
User Manual
Page 62
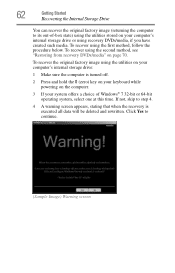
... this time. Click Yes to step 4. 4 A warning screen appears, stating that when the recovery is turned off. 2 Press and hold the 0 (zero) key on your keyboard while powering on the computer. 3 If your system offers a choice of -box state) using the first method, follow the procedure below. If not, skip to...
... this time. Click Yes to step 4. 4 A warning screen appears, stating that when the recovery is turned off. 2 Press and hold the 0 (zero) key on your keyboard while powering on the computer. 3 If your system offers a choice of -box state) using the first method, follow the procedure below. If not, skip to...
User Manual
Page 64
...executing the recovery. To resize and recover the C: drive using the second method, see "Restoring from recovery DVDs/media" on the keyboard to restart the computer. NOTE During the recovery process it is strongly recommended that the internal storage drive has been recovered. 9 Press...If your computer be connected to begin the recovery. When the process is turned off. 2 Press and hold the 0 (zero) key on your keyboard while powering on your computer's internal storage drive: 1 Make sure the computer is complete, a message displays indicating that your system offers a choice ...
...executing the recovery. To resize and recover the C: drive using the second method, see "Restoring from recovery DVDs/media" on the keyboard to restart the computer. NOTE During the recovery process it is strongly recommended that the internal storage drive has been recovered. 9 Press...If your computer be connected to begin the recovery. When the process is turned off. 2 Press and hold the 0 (zero) key on your keyboard while powering on your computer's internal storage drive: 1 Make sure the computer is complete, a message displays indicating that your system offers a choice ...
User Manual
Page 66
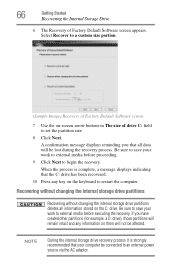
Select Recover to a custom size portion. (Sample Image) Recovery of Factory Default Software screen 7 Use the on the keyboard to restart the computer. A confirmation message displays reminding you have created other partitions (for example, a D: drive), those partitions will remain intact and any key on -...
Select Recover to a custom size portion. (Sample Image) Recovery of Factory Default Software screen 7 Use the on the keyboard to restart the computer. A confirmation message displays reminding you have created other partitions (for example, a D: drive), those partitions will remain intact and any key on -...
User Manual
Page 67
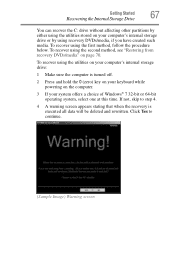
Click Yes to step 4. 4 A warning screen appears stating that when the recovery is turned off. 2 Press and hold the 0 (zero) key on your keyboard while powering on your computer's internal storage drive or by either using the utilities stored on page 70. To recover using the second method, see "...
Click Yes to step 4. 4 A warning screen appears stating that when the recovery is turned off. 2 Press and hold the 0 (zero) key on your keyboard while powering on your computer's internal storage drive or by either using the utilities stored on page 70. To recover using the second method, see "...
User Manual
Page 69
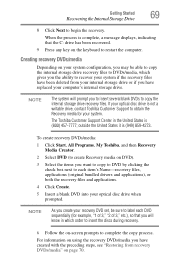
...it is (800) 457-7777; To create recovery DVDs/media: 1 Click Start, All Programs, My Toshiba, and then Recovery Media Creator. 2 Select DVD (to create Recovery media on the keyboard to recover your system if the recovery files have been deleted from recovery DVDs/media" on using the recovery... DVDs/media you have created with the preceding steps, see "Restoring from your internal storage drive or if you have replaced your system. The Toshiba Customer ...
...it is (800) 457-7777; To create recovery DVDs/media: 1 Click Start, All Programs, My Toshiba, and then Recovery Media Creator. 2 Select DVD (to create Recovery media on the keyboard to recover your system if the recovery files have been deleted from recovery DVDs/media" on using the recovery... DVDs/media you have created with the preceding steps, see "Restoring from your internal storage drive or if you have replaced your system. The Toshiba Customer ...
User Manual
Page 71
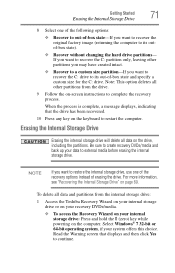
If you want to recover the C: partition only, leaving other partitions from the internal storage drive: 1 Access the Toshiba Recovery Wizard on your internal storage drive or on your recovery DVDs/media. ❖ To access the Recovery Wizard on your internal storage...to its outof-box state). ❖ Recover without changing the hard drive partitions- For more information, see "Recovering the Internal Storage Drive" on the keyboard to restart the computer. To delete all data on the computer. When the process is complete, a message displays, indicating that displays and then click ...
If you want to recover the C: partition only, leaving other partitions from the internal storage drive: 1 Access the Toshiba Recovery Wizard on your internal storage drive or on your recovery DVDs/media. ❖ To access the Recovery Wizard on your internal storage...to its outof-box state). ❖ Recover without changing the hard drive partitions- For more information, see "Recovering the Internal Storage Drive" on the keyboard to restart the computer. To delete all data on the computer. When the process is complete, a message displays, indicating that displays and then click ...
User Manual
Page 72
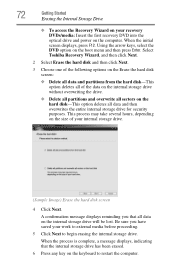
Select Toshiba Recovery Wizard, and then click Next. 2 Select Erase the hard disk and then click Next. 3 Choose one of the following options on the Erase the ... the hard disk-This option deletes all data on the internal storage drive will be lost. This process may take several hours, depending on the keyboard to begin erasing the internal storage drive. Using the arrow keys, select the DVD option on the computer. A confirmation message displays reminding you have saved...
Select Toshiba Recovery Wizard, and then click Next. 2 Select Erase the hard disk and then click Next. 3 Choose one of the following options on the Erase the ... the hard disk-This option deletes all data on the internal storage drive will be lost. This process may take several hours, depending on the keyboard to begin erasing the internal storage drive. Using the arrow keys, select the DVD option on the computer. A confirmation message displays reminding you have saved...
User Manual
Page 73
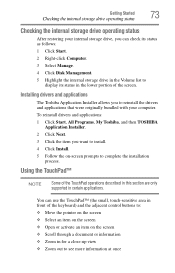
...drivers and applications: 1 Click Start, All Programs, My Toshiba, and then TOSHIBA Application Installer. 2 Click Next. 3 Click the item you can use the TouchPad™ (the small, touch-sensitive area in front of the keyboard) and the adjacent control buttons to: ❖ Move ...the on the screen ❖ Scroll through a document or information ❖ Zoom in certain applications. Installing drivers and applications The Toshiba Application Installer allows you to reinstall the drivers and applications that were originally bundled with your internal storage drive, you want to see...
...drivers and applications: 1 Click Start, All Programs, My Toshiba, and then TOSHIBA Application Installer. 2 Click Next. 3 Click the item you can use the TouchPad™ (the small, touch-sensitive area in front of the keyboard) and the adjacent control buttons to: ❖ Move ...the on the screen ❖ Scroll through a document or information ❖ Zoom in certain applications. Installing drivers and applications The Toshiba Application Installer allows you to reinstall the drivers and applications that were originally bundled with your internal storage drive, you want to see...
User Manual
Page 81
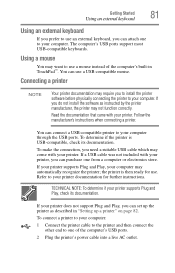
...a suitable USB cable which may not function correctly. Refer to your computer. Getting Started 81 Using an external keyboard Using an external keyboard If you prefer to use an external keyboard, you can attach one to your printer documentation for use. TECHNICAL NOTE: To determine if your printer. If... that came with your computer may want to use a USB-compatible mouse. The computer's USB ports support most USB-compatible keyboards. the printer is USB-compatible, check its documentation. To determine if the printer is then ready for further instructions.
...a suitable USB cable which may not function correctly. Refer to your computer. Getting Started 81 Using an external keyboard Using an external keyboard If you prefer to use an external keyboard, you can attach one to your printer documentation for use. TECHNICAL NOTE: To determine if your printer. If... that came with your computer may want to use a USB-compatible mouse. The computer's USB ports support most USB-compatible keyboards. the printer is USB-compatible, check its documentation. To determine if the printer is then ready for further instructions.
User Manual
Page 92
..., see "Power Plans" on cleaning and moving your computer This section gives tips on page 121. To keep dust and dirt out of the computer's keyboard, speaker, and other openings. Never use harsh or caustic chemical products to customize your computer clean, gently wipe the display panel and exterior case with...
..., see "Power Plans" on cleaning and moving your computer This section gives tips on page 121. To keep dust and dirt out of the computer's keyboard, speaker, and other openings. Never use harsh or caustic chemical products to customize your computer clean, gently wipe the display panel and exterior case with...
User Manual
Page 95
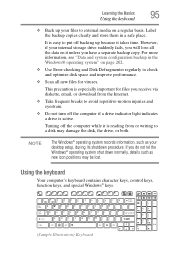
Learning the Basics 95 Using the keyboard ❖ Back up because it is reading from the Internet. ❖ Take frequent breaks to avoid repetitive-motion injuries and eyestrain. ❖ Do not turn ... backup in a safe place. Turning off backing up your desktop setup, during its shutdown procedure. Using the keyboard Your computer's keyboard contains character keys, control keys, function keys, and special Windows® keys. (Sample Illustration) Keyboard NOTE The Windows® operating system records information, such as new icon positions may damage the disk...
Learning the Basics 95 Using the keyboard ❖ Back up because it is reading from the Internet. ❖ Take frequent breaks to avoid repetitive-motion injuries and eyestrain. ❖ Do not turn ... backup in a safe place. Turning off backing up your desktop setup, during its shutdown procedure. Using the keyboard Your computer's keyboard contains character keys, control keys, function keys, and special Windows® keys. (Sample Illustration) Keyboard NOTE The Windows® operating system records information, such as new icon positions may damage the disk...
User Manual
Page 96
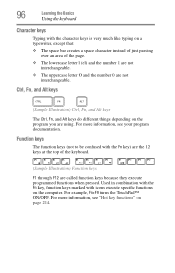
... in combination with the Fn key, function keys marked with icons execute specific functions on page 214. 96 Learning the Basics Using the keyboard Character keys Typing with the character keys is very much like typing on the program you are using. For example, Fn+F9 turns the... different things depending on a typewriter, except that: ❖ The space bar creates a space character instead of just passing over an area of the keyboard. (Sample Illustration) Function keys F1 through F12 are not interchangeable. Function keys The function keys (not to be confused with the Fn key) are...
... in combination with the Fn key, function keys marked with icons execute specific functions on page 214. 96 Learning the Basics Using the keyboard Character keys Typing with the character keys is very much like typing on the program you are using. For example, Fn+F9 turns the... different things depending on a typewriter, except that: ❖ The space bar creates a space character instead of just passing over an area of the keyboard. (Sample Illustration) Function keys F1 through F12 are not interchangeable. Function keys The function keys (not to be confused with the Fn key) are...
User Manual
Page 97
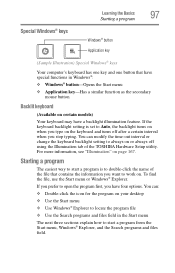
...The easiest way to double-click the name of the TOSHIBA Hardware Setup utility. Special Windows® keys Learning the Basics 97 Starting a program Windows® button Application key (Sample Illustration) Special Windows® keys Your computer's keyboard has one key and one button that contains the information ...four options. You can : ❖ Double-click the icon for the program on . For more information, see "Illumination" on the keyboard and turns off using the Illumination tab of the file that have special functions in the Start menu The next three sections explain how to...
...The easiest way to double-click the name of the TOSHIBA Hardware Setup utility. Special Windows® keys Learning the Basics 97 Starting a program Windows® button Application key (Sample Illustration) Special Windows® keys Your computer's keyboard has one key and one button that contains the information ...four options. You can : ❖ Double-click the icon for the program on . For more information, see "Illumination" on the keyboard and turns off using the Illumination tab of the file that have special functions in the Start menu The next three sections explain how to...

