User Guide
Page 28
28 Contents Using the computer for the first time 47 Opening the display panel 47 Your computer's features and specifications ....48 Turning on the power 48 Adding memory (optional 49 Installing a memory module 49 Removing a memory module 55 Checking total memory 56 Hard Drive Recovery Utilities 57 Creating Recovery CDs/DVDs 58 Hard... off the computer 74 Using the Shut Down command 77 Using and configuring Hibernation mode .........79 Using and configuring Sleep mode 81 Closing the display panel 84 Customizing your computer's settings 84
28 Contents Using the computer for the first time 47 Opening the display panel 47 Your computer's features and specifications ....48 Turning on the power 48 Adding memory (optional 49 Installing a memory module 49 Removing a memory module 55 Checking total memory 56 Hard Drive Recovery Utilities 57 Creating Recovery CDs/DVDs 58 Hard... off the computer 74 Using the Shut Down command 77 Using and configuring Hibernation mode .........79 Using and configuring Sleep mode 81 Closing the display panel 84 Customizing your computer's settings 84
User Guide
Page 47
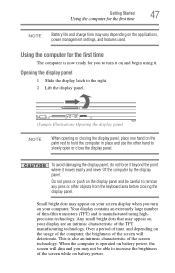
... be able to slowly open or close the display panel. Your display contains an extremely large number of thin-film transistors (TFT) and is also an intrinsic characteristic of the screen will dim and you to remove any pens or other hand to increase the brightness of the TFT manufacturing technology. Over...
... be able to slowly open or close the display panel. Your display contains an extremely large number of thin-film transistors (TFT) and is also an intrinsic characteristic of the screen will dim and you to remove any pens or other hand to increase the brightness of the TFT manufacturing technology. Over...
User Guide
Page 51
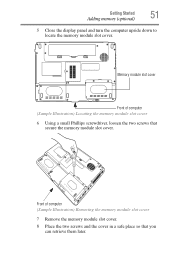
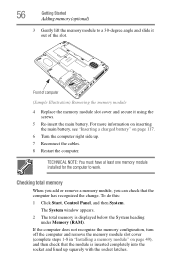
Getting Started 51 Adding memory (optional) 5 Close the display panel and turn the computer upside down to locate the memory module slot cover. Memory module slot cover Front of computer (Sample Illustration) Removing the memory module slot cover 7 Remove the memory module slot cover. 8 Place the two screws and the cover in a safe place so that secure the memory module slot cover. Front of computer (Sample Illustration) Locating the memory module slot cover 6 Using a small Phillips screwdriver, loosen the two screws that you can retrieve them later.
Getting Started 51 Adding memory (optional) 5 Close the display panel and turn the computer upside down to locate the memory module slot cover. Memory module slot cover Front of computer (Sample Illustration) Removing the memory module slot cover 7 Remove the memory module slot cover. 8 Place the two screws and the cover in a safe place so that secure the memory module slot cover. Front of computer (Sample Illustration) Locating the memory module slot cover 6 Using a small Phillips screwdriver, loosen the two screws that you can retrieve them later.
User Guide
Page 56
...Installing a memory module" on page 117. 6 Turn the computer right side up squarely with the socket latches. Checking total memory When you add or remove a memory module, you can check that the module is displayed below the System heading under Memory (RAM). Front of the slot. To do this...: 1 Click Start, Control Panel, and then System. The System window appears. 2 The total memory is inserted completely into the socket and lined up . 7 Reconnect the cables....
...Installing a memory module" on page 117. 6 Turn the computer right side up squarely with the socket latches. Checking total memory When you add or remove a memory module, you can check that the module is displayed below the System heading under Memory (RAM). Front of the slot. To do this...: 1 Click Start, Control Panel, and then System. The System window appears. 2 The total memory is inserted completely into the socket and lined up . 7 Reconnect the cables....
User Guide
Page 115
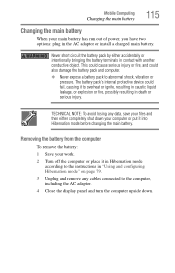
...contact with another conductive object. TECHNICAL NOTE: To avoid losing any cables connected to the computer, including the AC adaptor. 4 Close the display panel and turn the computer upside down your computer or put it to the instructions in "Using and configuring Hibernation mode" on page 79. 3... . This could cause serious injury or fire, and could fail, causing it into Hibernation mode before changing the main battery. Removing the battery from the computer To remove the battery: 1 Save your work. 2 Turn off the computer or place it in Hibernation mode according to overheat or ignite...
...contact with another conductive object. TECHNICAL NOTE: To avoid losing any cables connected to the computer, including the AC adaptor. 4 Close the display panel and turn the computer upside down your computer or put it to the instructions in "Using and configuring Hibernation mode" on page 79. 3... . This could cause serious injury or fire, and could fail, causing it into Hibernation mode before changing the main battery. Removing the battery from the computer To remove the battery: 1 Save your work. 2 Turn off the computer or place it in Hibernation mode according to overheat or ignite...
User Guide
Page 180
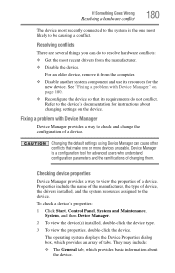
... ramifications of a device. Changing the default settings using Device Manager can do not conflict. To check a device's properties: 1 Click Start, Control Panel, System and Maintenance, System, and then Device Manager. 2 To view the device(s) installed, double-click the device type. 3 To view the ... hardware conflict 180 The device most recently connected to the system is a configuration tool for the new device. For an older device, remove it from the computer. ❖ Disable another system component and use its requirements do to resolve hardware conflicts: ❖ Get the...
... ramifications of a device. Changing the default settings using Device Manager can do not conflict. To check a device's properties: 1 Click Start, Control Panel, System and Maintenance, System, and then Device Manager. 2 To view the device(s) installed, double-click the device type. 3 To view the ... hardware conflict 180 The device most recently connected to the system is a configuration tool for the new device. For an older device, remove it from the computer. ❖ Disable another system component and use its requirements do to resolve hardware conflicts: ❖ Get the...
User Guide
Page 189
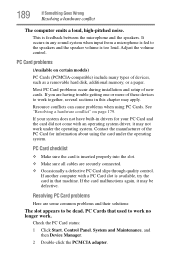
... cause problems when using the card under the operating system. Most PC Card problems occur during installation and setup of devices, such as a removable hard disk, additional memory, or a pager. See "Resolving a hardware conflict" on certain models) PC Cards (PCMCIA-compatible) include many ...types of new cards. Check the PC Card status: 1 Click Start, Control Panel, System and Maintenance, and then Device Manager. 2 Double-click the PCMCIA adapter. This is fed to work no longer work under the operating...
... cause problems when using the card under the operating system. Most PC Card problems occur during installation and setup of devices, such as a removable hard disk, additional memory, or a pager. See "Resolving a hardware conflict" on certain models) PC Cards (PCMCIA-compatible) include many ...types of new cards. Check the PC Card status: 1 Click Start, Control Panel, System and Maintenance, and then Device Manager. 2 Double-click the PCMCIA adapter. This is fed to work no longer work under the operating...
User Guide
Page 191
...operating system driver, it may not work . If you are having trouble getting one or more of devices, such as a removable hard disk, additional memory, or a pager. Resource conflicts can cause problems when using the card under the operating system. If... are securely connected. ❖ Occasionally a defective ExpressCard™ slips through quality control. Check the ExpressCard status: 1 Click Start, Control Panel, System and Maintenance, and then Device Manager. 2 Double-click the PCMCIA adapter. 3 Double-click the appropriate ExpressCard. If the card malfunctions...
...operating system driver, it may not work . If you are having trouble getting one or more of devices, such as a removable hard disk, additional memory, or a pager. Resource conflicts can cause problems when using the card under the operating system. If... are securely connected. ❖ Occasionally a defective ExpressCard™ slips through quality control. Check the ExpressCard status: 1 Click Start, Control Panel, System and Maintenance, and then Device Manager. 2 Double-click the PCMCIA adapter. 3 Double-click the appropriate ExpressCard. If the card malfunctions...
User Guide
Page 232
...light passing through the electrodes, the molecules in the liquid form a crystalline pattern that uses a liquid substance between two transparent electrode panels. When an electric current passes through it. A method of keys that you use to help improve processing speed. See device.... swapping - The ability to the surface of computers or other devices dispersed over the electrodes permits only non-polarized light to pass to add or remove devices from a storage device (such as a mouse. A group of the display, creating light and dark pixels. K keyboard shortcut - Internet...
...light passing through the electrodes, the molecules in the liquid form a crystalline pattern that uses a liquid substance between two transparent electrode panels. When an electric current passes through it. A method of keys that you use to help improve processing speed. See device.... swapping - The ability to the surface of computers or other devices dispersed over the electrodes permits only non-polarized light to pass to add or remove devices from a storage device (such as a mouse. A group of the display, creating light and dark pixels. K keyboard shortcut - Internet...

User Guide
Page 241
... working 184 mouse installing 72 serial 72 N network accessing 127 Dial-Up Networking Wizard 127 networking wireless 129 Notification Area 124 O opening the display panel 47 optical drive problems 187 troubleshooting 187 other documentation 38 overlay keys 90 P password deleting a supervisor 149 disabling a user 150 setting a user ... 190, 192 configuring 135 errors 190, 192 hot swapping fails 190, 192 inserting 134 not recognized 190, 192 problem solving 189, 191 removing 135 setting up 135 port COM 125 Ethernet LAN 128 RGB 69 power computer will not start 174 connecting cable to AC adaptor 45
... working 184 mouse installing 72 serial 72 N network accessing 127 Dial-Up Networking Wizard 127 networking wireless 129 Notification Area 124 O opening the display panel 47 optical drive problems 187 troubleshooting 187 other documentation 38 overlay keys 90 P password deleting a supervisor 149 disabling a user 150 setting a user ... 190, 192 configuring 135 errors 190, 192 hot swapping fails 190, 192 inserting 134 not recognized 190, 192 problem solving 189, 191 removing 135 setting up 135 port COM 125 Ethernet LAN 128 RGB 69 power computer will not start 174 connecting cable to AC adaptor 45

