User Guide
Page 58
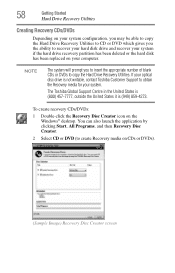
... or DVD (to create Recovery media on the Windows® desktop. The Toshiba Global Support Centre in the United States is (800) 457-7777, outside the United States it is not... Double-click the Recovery Disc Creator icon on CDs or DVDs). (Sample Image) Recovery Disc Creator screen NOTE The system will prompt you the ability to recover your hard disk drive and recover your system... if the hard drive recovery partition has been deleted or the hard disk has been replaced on your computer. 58 Getting Started Hard Drive Recovery Utilities Creating Recovery CDs/DVDs Depending on...
... or DVD (to create Recovery media on the Windows® desktop. The Toshiba Global Support Centre in the United States is (800) 457-7777, outside the United States it is not... Double-click the Recovery Disc Creator icon on CDs or DVDs). (Sample Image) Recovery Disc Creator screen NOTE The system will prompt you the ability to recover your hard disk drive and recover your system... if the hard drive recovery partition has been deleted or the hard disk has been replaced on your computer. 58 Getting Started Hard Drive Recovery Utilities Creating Recovery CDs/DVDs Depending on...
User Guide
Page 159
.... The fingerprint authentication utility can be used for any failure or damage that the fingerprint utility technology will accurately screen out unauthorized users at all times. Toshiba does not guarantee that you want to replace the keyboard-based user/BIOS password authentication system when booting up. Click the Enroll or Edit Fingerprints wizard...
.... The fingerprint authentication utility can be used for any failure or damage that the fingerprint utility technology will accurately screen out unauthorized users at all times. Toshiba does not guarantee that you want to replace the keyboard-based user/BIOS password authentication system when booting up. Click the Enroll or Edit Fingerprints wizard...

Maintenance Manual
Page 167
4 Replacement Procedures 5. Figure 4-42 Removing the LVDS cable Installing the LCD Module To install the LCD module, follow the steps below and refer to the LCD .... Note the L and R markings to the LCD module with four M2.5x4 screws. 9. Secure all cables are secured on the correct side. 4. Turn the LCD screen over and remove the tape securing the LVDS cable. Secure the LVDS cable to the LCD module with six M2x3 black screws. Secure the hinges...
4 Replacement Procedures 5. Figure 4-42 Removing the LVDS cable Installing the LCD Module To install the LCD module, follow the steps below and refer to the LCD .... Note the L and R markings to the LCD module with four M2.5x4 screws. 9. Secure all cables are secured on the correct side. 4. Turn the LCD screen over and remove the tape securing the LVDS cable. Secure the LVDS cable to the LCD module with six M2x3 black screws. Secure the hinges...


