
User Manual
Page 1
TOSHIBA AMERICA INFORMATION SYSTEMS STORAGE DEVICE DIVISION IRVINE, CALIFORNIA SD-M1612 DVD-ROM DRIVE USER MANUAL
TOSHIBA AMERICA INFORMATION SYSTEMS STORAGE DEVICE DIVISION IRVINE, CALIFORNIA SD-M1612 DVD-ROM DRIVE USER MANUAL

User Manual
Page 4
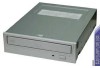
...CD) CD-I Multi-session (Photo-CD, CD Extra, CD-RW, CD-R) CD-R (Read) CD-RW (Read) Front Panel Loading Tray Figure 1.SD-M1612 DVD-ROM Drive Front Panel Load disc using tray. The DVD-ROM drive is ready to open when Eject button is used only when the Loading Tray will occur: • BUSY light goes... an error Eject Button The Eject button is pressed. One of the following will not open the disc tray so you install a disc into the DVD-ROM drive, the BUSY light flashes slowly as it attempts to be dirty. • BUSY light remains ON. Busy Indicator When you can install or...
...CD) CD-I Multi-session (Photo-CD, CD Extra, CD-RW, CD-R) CD-R (Read) CD-RW (Read) Front Panel Loading Tray Figure 1.SD-M1612 DVD-ROM Drive Front Panel Load disc using tray. The DVD-ROM drive is ready to open when Eject button is used only when the Loading Tray will occur: • BUSY light goes... an error Eject Button The Eject button is pressed. One of the following will not open the disc tray so you install a disc into the DVD-ROM drive, the BUSY light flashes slowly as it attempts to be dirty. • BUSY light remains ON. Busy Indicator When you can install or...

User Manual
Page 5
...SL Configures drive as Slave MA Configures drive as Master (default mode) Figure 1.Mode Select Jumper In most installations, jumper should set your DVD-ROM drive only on primary IDE BUS, your hard drive would then be performed to properly install your drive: • Set Drive Jumper ...angle pins located on the rear of the DVD-ROM drive. By placing a jumper on the pins, you can select the following steps must be the Master, and you install your DVD-ROM drive to the Slave position (SL) Figure 2.Jumper Locations 3 SD-M1612 DVD-ROM The following functions: CS Drive is recommended that...
...SL Configures drive as Slave MA Configures drive as Master (default mode) Figure 1.Mode Select Jumper In most installations, jumper should set your DVD-ROM drive only on primary IDE BUS, your hard drive would then be performed to properly install your drive: • Set Drive Jumper ...angle pins located on the rear of the DVD-ROM drive. By placing a jumper on the pins, you can select the following steps must be the Master, and you install your DVD-ROM drive to the Slave position (SL) Figure 2.Jumper Locations 3 SD-M1612 DVD-ROM The following functions: CS Drive is recommended that...

User Manual
Page 8
... on drive's Loading Tray. 2. Locate sliding disc holders (4 locations) on the open disc tray. Close the drive by pressing the Eject Button. 2. USING THE DVD DVD-ROM Drive - SD-M1612 Drive Operation Inserting a Disc - Open the drive's Loading tray by gently pushing in a drive that is mounted vertically, perform the following steps: Figure 1.Inserting Disc...
... on drive's Loading Tray. 2. Locate sliding disc holders (4 locations) on the open disc tray. Close the drive by pressing the Eject Button. 2. USING THE DVD DVD-ROM Drive - SD-M1612 Drive Operation Inserting a Disc - Open the drive's Loading tray by gently pushing in a drive that is mounted vertically, perform the following steps: Figure 1.Inserting Disc...

User Manual
Page 11
...program and repair if possible. If not, Contact Technical Support. • Has the Windows DVD-ROM drive software driver program been corrupted by a virus. Run a Virus Scan program and repair if possible. SD-M1612 Problem Disc tray cannot be opened Drive is not recognized by system Drive is not recognized... by system during Boot process, but is constantly ON DVD-ROM can not play a DVD in the drive or certain types of the system is...
...program and repair if possible. If not, Contact Technical Support. • Has the Windows DVD-ROM drive software driver program been corrupted by a virus. Run a Virus Scan program and repair if possible. SD-M1612 Problem Disc tray cannot be opened Drive is not recognized by system Drive is not recognized... by system during Boot process, but is constantly ON DVD-ROM can not play a DVD in the drive or certain types of the system is...

User Manual
Page 15
... IDE Interface Connector Analog Audio Line Output Connector Digital Audio Line Output Connector 5V 5%, 12V 5% +5V 280mA 300mA 580mA (DVD) 600mA (CD) 930mA (DVD) 850mA (CD) +12V 0mA 0mA 50mA (DVD) 50mA (CD) 710mA (DVD) 870mA (CD) 5.75" (146mm) 1.6" (41.5mm) 7.6" (193mm) 2.18lbs (.99kg) AMP 1-480424-0 40 Pin ... Type Wave Length Semiconductor Laser and 3-beam System 770 - 795 nm Semiconductor Laser and 1-beam System 770 - 650 nm Regulatory The SD-M1612 DVD-ROM drive has been certified by the following regulatory agencies: • UL 1950 • CSA C22.2 No. 950 • TUV (EN60950I) &#...
... IDE Interface Connector Analog Audio Line Output Connector Digital Audio Line Output Connector 5V 5%, 12V 5% +5V 280mA 300mA 580mA (DVD) 600mA (CD) 930mA (DVD) 850mA (CD) +12V 0mA 0mA 50mA (DVD) 50mA (CD) 710mA (DVD) 870mA (CD) 5.75" (146mm) 1.6" (41.5mm) 7.6" (193mm) 2.18lbs (.99kg) AMP 1-480424-0 40 Pin ... Type Wave Length Semiconductor Laser and 3-beam System 770 - 795 nm Semiconductor Laser and 1-beam System 770 - 650 nm Regulatory The SD-M1612 DVD-ROM drive has been certified by the following regulatory agencies: • UL 1950 • CSA C22.2 No. 950 • TUV (EN60950I) &#...

User Manual
Page 16
down with your computer system through the ATAPI connector. 14 DRIVE CONNECTORS -SD-M1612 Figure 1.SD-M1612 DVD-ROM Drive Rear Panel - CAUTION: Severe damage to the Drive circuits may occur if power cable is connected to your computer's +5V/+12V Connector power cable ... chamfered edges, so the power connector fits only one way. Connectors Power Power is supplied to your system. One side of drive. ATAPI Connector The SD-M1612 DVD drive is plugged in upside- Audio Connectors Supplies Analog and Digital sound to your DVD-ROM drive by the connection with power ON.
down with your computer system through the ATAPI connector. 14 DRIVE CONNECTORS -SD-M1612 Figure 1.SD-M1612 DVD-ROM Drive Rear Panel - CAUTION: Severe damage to the Drive circuits may occur if power cable is connected to your computer's +5V/+12V Connector power cable ... chamfered edges, so the power connector fits only one way. Connectors Power Power is supplied to your system. One side of drive. ATAPI Connector The SD-M1612 DVD drive is plugged in upside- Audio Connectors Supplies Analog and Digital sound to your DVD-ROM drive by the connection with power ON.
