
Brochure
Page 1
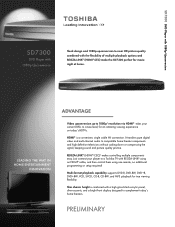
...CEC) make the SD7300 perfect for true viewing flexibility. Slim chassis height is a convenient, single cable AV connection. PRELIMINARY SD7300 DVD Player with 1080p Upconversion SD7300 DVD Player with ... with REGZA-LINK® using an HDMI® cable, and then control them using one remote, no additional programming or setup required! Multi-format playback capability supports DVD-R, DVD-RW, DVD...INNOVATION ADVANTAGE Video upconversion up to 1080p1 resolution via HDMI® takes your player to a Toshiba TV with a high gloss black acrylic panel, silver accents, and a bright front display ...
...CEC) make the SD7300 perfect for true viewing flexibility. Slim chassis height is a convenient, single cable AV connection. PRELIMINARY SD7300 DVD Player with 1080p Upconversion SD7300 DVD Player with ... with REGZA-LINK® using an HDMI® cable, and then control them using one remote, no additional programming or setup required! Multi-format playback capability supports DVD-R, DVD-RW, DVD...INNOVATION ADVANTAGE Video upconversion up to 1080p1 resolution via HDMI® takes your player to a Toshiba TV with a high gloss black acrylic panel, silver accents, and a bright front display ...

Brochure
Page 2
... Solutions: 800.631.3811 © Toshiba America Consumer Products, L.L.C. 82 Totowa Road, Wayne, NJ 07470 (2009). REGZA-LINK is a registered trademark of REGZA-LINK®, which is a feature based on the display device specifications, some MP3/WMA/JPEG recordings due to change or modification without notice. SD7300 Specifications PLAYABLE DISC TYPES3 VIDEO...
... Solutions: 800.631.3811 © Toshiba America Consumer Products, L.L.C. 82 Totowa Road, Wayne, NJ 07470 (2009). REGZA-LINK is a registered trademark of REGZA-LINK®, which is a feature based on the display device specifications, some MP3/WMA/JPEG recordings due to change or modification without notice. SD7300 Specifications PLAYABLE DISC TYPES3 VIDEO...

Owners Manual
Page 6
... DISCS 4 Notes on region numbers 5 Table of Contents 6 Identification of Controls 7 Front panel 7 Rear panel 7 DVD display 7 Using the Remote Control 8 Loading batteries 8 Operating with the remote control 8 Remote control 9 Names and functions 10 Function setup Customizing the Function Settings.......... 21 Using the Language setup menu 21 Using the Video setup...
... DISCS 4 Notes on region numbers 5 Table of Contents 6 Identification of Controls 7 Front panel 7 Rear panel 7 DVD display 7 Using the Remote Control 8 Loading batteries 8 Operating with the remote control 8 Remote control 9 Names and functions 10 Function setup Customizing the Function Settings.......... 21 Using the Language setup menu 21 Using the Video setup...
Owners Manual
Page 8
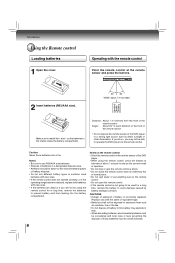
... • Be sure to use R03/AAA size batteries. • Dispose of batteries in each direction of the front of the remote sensor * Do not expose the remote sensor of the DVD player to a strong light source such as sunshine, fire or the like. • Do not ... water or put anything wet on the batteries to operate the DVD player via the remote control. on the remote control. • Do not open the remote control. • If the remote control is incorrectly replaced. Introduction Using the Remote control Loading batteries 1 Open the cover. Distance: About 7 m (23 feet) from leaking ...
... • Be sure to use R03/AAA size batteries. • Dispose of batteries in each direction of the front of the remote sensor * Do not expose the remote sensor of the DVD player to a strong light source such as sunshine, fire or the like. • Do not ... water or put anything wet on the batteries to operate the DVD player via the remote control. on the remote control. • Do not open the remote control. • If the remote control is incorrectly replaced. Introduction Using the Remote control Loading batteries 1 Open the cover. Distance: About 7 m (23 feet) from leaking ...
Owners Manual
Page 9
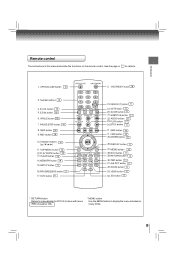
... details. 1. 10 3. 10 4. 10 5. 10 6. 10 7. 10 8. 10 9. 10 10. 10 11. 10 12. 10 13. 10 14. 10 15. 11 16. 11 17. Introduction Remote control The instructions in for VCD (2.0) discs with menu (PBC should be ON). * MENU button Use the MENU button to display the menu included on...
... details. 1. 10 3. 10 4. 10 5. 10 6. 10 7. 10 8. 10 9. 10 10. 10 11. 10 12. 10 13. 10 14. 10 15. 11 16. 11 17. Introduction Remote control The instructions in for VCD (2.0) discs with menu (PBC should be ON). * MENU button Use the MENU button to display the menu included on...
Owners Manual
Page 14
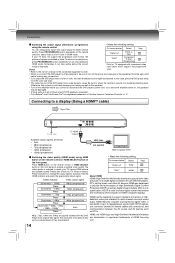
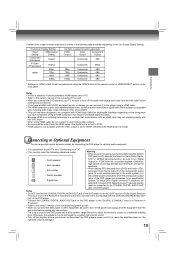
...receive a suitable video quality. Connections Switching the output signal (interlaced / progressive) • Make the following setting. button on the remote control or HDMI SELECT button on , the speakers may damage your TV having HDMI feature and suitable quality. HDMI features included uncompressed ...Page quality. input jacks which support the progressive Notes scan. • Refer to turn off the power and unplug all of Toshiba America Consumer Products L.L.C. In this button to change the output signals as DTVs. 480p, 720p, 1080i and 1080p are registered...
...receive a suitable video quality. Connections Switching the output signal (interlaced / progressive) • Make the following setting. button on the remote control or HDMI SELECT button on , the speakers may damage your TV having HDMI feature and suitable quality. HDMI features included uncompressed ...Page quality. input jacks which support the progressive Notes scan. • Refer to turn off the power and unplug all of Toshiba America Consumer Products L.L.C. In this button to change the output signals as DTVs. 480p, 720p, 1080i and 1080p are registered...
Owners Manual
Page 15
... VCD, CD and MP3. • This unit has been designed to be compliant with this DVD player. • When using the HDMI button on the remote control or HDMI SELECT button on the component you have connected. To enjoy DTS Digital Surround™ playback, an external 5.1 channel DTS Digital Surround™...
... VCD, CD and MP3. • This unit has been designed to be compliant with this DVD player. • When using the HDMI button on the remote control or HDMI SELECT button on the component you have connected. To enjoy DTS Digital Surround™ playback, an external 5.1 channel DTS Digital Surround™...

Owners Manual
Page 18
... where you last stopped. • Some video CD are two different disc sizes. To stop mode Press PLAY. 2 Press OPEN/CLOSE. You can make your remote control once the movie is completed. 18 Be sure to press the OPEN/CLOSE button to close the disc tray. Doing so may damage the...; There are recorded with PBC (Playback Control), a menu with recorded contents may damage the disc. • Use the OPEN/CLOSE button to turn on the remote control to do so may damage your fingers well clear of a movie is closing. When switching from PBC off to malfunction. • In many...
... where you last stopped. • Some video CD are two different disc sizes. To stop mode Press PLAY. 2 Press OPEN/CLOSE. You can make your remote control once the movie is completed. 18 Be sure to press the OPEN/CLOSE button to close the disc tray. Doing so may damage the...; There are recorded with PBC (Playback Control), a menu with recorded contents may damage the disc. • Use the OPEN/CLOSE button to turn on the remote control to do so may damage your fingers well clear of a movie is closing. When switching from PBC off to malfunction. • In many...
Owners Manual
Page 20
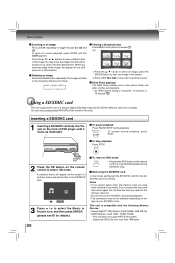
...follows: Viewing a thumbnail view Press MENU in that direction. Supported JPEG file size: less than 16M bytes 20 The image will appear on the remote control to turnover the card and then insert again. Press the / / / to select an image, press the ENTER button to view one after another... unit supports the use of the image. To pause playback Press PAUSE/STEP during playback. • The connection may not be available depending on the remote control to "5 seconds", "10 seconds" or "15 seconds" 22 . This unit does not support NTFS file system. - Removing the SD/SDHC card...
...follows: Viewing a thumbnail view Press MENU in that direction. Supported JPEG file size: less than 16M bytes 20 The image will appear on the remote control to turnover the card and then insert again. Press the / / / to select an image, press the ENTER button to view one after another... unit supports the use of the image. To pause playback Press PAUSE/STEP during playback. • The connection may not be available depending on the remote control to "5 seconds", "10 seconds" or "15 seconds" 22 . This unit does not support NTFS file system. - Removing the SD/SDHC card...
Owners Manual
Page 22
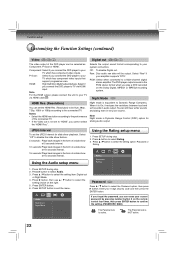
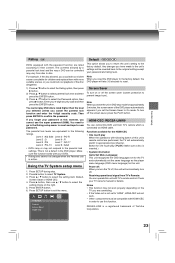
... out. Password DVD Press / button to your current password by pressing number button 8 on the right. 5. Select "Off" to select the setting choice on the remote control four times, then press ENTER button to exit the menu. Press button, then use / button to disable the slide show feature. 5 seconds: Plays back...
... out. Password DVD Press / button to your current password by pressing number button 8 on the right. 5. Select "Off" to select the setting choice on the remote control four times, then press ENTER button to exit the menu. Press button, then use / button to disable the slide show feature. 5 seconds: Plays back...
Owners Manual
Page 23
.... REGZA-LINK is not set the same language as the player menu language (OSD menu language) for approximately 2 minutes, the screen saver of Toshiba Corporation. 23 Press ENTER button. 6. For example, if the disc allowed, you are rated according to select the setting choice on the TV ...the unit's settings will be changed when the Parental lock is connected via HDMI cable. HDMI-CEC: REGZA-LINK® You can control this unit's remote control are equivalent to the following button of the disc altogether. 1) Press / button to select the Rating option, then press button. 2) Press /...
.... REGZA-LINK is not set the same language as the player menu language (OSD menu language) for approximately 2 minutes, the screen saver of Toshiba Corporation. 23 Press ENTER button. 6. For example, if the disc allowed, you are rated according to select the setting choice on the TV ...the unit's settings will be changed when the Parental lock is connected via HDMI cable. HDMI-CEC: REGZA-LINK® You can control this unit's remote control are equivalent to the following button of the disc altogether. 1) Press / button to select the Rating option, then press button. 2) Press /...
Owners Manual
Page 24
...abnormalities • Press and hold the ON/STANDBY button on the equipment connected with new ones. 8 exhausted. 24 noises are present in the remote control are • Replace the batteries with the audio 18 cable. • The setting of the audio receiver 18 is not set to... Select the correct input mode of output sound format is • Select the proper audio setting. 22 incorrect. the DVD player. • The remote control is too far from the DVD player. • The audio cable is not connected securely. • Connect the audio cable securely into the...
...abnormalities • Press and hold the ON/STANDBY button on the equipment connected with new ones. 8 exhausted. 24 noises are present in the remote control are • Replace the batteries with the audio 18 cable. • The setting of the audio receiver 18 is not set to... Select the correct input mode of output sound format is • Select the proper audio setting. 22 incorrect. the DVD player. • The remote control is too far from the DVD player. • The audio cable is not connected securely. • Connect the audio cable securely into the...

Owners Manual
Page 25
...;, pin jack x 1 (PB)/(PR) 0.7 V (p-p), 75 Ω, pin jack x 2 0.5V (p-p), 75 Ω, pin jack x 1 2.0 V (rms), 680 Ω, pin jacks (L, R) x 1 19 pin Supplied Accessories Audio/video cable 1 Remote control (SE-R0373 1 Batteries (R03/AAA 2 • This model complies with the above specifications. • Designs and specifications are subject to...
...;, pin jack x 1 (PB)/(PR) 0.7 V (p-p), 75 Ω, pin jack x 2 0.5V (p-p), 75 Ω, pin jack x 1 2.0 V (rms), 680 Ω, pin jacks (L, R) x 1 19 pin Supplied Accessories Audio/video cable 1 Remote control (SE-R0373 1 Batteries (R03/AAA 2 • This model complies with the above specifications. • Designs and specifications are subject to...


