Owners Manual
Page 11
...•Identification of Controls 12 Repeating a title, chapter or tracks 36 Front panel 12 Repeating a specific segment 36 Rear panel DVD display Remote control 12 • Playing in a Favorite Order 37 13 Setting titles, chapters, or tracks in a favorite 14 order 37 Loading batteries... 15 •Zooming a Picture 38 Operating with the remote control 15 Zooming a picture 38 Connections •Selecting the Camera Angle 39 Changing the camera angle 39 •Connecting to aTV 18 ...
...•Identification of Controls 12 Repeating a title, chapter or tracks 36 Front panel 12 Repeating a specific segment 36 Rear panel DVD display Remote control 12 • Playing in a Favorite Order 37 13 Setting titles, chapters, or tracks in a favorite 14 order 37 Loading batteries... 15 •Zooming a Picture 38 Operating with the remote control 15 Zooming a picture 38 Connections •Selecting the Camera Angle 39 Changing the camera angle 39 •Connecting to aTV 18 ...
Owners Manual
Page 12
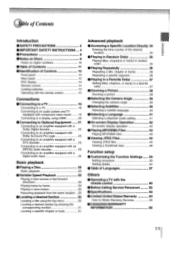
Front panel ON/STANDBY indicator 1 6> ON: Lit in for details. Disc tray 126> DVD display 13> Remote Sensor 115> PLAY button 126> N ANALOG/HDMI switch 20> SELECT button I 2fil> ON/STANDBY button 26) OPEN/CLOSE button 126) SKIP buttons r31) PAUSE button p> ...
Front panel ON/STANDBY indicator 1 6> ON: Lit in for details. Disc tray 126> DVD display 13> Remote Sensor 115> PLAY button 126> N ANALOG/HDMI switch 20> SELECT button I 2fil> ON/STANDBY button 26) OPEN/CLOSE button 126) SKIP buttons r31) PAUSE button p> ...
Owners Manual
Page 13
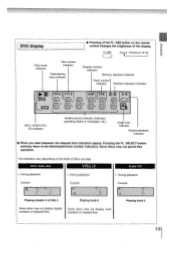
... the kinds of title 2 Playing track 6 Some discs may not display chapter numbers or elapsed time. Pressing the FL. The indicators vary depending on the remote 3. DIM Normal Dimmed--► Off 0 Play mode indicator Title number indicator Total playing time indicator Chapter number indicator Memory playback indicator Track number indicator Random...
... the kinds of title 2 Playing track 6 Some discs may not display chapter numbers or elapsed time. Pressing the FL. The indicators vary depending on the remote 3. DIM Normal Dimmed--► Off 0 Play mode indicator Title number indicator Total playing time indicator Chapter number indicator Memory playback indicator Track number indicator Random...
Owners Manual
Page 14
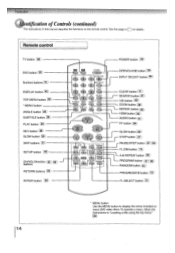
...> PROGRESSIVE button FL.SELECT button 13> 14 * MENU button Use the MENU button to display the menu included on the remote control. To operate a menu, follow the instructions in for details. [ Remote control TV button 60> DVD button 126 Number buttons 131> DISPLAY button 42> TOP MENU button 130> * MENU button ANGLE...
...> PROGRESSIVE button FL.SELECT button 13> 14 * MENU button Use the MENU button to display the menu included on the remote control. To operate a menu, follow the instructions in for details. [ Remote control TV button 60> DVD button 126 Number buttons 131> DISPLAY button 42> TOP MENU button 130> * MENU button ANGLE...
Owners Manual
Page 15
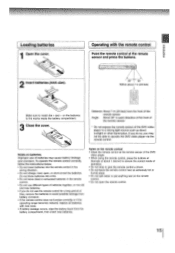
.... • Do not open , or short-circuit the batteries. Notes on the remote control • Direct the remote control at the remote sensor of the DVD video player. • When using the remote control, press the buttons at the remote sensor and press the buttons. 2 Insert batteries (AAA size). 30° ' 30° Within .... • Do not use different types of about 7 m (23 feet) Make sure to operate the DVD video player via the remote control. Operating with new ones. • If battery leakage occurs, wipe the battery liquid from the front of batteries may not be able to ...
.... • Do not open , or short-circuit the batteries. Notes on the remote control • Direct the remote control at the remote sensor of the DVD video player. • When using the remote control, press the buttons at the remote sensor and press the buttons. 2 Insert batteries (AAA size). 30° ' 30° Within .... • Do not use different types of about 7 m (23 feet) Make sure to operate the DVD video player via the remote control. Operating with new ones. • If battery leakage occurs, wipe the battery liquid from the front of batteries may not be able to ...
Owners Manual
Page 19
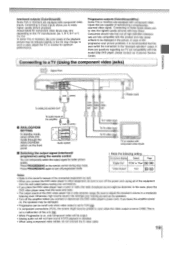
... set to YUV. • In component connections (YUV), the screen might become pinkish in color when the video output is selected. • When using the remote control You can be on , only component video will be displayed in the picture. If there are fully compatible with this case, place the DVD... can temporarily switch the output signal for optimum performance. In such a case, adjust the TV or monitor for better picture quality. Press PROGRESSIVE on the remote control during stop mode. Press PROGRESSIVE again to a moderate listening level.
... set to YUV. • In component connections (YUV), the screen might become pinkish in color when the video output is selected. • When using the remote control You can be on , only component video will be displayed in the picture. If there are fully compatible with this case, place the DVD... can temporarily switch the output signal for optimum performance. In such a case, adjust the TV or monitor for better picture quality. Press PROGRESSIVE on the remote control during stop mode. Press PROGRESSIVE again to a moderate listening level.
Owners Manual
Page 20
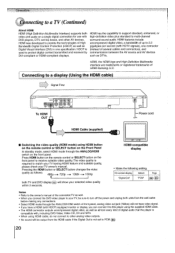
... video signal. • If you have a HDMI (with , including DVD-Video, Video CD, CD and MP3. • When using HDMI button on the remote control or SELECT button on the Front Panel In standby mode, select HDMI mode through the ANALOG/HDMI switch of HDMI licensing LLC. Press HDMI... button on the remote control or SELECT button on the front panel. HDMI, the HDMI logo andHigh-Definition Multimedia Interface are trademarks or registered trademarks of front panel,...
... video signal. • If you have a HDMI (with , including DVD-Video, Video CD, CD and MP3. • When using HDMI button on the remote control or SELECT button on the Front Panel In standby mode, select HDMI mode through the ANALOG/HDMI switch of HDMI licensing LLC. Press HDMI... button on the remote control or SELECT button on the front panel. HDMI, the HDMI logo andHigh-Definition Multimedia Interface are trademarks or registered trademarks of front panel,...
Owners Manual
Page 26
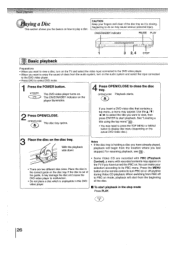
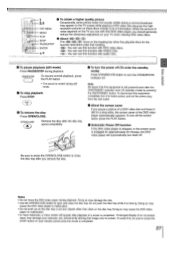
Place the disc in this DVD video player. • Some Video CD are two different disc sizes. Press the MENU button on the remote control to play a disc CAUTION Keep your selection according to PBC on mode, playback will begin from the location where you want to view, then ...
Place the disc in this DVD video player. • Some Video CD are two different disc sizes. Press the MENU button on the remote control to play a disc CAUTION Keep your selection according to PBC on mode, playback will begin from the location where you want to view, then ...
Owners Manual
Page 27
.../STANDBY button. To avoid this DVD video player, you use with this , be sure to press the STOP button on -screen menu may damage your remote control once the movie is muted during a normal broadcast may cause the DVD video player to malfunction. • Do not push up on the disc...
.../STANDBY button. To avoid this DVD video player, you use with this , be sure to press the STOP button on -screen menu may damage your remote control once the movie is muted during a normal broadcast may cause the DVD video player to malfunction. • Do not push up on the disc...
Owners Manual
Page 56
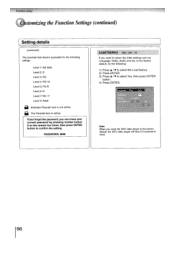
...-R Level 6: R Level 7: NC-17 Level 8: Adult Indicates Parental lock is active. Note When you can erase your current password by pressing number button 8 on the remote four times, then press ENTER button to confirm the setting. a The Parental lock is not active. If you forget the password, you reset the DVD...
...-R Level 6: R Level 7: NC-17 Level 8: Adult Indicates Parental lock is active. Note When you can erase your current password by pressing number button 8 on the remote four times, then press ENTER button to confirm the setting. a The Parental lock is not active. If you forget the password, you reset the DVD...
Owners Manual
Page 59
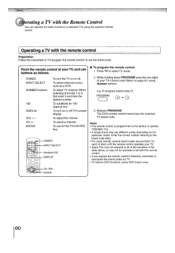
WIIYtlg Others • Operating a TV with the Remote Control • Before Calling Service Personnel • Specifications • Limited United States Warranty • Canadian Warranty Information
WIIYtlg Others • Operating a TV with the Remote Control • Before Calling Service Personnel • Specifications • Limited United States Warranty • Canadian Warranty Information
Owners Manual
Page 60
... memorizes the selected TV brand code. Try each of them until the remote control operates your TV. • Some TVs may not respond to all with this remote control. • If you replace the remote control's batteries, remember to operate TOSHIBA TVs. • A single brand may not be operated at your TV's brand code...
... memorizes the selected TV brand code. Try each of them until the remote control operates your TV. • Some TVs may not respond to all with this remote control. • If you replace the remote control's batteries, remember to operate TOSHIBA TVs. • A single brand may not be operated at your TV's brand code...
Owners Manual
Page 62
...8226; Press HDMI button to select another picture 20 resolution. • Select the correct input mode of the DVD video player. • The remote control is unstable or noises are exhausted. If the buttons still do not work properly. No picture or abnormal color (pinkish, greenish, etc.). ... or fast reverse playback. • The effect of copy protection. • The effect of the DVD video player. 15 • Operate the remote control within the guide. • The disc is dirty. • The parental lock function is set to correct position. • Mismatch setting ...
...8226; Press HDMI button to select another picture 20 resolution. • Select the correct input mode of the DVD video player. • The remote control is unstable or noises are exhausted. If the buttons still do not work properly. No picture or abnormal color (pinkish, greenish, etc.). ... or fast reverse playback. • The effect of copy protection. • The effect of the DVD video player. 15 • Operate the remote control within the guide. • The disc is dirty. • The parental lock function is set to correct position. • Mismatch setting ...
Owners Manual
Page 63
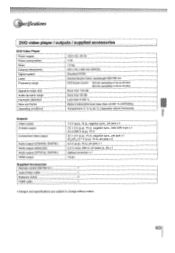
...) 0.7 V (p-p), 75 O, pin jack x 2 0.5 V (p-p), 75 O, pin jack x 1 Audio output (ANALOG) 2.0 V (rms), 680 O, pin jacks (L, R) x 1 Audio output (OPTICAL DIGITAL) Optical connector x 1 HDMI output 19 pin Supplied Accessories Remote control (SE-R0141) 1 AudioNideo cable 1 Batteries (AAA) 2 HDMI cable 1 • Designs and specifications are subject to change without notice. 63
...) 0.7 V (p-p), 75 O, pin jack x 2 0.5 V (p-p), 75 O, pin jack x 1 Audio output (ANALOG) 2.0 V (rms), 680 O, pin jacks (L, R) x 1 Audio output (OPTICAL DIGITAL) Optical connector x 1 HDMI output 19 pin Supplied Accessories Remote control (SE-R0141) 1 AudioNideo cable 1 Batteries (AAA) 2 HDMI cable 1 • Designs and specifications are subject to change without notice. 63


