
Owners Manual
Page 1
DIGITAL VIDEO DVD PLAYER SD-890KY OWNER'S MANUAL ® Introduction 2 Connections 11 Basic playback 17 Advanced playback 20 Function setup 31 Others 38 © 2008 Toshiba Corporation
DIGITAL VIDEO DVD PLAYER SD-890KY OWNER'S MANUAL ® Introduction 2 Connections 11 Basic playback 17 Advanced playback 20 Function setup 31 Others 38 © 2008 Toshiba Corporation
Owners Manual
Page 2
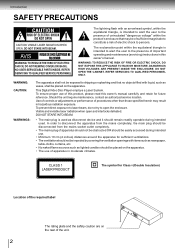
... retain for Class (Double lnsulation) Location of the required label The rating plate and the safety caution are on the apparatus. This Digital Video Disc Player employs a Laser System. To prevent direct exposure to laser beam, do not try to constitute a risk of the unit. 2 In order to persons. DO NOT...
... retain for Class (Double lnsulation) Location of the required label The rating plate and the safety caution are on the apparatus. This Digital Video Disc Player employs a Laser System. To prevent direct exposure to laser beam, do not try to constitute a risk of the unit. 2 In order to persons. DO NOT...
Owners Manual
Page 3
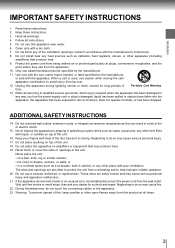
Protect the power cord from being walked on or pinched particularly at all servicing to help maintain reliable operation. 20. Unplug this apparatus during lightning storms or when unused for a check and repair. Do not overload wall outlets; Keep your dealer for long periods of the disc tray as a bookcase, built-in a confined space such as it is closing. Neglecting to do so may cause fire. 22. Do not place the apparatus on a bed, sofa, rug or similar surface; • too close to rain or moisture, does not operate normally, or has been dropped. or • in cabinet, or any...
Protect the power cord from being walked on or pinched particularly at all servicing to help maintain reliable operation. 20. Unplug this apparatus during lightning storms or when unused for a check and repair. Do not overload wall outlets; Keep your dealer for long periods of the disc tray as a bookcase, built-in a confined space such as it is closing. Neglecting to do so may cause fire. 22. Do not place the apparatus on a bed, sofa, rug or similar surface; • too close to rain or moisture, does not operate normally, or has been dropped. or • in cabinet, or any...
Owners Manual
Page 4
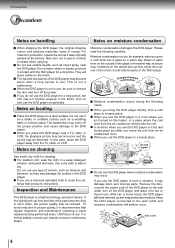
.... Inspection and Maintenance This DVD player is not a malfunction. For further details, contact your nearest consumer electronics dealer. When the DVD player is not in contact with the DVD player for example, when you use any moisture. In this DVD player near the DVD player. Moisture condensation occurs, for...where the cold wind from an air conditioned room. Introduction Precautions Notes on handling Notes on moisture condensation When shipping the DVD player, the original shipping carton and packing materials come off the power. To avoid reduction in handy. Do not use ...
.... Inspection and Maintenance This DVD player is not a malfunction. For further details, contact your nearest consumer electronics dealer. When the DVD player is not in contact with the DVD player for example, when you use any moisture. In this DVD player near the DVD player. Moisture condensation occurs, for...where the cold wind from an air conditioned room. Introduction Precautions Notes on handling Notes on moisture condensation When shipping the DVD player, the original shipping carton and packing materials come off the power. To avoid reduction in handy. Do not use ...
Owners Manual
Page 5
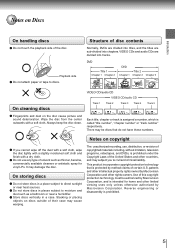
...disc cause picture and sound deterioration. Do not use , distribution, or revision of copyrighted materials including, without limitation, television programs, videotapes, and DVDs, is prohibited. 5 Do not store discs in a place subject to moisture and dust such as thinner, benzine, commercially available cleaners or ... disc. It may cause warping. Introduction Notes on Discs On handling discs Do not touch the playback side of disc contents Normally, DVDs are divided into titles, and the titles are divided into chapters. Wipe the disc from the center outwards with a dry cloth. ...
...disc cause picture and sound deterioration. Do not use , distribution, or revision of copyrighted materials including, without limitation, television programs, videotapes, and DVDs, is prohibited. 5 Do not store discs in a place subject to moisture and dust such as thinner, benzine, commercially available cleaners or ... disc. It may cause warping. Introduction Notes on Discs On handling discs Do not touch the playback side of disc contents Normally, DVDs are divided into titles, and the titles are divided into chapters. Wipe the disc from the center outwards with a dry cloth. ...
Owners Manual
Page 6
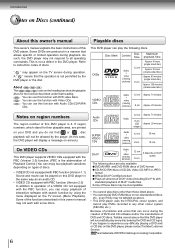
...174; Audio + video (moving pictures) 12 cm 8 cm It depends on this DVD player, please contact Toshiba Customer Service. is the abbreviation of Playback Control.) You can use this DVD player. Some DVDs are printed on your DVD and you do not find 4 or , disc playback will not be played on...PBC function, you happen to operation of interactive software with Audio CDs/CD-R/RW CDs. If you can be allowed by the DVD player or the disc. If region numbers, which stand for the function described under that the operation is 4. A " " means that heading. This is ...
...174; Audio + video (moving pictures) 12 cm 8 cm It depends on this DVD player, please contact Toshiba Customer Service. is the abbreviation of Playback Control.) You can use this DVD player. Some DVDs are printed on your DVD and you do not find 4 or , disc playback will not be played on...PBC function, you happen to operation of interactive software with Audio CDs/CD-R/RW CDs. If you can be allowed by the DVD player or the disc. If region numbers, which stand for the function described under that the operation is 4. A " " means that heading. This is ...
Owners Manual
Page 7
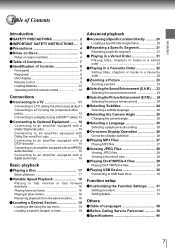
Introduction Table of Contents Introduction SAFETY PRECAUTIONS 2 IMPORTANT SAFETY INSTRUCTIONS .... 3 Precautions 4 Notes on Discs 5 Notes on region numbers 6 Table of Contents 7 Identification of Controls 8 Front panel 8 Rear panel 8 DVD display 8 Remote control 9 Loading batteries 10 Operating with the remote control 10 Connections Connecting to a TV 11 Connecting to a TV (Using the phono type...
Introduction Table of Contents Introduction SAFETY PRECAUTIONS 2 IMPORTANT SAFETY INSTRUCTIONS .... 3 Precautions 4 Notes on Discs 5 Notes on region numbers 6 Table of Contents 7 Identification of Controls 8 Front panel 8 Rear panel 8 DVD display 8 Remote control 9 Loading batteries 10 Operating with the remote control 10 Connections Connecting to a TV 11 Connecting to a TV (Using the phono type...
Owners Manual
Page 8
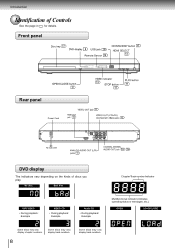
Some discs may only display track numbers. 8 Some discs may only display chapter numbers. No disc Bad disc Bad disc Chapter/Track number Indicator DVD VIDEO • During playback: Example VIDEO CD • During playback: Example Audio CD • During playback: Example Multifunctional indicator (indicates operating ...may only display track numbers. Front panel 17 17 8 USB jack 30 HDMI SELECT 10 13 17 Rear panel Power Cord HDMI OUT jack 13 HDMI indicator 13 17 17 11 12 15 16 11 DVD display The indicators vary depending on the kinds of Controls See the page in...
Some discs may only display track numbers. 8 Some discs may only display chapter numbers. No disc Bad disc Bad disc Chapter/Track number Indicator DVD VIDEO • During playback: Example VIDEO CD • During playback: Example Audio CD • During playback: Example Multifunctional indicator (indicates operating ...may only display track numbers. Front panel 17 17 8 USB jack 30 HDMI SELECT 10 13 17 Rear panel Power Cord HDMI OUT jack 13 HDMI indicator 13 17 17 11 12 15 16 11 DVD display The indicators vary depending on the kinds of Controls See the page in...
Owners Manual
Page 9
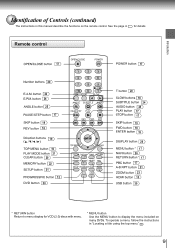
Introduction Identification of Controls (continued) The instructions in this manual describe the functions on many DVDs. To operate a menu, follow the instructions in for VCD (2.0) discs with menu. * MENU button Use the MENU button to display the menu included on the remote control. Remote control 17 20 23 24 25 17 19 18 19 19 21 20 22 31 12 DVD button 30 DVD USB 17 20 18 24 25 17 17 19 18 19 26 17 26 17 17 21 23 HDMI button 13 USB button 30 * RETURN button Return to menu display for details. See the page in "Locating a title using the top menu." 19 9
Introduction Identification of Controls (continued) The instructions in this manual describe the functions on many DVDs. To operate a menu, follow the instructions in for VCD (2.0) discs with menu. * MENU button Use the MENU button to display the menu included on the remote control. Remote control 17 20 23 24 25 17 19 18 19 19 21 20 22 31 12 DVD button 30 DVD USB 17 20 18 24 25 17 17 19 18 19 26 17 26 17 17 21 23 HDMI button 13 USB button 30 * RETURN button Return to menu display for details. See the page in "Locating a title using the top menu." 19 9
Owners Manual
Page 10
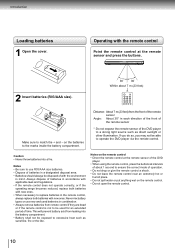
.... • Always remove batteries from leaking into a fire. on the batteries to match the + and - Within about 1 second to operate the DVD player via the remote control. Caution • Never throw batteries into the battery compartment. • Battery shall not be disposed of the... DVD player. • When using the remote control, press the buttons at the remote sensor and press the buttons. 2 Insert batteries (R03/AAA ...
.... • Always remove batteries from leaking into a fire. on the batteries to match the + and - Within about 1 second to operate the DVD player via the remote control. Caution • Never throw batteries into the battery compartment. • Battery shall not be disposed of the... DVD player. • When using the remote control, press the buttons at the remote sensor and press the buttons. 2 Insert batteries (R03/AAA ...
Owners Manual
Page 11
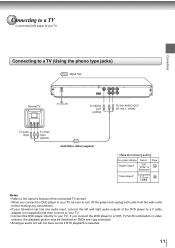
... you connect the DVD player to your TV, be distorted as DVDs are copy protected. • Analogue audio out will not have sound if DTS playback is selected. 11 On-screen display Select: Page "Digital Output" "Off", "PCM" or 34 "Bitstream" "Video Output" Component P-Scan 34 HDMI Notes • ...Refer to the owner's manual of the connected TV as well. • When you connect the DVD player to a VCR, TV/VCR combination or video selector, the playback picture may be sure to ...
... you connect the DVD player to your TV, be distorted as DVDs are copy protected. • Analogue audio out will not have sound if DTS playback is selected. 11 On-screen display Select: Page "Digital Output" "Off", "PCM" or 34 "Bitstream" "Video Output" Component P-Scan 34 HDMI Notes • ...Refer to the owner's manual of the connected TV as well. • When you connect the DVD player to a VCR, TV/VCR combination or video selector, the playback picture may be sure to ...
Owners Manual
Page 12
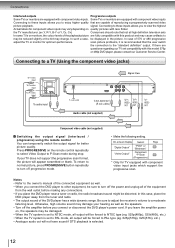
...the connected equipment as the speakers. • Turn off progressive mode. • Make the following setting. If you connect or disconnect the DVD player's power cord. In such a case, be sure to turn off the amplifier before making any connections. • If you to the owner...is set compatibility with less flicker. Connections Interlaced outputs Progressive outputs Some TVs or monitors are equipped with this case, place the DVD player away from the wall outlet before you leave the amplifier power on, the speakers may change. Connecting to other equipment, be ...
...the connected equipment as the speakers. • Turn off progressive mode. • Make the following setting. If you connect or disconnect the DVD player's power cord. In such a case, be sure to turn off the amplifier before making any connections. • If you to the owner...is set compatibility with less flicker. Connections Interlaced outputs Progressive outputs Some TVs or monitors are equipped with this case, place the DVD player away from the wall outlet before you leave the amplifier power on, the speakers may change. Connecting to other equipment, be ...
Owners Manual
Page 13
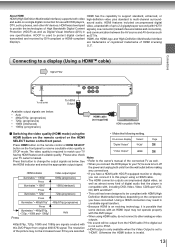
...plus standard to multi-channel surround- transmitted and received by DVI-compliant or HDMI-compliant HDMI, the HDMI logo and High-Definition Multimedia Interface displays. are below . HDMI button on the remote control or the HDMI SELECT button on a single digital connection for use with DVD players, sound audio...576p, • 720p, • 1080i and • 1080p" Auto Press some devices with an HDMI input may result in STOP mode. the HDMI indicator and select the appropriate output signal. • When you connect the DVD player to your TV owner's manual. Notes Press this button to...
...plus standard to multi-channel surround- transmitted and received by DVI-compliant or HDMI-compliant HDMI, the HDMI logo and High-Definition Multimedia Interface displays. are below . HDMI button on the remote control or the HDMI SELECT button on a single digital connection for use with DVD players, sound audio...576p, • 720p, • 1080i and • 1080p" Auto Press some devices with an HDMI input may result in STOP mode. the HDMI indicator and select the appropriate output signal. • When you connect the DVD player to your TV owner's manual. Notes Press this button to...
Owners Manual
Page 14
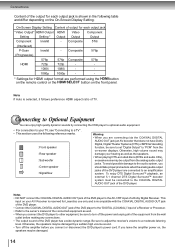
...Otherwise, the speakers may damage your A/V Receiver is selected, it follows preference HDMI aspect ratio of the DVD player are performed using the HDMI button on the remote control or the HDMI SELECT button on , the speakers may be damaged. 14 Composite 576i (Interlaced)...'s volume to the AC-3 RF input of the DVD player. If you connect or disconnect the DVD player's power cord. Composite 576p (Progressive) 576p 576p Composite 576p HDMI 720p 720p - - 1080i 1080i - - 1080p 1080p - - * Settings for HDMI output format are connected to the COAXIAL DIGITAL AUDIO ...
...Otherwise, the speakers may damage your A/V Receiver is selected, it follows preference HDMI aspect ratio of the DVD player are performed using the HDMI button on the remote control or the HDMI SELECT button on , the speakers may be damaged. 14 Composite 576i (Interlaced)...'s volume to the AC-3 RF input of the DVD player. If you connect or disconnect the DVD player's power cord. Composite 576p (Progressive) 576p 576p Composite 576p HDMI 720p 720p - - 1080i 1080i - - 1080p 1080p - - * Settings for HDMI output format are connected to the COAXIAL DIGITAL AUDIO ...
Owners Manual
Page 15
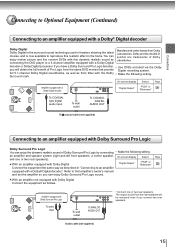
...to that provide Digital recording system. Amplifier equipped with this realistic effect in the home. You can enjoy motion picture and live concert DVDs with Dolby Surround Pro Logic To audio input To wall outlet To ANALOG AUDIO OUT Audio cable (not supplied) * Connect one or... enjoy the dynamic realistic sound of Dolby Laboratories. Dolby and the double-D symbol are trademarks of Dolby Surround Pro Logic by connecting the DVD player to an amplifier equipped with the Dolby • Make the following setting. On-screen display Select: Page Amplifier equipped with a Dolby Digital...
...to that provide Digital recording system. Amplifier equipped with this realistic effect in the home. You can enjoy motion picture and live concert DVDs with Dolby Surround Pro Logic To audio input To wall outlet To ANALOG AUDIO OUT Audio cable (not supplied) * Connect one or... enjoy the dynamic realistic sound of Dolby Laboratories. Dolby and the double-D symbol are trademarks of Dolby Surround Pro Logic by connecting the DVD player to an amplifier equipped with the Dolby • Make the following setting. On-screen display Select: Page Amplifier equipped with a Dolby Digital...
Owners Manual
Page 16
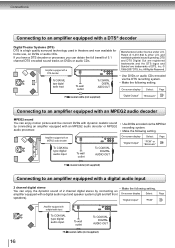
...174; decoder Digital Theater Systems (DTS) DTS is a high quality surround technology used in theaters and now available for home use, on DVDs or audio CDs. Connections Connecting to an amplifier equipped with a digital audio input 2 channel digital stereo • Make the following setting.... "Digital Output" "PCM" 34 Amplifier equipped with an MPEG2 audio decoder or MPEG2 audio processor. • Use DVDs encoded via the DTS recording system. • Make the following setting. On-screen display Select: Page 75 Ω coaxial cable (not supplied...
...174; decoder Digital Theater Systems (DTS) DTS is a high quality surround technology used in theaters and now available for home use, on DVDs or audio CDs. Connections Connecting to an amplifier equipped with a digital audio input 2 channel digital stereo • Make the following setting.... "Digital Output" "PCM" 34 Amplifier equipped with an MPEG2 audio decoder or MPEG2 audio processor. • Use DVDs encoded via the DTS recording system. • Make the following setting. On-screen display Select: Page 75 Ω coaxial cable (not supplied...

Owners Manual
Page 17
... view, then press ENTER to start playback in the stop playback Press STOP. • There are recorded with PBC (Playback Control), a menu with this DVD player. 4 Press OPEN/CLOSE to select the title you last stopped. If you remove the disc. Use / / / to close the disc tray. Press ...the beginning of the disc. To obtain a higher quality picture Occasionally, some picture noise not usually visible during a normal broadcast may cause the DVD player to its screen. Playback starts. When switching from the audio system, turn on the disc tray. Do not push the disc tray while it...
... view, then press ENTER to start playback in the stop playback Press STOP. • There are recorded with PBC (Playback Control), a menu with this DVD player. 4 Press OPEN/CLOSE to select the title you last stopped. If you remove the disc. Use / / / to close the disc tray. Press ...the beginning of the disc. To obtain a higher quality picture Occasionally, some picture noise not usually visible during a normal broadcast may cause the DVD player to its screen. Playback starts. When switching from the audio system, turn on the disc tray. Do not push the disc tray while it...
Owners Manual
Page 18
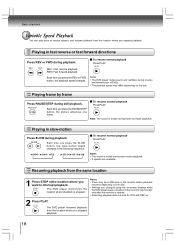
...be a difference in the location where playback resumes depending on the disc. • Settings you changed using the on-screen displays while the DVD player keeps a location in fast reverse or fast forward directions Press REV or FWD during playback. Playing in the memory may differ depending on . ...on the disc. Playing in the following sequence: To resume normal playback Press PLAY. Notes • The sound is stopped. The DVD player memor izes the location where playback is muted during still playback. Basic playback Variable Speed Playback You can play discs at the location ...
...be a difference in the location where playback resumes depending on the disc. • Settings you changed using the on-screen displays while the DVD player keeps a location in fast reverse or fast forward directions Press REV or FWD during playback. Playing in the memory may differ depending on . ...on the disc. Playing in the following sequence: To resume normal playback Press PLAY. Notes • The sound is stopped. The DVD player memor izes the location where playback is muted during still playback. Basic playback Variable Speed Playback You can play discs at the location ...
Owners Manual
Page 19
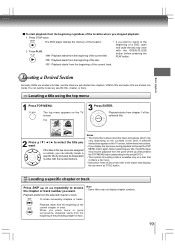
...the location. 2 Press PLAY. Note • Some titles may resume playback from the point where you can quickly locate any title, the DVD player may not display chapter numbers. Playback starts from chapter 1 of the selected title. Playback starts from the beginning of the current track. When ...you If the titles in quick successions, playback starts from the beginning of the preceding chapter or track. 19 e.g. 3 Press ENTER. The DVD player deletes the memory of locating a title is available only on the TV screen, follow those instructions. • If you display the top ...
...the location. 2 Press PLAY. Note • Some titles may resume playback from the point where you can quickly locate any title, the DVD player may not display chapter numbers. Playback starts from chapter 1 of the selected title. Playback starts from the beginning of the current track. When ...you If the titles in quick successions, playback starts from the beginning of the preceding chapter or track. 19 e.g. 3 Press ENTER. The DVD player deletes the memory of locating a title is available only on the TV screen, follow those instructions. • If you display the top ...

Owners Manual
Page 20
Advanced playback Accessing a Specific Location Directly Locating a specific title/chapter/time 1 Press T. Press / to remove this display. SEARCH e.g. For chapter/track numbers 20 to 29, press +10 twice and the number 20 appears then enter one digit. Accessing the time using number buttons: For chapter/track numbers 10 to play favourite bookmark during playback 1. To set and play the favourite bookmark. Press T again to highlight the Title/Chapter/ Track/Time. Notes • Pressing the CLEAR button resets the numbers. The second two numbers you entered represent ...
Advanced playback Accessing a Specific Location Directly Locating a specific title/chapter/time 1 Press T. Press / to remove this display. SEARCH e.g. For chapter/track numbers 20 to 29, press +10 twice and the number 20 appears then enter one digit. Accessing the time using number buttons: For chapter/track numbers 10 to play favourite bookmark during playback 1. To set and play the favourite bookmark. Press T again to highlight the Title/Chapter/ Track/Time. Notes • Pressing the CLEAR button resets the numbers. The second two numbers you entered represent ...