
User Guide
Page 11
... INSTRUCTIONS ... 4 Precautions 8 Notes on Discs 9 Notes on region numbers 10 Table of Contents 11 Identification of Controls 12 Front panel 12 Rear panel 12 DVD display 13 Remote control 14 Loading batteries 15 Operating with the remote control 15 Connections Connecting to a TV 18 Connecting to a TV 18 Connecting to an audio system and TV...
... INSTRUCTIONS ... 4 Precautions 8 Notes on Discs 9 Notes on region numbers 10 Table of Contents 11 Identification of Controls 12 Front panel 12 Rear panel 12 DVD display 13 Remote control 14 Loading batteries 15 Operating with the remote control 15 Connections Connecting to a TV 18 Connecting to a TV 18 Connecting to an audio system and TV...
User Guide
Page 13
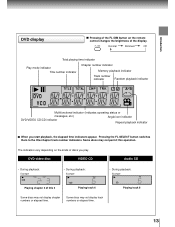
Some discs may not display track numbers or elapsed time. 13 The indicators vary depending on the remote control changes the brightness of the display. Pressing the FL SELECT button switches them to the title/chapter/track number indicators. Some discs may not permit ...
Some discs may not display track numbers or elapsed time. 13 The indicators vary depending on the remote control changes the brightness of the display. Pressing the FL SELECT button switches them to the title/chapter/track number indicators. Some discs may not permit ...
User Guide
Page 14
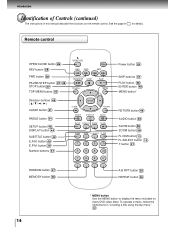
...button 31 A-B RPT button 35 REPEAT button 35 14 * MENU button Use the MENU button to display the menu included on the remote control. Remote control OPEN/CLOSE button 26 REV button 28 FWD button 28 PAUSE/STEP button 27 28 STOP button 27 TOP MENU button 30 OPEN/CLOSE...buttons 48 (// / ) CLEAR button 31 ANGLE button 41 SETUP button 48 DISPLAY button 44 SUBTITLE button 42 E.A.M. button 40 E.P.M. E.P.M. Introduction Identification of Controls (continued) The instructions in for details. To operate a menu, follow the instructions in "Locating a title using the top menu." 30 button 39 ...
...button 31 A-B RPT button 35 REPEAT button 35 14 * MENU button Use the MENU button to display the menu included on the remote control. Remote control OPEN/CLOSE button 26 REV button 28 FWD button 28 PAUSE/STEP button 27 28 STOP button 27 TOP MENU button 30 OPEN/CLOSE...buttons 48 (// / ) CLEAR button 31 ANGLE button 41 SETUP button 48 DISPLAY button 44 SUBTITLE button 42 E.A.M. button 40 E.P.M. E.P.M. Introduction Identification of Controls (continued) The instructions in for details. To operate a menu, follow the instructions in "Locating a title using the top menu." 30 button 39 ...
User Guide
Page 15
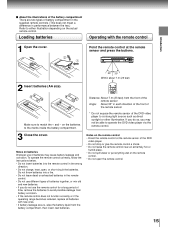
... the DVD video player. • Do not drop or give the remote control a shock. • Do not leave the remote control near an extremely hot or humid place. • Do not spill water or put anything wet on the remote control • Direct the remote control at the remote sensor and press the buttons. 30° 30° Within...
... the DVD video player. • Do not drop or give the remote control a shock. • Do not leave the remote control near an extremely hot or humid place. • Do not spill water or put anything wet on the remote control • Direct the remote control at the remote sensor and press the buttons. 30° 30° Within...
User Guide
Page 27
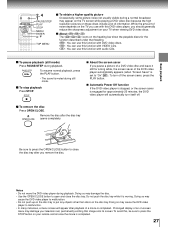
... (when "Screen Saver" is completed. Doing so may appear on the TV screen while playing a DVD video disc because the high resolution pictures on your remote control once the movie is moving. To avoid this DVD video player, you pause a picture of noise depends on the TV you remove the disc. STOP...
... (when "Screen Saver" is completed. Doing so may appear on the TV screen while playing a DVD video disc because the high resolution pictures on your remote control once the movie is moving. To avoid this DVD video player, you pause a picture of noise depends on the TV you remove the disc. STOP...
User Guide
Page 58
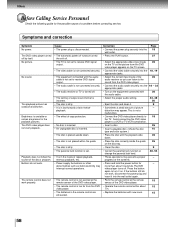
... turns off by itself. Correction • Connect the power plug securely into the wall outlet again. • Point the remote control at the remote sensor of the DVD video player. • Operate the remote control within about 3 seconds. Avoid connecting the DVD video player to 18 the TV. Others Before Calling Service Personnel Check the...
... turns off by itself. Correction • Connect the power plug securely into the wall outlet again. • Point the remote control at the remote sensor of the DVD video player. • Operate the remote control within about 3 seconds. Avoid connecting the DVD video player to 18 the TV. Others Before Calling Service Personnel Check the...
User Guide
Page 59
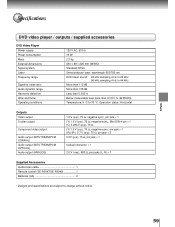
...) 0.7 V (p-p), 75 Ω, pin jack × 2 0.5V (p-p), 75 Ω, pin jack × 1 Optical connector × 1 2.0 V (rms), 680 Ω, pin jacks (L, R) × 1 Supplied Accessories Audio/video cable 1 Remote control (SE-R0047/SE-R0049 1 Batteries (AA 2 • Designs and specifications are subject to change without notice.
...) 0.7 V (p-p), 75 Ω, pin jack × 2 0.5V (p-p), 75 Ω, pin jack × 1 Optical connector × 1 2.0 V (rms), 680 Ω, pin jacks (L, R) × 1 Supplied Accessories Audio/video cable 1 Remote control (SE-R0047/SE-R0049 1 Batteries (AA 2 • Designs and specifications are subject to change without notice.


