
User Guide 2
Page 34
34 Contents Setting up your software 53 Registering your computer with Toshiba 54 Adding optional external devices 54 Adding memory (optional 54 Installing a memory module 55 Removing a memory module 60 Checking total memory 63 Recovering the Internal ... or projector.....84 Directing the display output when you turn on the computer 85 Adjusting the quality of the external display......86 Using an external keyboard 86 Using a mouse 86 Connecting a printer 86 Setting up a printer 87 Turning off the computer 87 Options for turning off the computer 88 Using the...
34 Contents Setting up your software 53 Registering your computer with Toshiba 54 Adding optional external devices 54 Adding memory (optional 54 Installing a memory module 55 Removing a memory module 60 Checking total memory 63 Recovering the Internal ... or projector.....84 Directing the display output when you turn on the computer 85 Adjusting the quality of the external display......86 Using an external keyboard 86 Using a mouse 86 Connecting a printer 86 Setting up a printer 87 Turning off the computer 87 Options for turning off the computer 88 Using the...
User Guide 2
Page 35
... the computer 98 Moving the computer 99 Using a computer lock 99 Chapter 2: Learning the Basics 100 Computing tips 100 Using the keyboard 101 Character keys 102 Making your keyboard emulate a full-size keyboard 102 Ctrl, Fn, and Alt keys 102 Function keys 102 Special Windows® keys 103 Overlay keys 103 Starting a program...
... the computer 98 Moving the computer 99 Using a computer lock 99 Chapter 2: Learning the Basics 100 Computing tips 100 Using the keyboard 101 Character keys 102 Making your keyboard emulate a full-size keyboard 102 Ctrl, Fn, and Alt keys 102 Function keys 102 Special Windows® keys 103 Overlay keys 103 Starting a program...
User Guide 2
Page 38
... Authentication Utility.....171 Fingerprint Logon 172 Care and maintenance of your fingerprint reader 172 Fingerprint reader limitations 174 TOSHIBA eco Utility 175 TOSHIBA Service Station 176 TOSHIBA PC Health Monitor 176 Chapter 6: If Something Goes Wrong 178 Problems that are easy to fix 178 ... you 183 Fixing a problem with Device Manager 184 Checking device properties 184 Memory problems 185 Power and the batteries 185 Keyboard problems 187 Display problems 187 Disk or storage drive problems 189 Error-checking 189 Optical disc drive problems 190 Sound system problems...
... Authentication Utility.....171 Fingerprint Logon 172 Care and maintenance of your fingerprint reader 172 Fingerprint reader limitations 174 TOSHIBA eco Utility 175 TOSHIBA Service Station 176 TOSHIBA PC Health Monitor 176 Chapter 6: If Something Goes Wrong 178 Problems that are easy to fix 178 ... you 183 Fixing a problem with Device Manager 184 Checking device properties 184 Memory problems 185 Power and the batteries 185 Keyboard problems 187 Display problems 187 Disk or storage drive problems 189 Error-checking 189 Optical disc drive problems 190 Sound system problems...

User Guide 2
Page 39
...backup in the Windows® operating system 199 If you need further assistance 203 Before you contact Toshiba 203 Contacting Toshiba 204 Other Toshiba Internet Web sites 205 Toshiba's worldwide offices 205 Appendix A: Hot Keys/TOSHIBA Cards 207 Hot Key Cards 207 Using the Hot Key Cards 208 Hot key functions 209 Optical...Display brightness 216 Disabling or enabling wireless devices............217 Disabling or enabling the touch pad 218 Cursor control overlay 219 Numeric overlay 219 Keyboard hot key functions 220 Appendix B: Power Cord/Cable Connectors 221 Glossary 222 Index 237
...backup in the Windows® operating system 199 If you need further assistance 203 Before you contact Toshiba 203 Contacting Toshiba 204 Other Toshiba Internet Web sites 205 Toshiba's worldwide offices 205 Appendix A: Hot Keys/TOSHIBA Cards 207 Hot Key Cards 207 Using the Hot Key Cards 208 Hot key functions 209 Optical...Display brightness 216 Disabling or enabling wireless devices............217 Disabling or enabling the touch pad 218 Cursor control overlay 219 Numeric overlay 219 Keyboard hot key functions 220 Appendix B: Power Cord/Cable Connectors 221 Glossary 222 Index 237
User Guide 2
Page 48
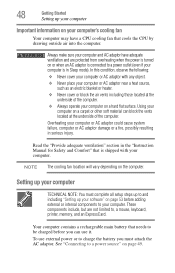
... "Provide adequate ventilation" section in the "Instruction Manual for Safety and Comfort" that needs to be charged before adding external or internal components to , a mouse, keyboard, printer, memory, and an ExpressCard. See "Connecting to charge the battery you can block the vents located at the underside of the computer. In this...
... "Provide adequate ventilation" section in the "Instruction Manual for Safety and Comfort" that needs to be charged before adding external or internal components to , a mouse, keyboard, printer, memory, and an ExpressCard. See "Connecting to charge the battery you can block the vents located at the underside of the computer. In this...
User Guide 2
Page 52
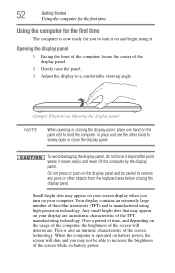
... or closing the display panel, place one hand on the palm rest to hold the computer in place and use the other objects from the keyboard area before closing the display panel. When the computer is operated on battery power, the screen will deteriorate. Your display contains an extremely large number...
... or closing the display panel, place one hand on the palm rest to hold the computer in place and use the other objects from the keyboard area before closing the display panel. When the computer is operated on battery power, the screen will deteriorate. Your display contains an extremely large number...
User Guide 2
Page 54
... complex software or process large amounts of today's popular applications. Adding optional external devices NOTE Before adding external devices or memory, Toshiba recommends setting up your software" on page 143) Adding memory (optional) HINT: To purchase additional memory modules, see "Using an... or visit accessories.toshiba.com. NOTE To register online, you may want to: ❖ Add more memory (see "Adding memory (optional)" on page 54) ❖ Connect a mouse (see "Using a mouse" on page 86) ❖ Connect an external keyboard (see "Using an external keyboard" on page 86...
... complex software or process large amounts of today's popular applications. Adding optional external devices NOTE Before adding external devices or memory, Toshiba recommends setting up your software" on page 143) Adding memory (optional) HINT: To purchase additional memory modules, see "Using an... or visit accessories.toshiba.com. NOTE To register online, you may want to: ❖ Add more memory (see "Adding memory (optional)" on page 54) ❖ Connect a mouse (see "Using a mouse" on page 86) ❖ Connect an external keyboard (see "Using an external keyboard" on page 86...
User Guide 2
Page 65
... the drive and all information stored in those partitions. See "Erasing the Internal Storage Drive" on page 77 for more information, see "Backing up your keyboard while powering on page 109. You can recover the original factory image (returning the computer to an external power source via the AC adaptor. ❖...
... the drive and all information stored in those partitions. See "Erasing the Internal Storage Drive" on page 77 for more information, see "Backing up your keyboard while powering on page 109. You can recover the original factory image (returning the computer to an external power source via the AC adaptor. ❖...

User Guide 2
Page 67
NOTE During the internal storage drive recovery process it is complete, a message displays indicating that all information stored on the keyboard to restart the computer. When the process is strongly recommended that your computer be lost during the recovery process. Recovering without changing the internal storage ...
NOTE During the internal storage drive recovery process it is complete, a message displays indicating that all information stored on the keyboard to restart the computer. When the process is strongly recommended that your computer be lost during the recovery process. Recovering without changing the internal storage ...
User Guide 2
Page 68
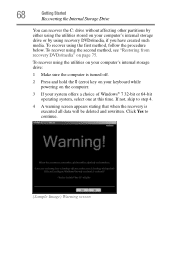
... and rewritten. Click Yes to step 4. 4 A warning screen appears stating that when the recovery is turned off. 2 Press and hold the 0 (zero) key on your keyboard while powering on the computer. 3 If your computer's internal storage drive or by either using the utilities stored on page 75. 68 Getting Started Recovering...
... and rewritten. Click Yes to step 4. 4 A warning screen appears stating that when the recovery is turned off. 2 Press and hold the 0 (zero) key on your keyboard while powering on the computer. 3 If your computer's internal storage drive or by either using the utilities stored on page 75. 68 Getting Started Recovering...
User Guide 2
Page 70
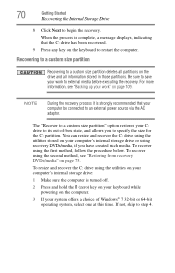
... storage drive or using the first method, follow the procedure below. When the process is turned off. 2 Press and hold the 0 (zero) key on your keyboard while powering on the drive and all information stored in those partitions. You can resize and recover the C: drive using the utilities stored on page... the size for the C: partition. NOTE During the recovery process it is strongly recommended that the C: drive has been recovered. 9 Press any key on the keyboard to a custom size partition" option restores your work " on page 109.
... storage drive or using the first method, follow the procedure below. When the process is turned off. 2 Press and hold the 0 (zero) key on your keyboard while powering on the drive and all information stored in those partitions. You can resize and recover the C: drive using the utilities stored on page... the size for the C: partition. NOTE During the recovery process it is strongly recommended that the C: drive has been recovered. 9 Press any key on the keyboard to a custom size partition" option restores your work " on page 109.
User Guide 2
Page 72
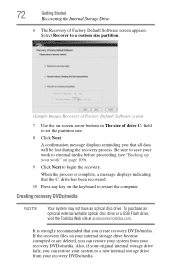
...Click Next. When the process is strongly recommended that all data will be lost during the recovery process. If the recovery files on the keyboard to a new internal storage drive from your recovery DVDs/media. To purchase an optional external writable optical disc drive or a USB Flash drive..., visit the Toshiba Web site at accessories.toshiba.com. It is complete, a message displays indicating that the C: drive has been recovered. 10 Press any key on your ...
...Click Next. When the process is strongly recommended that all data will be lost during the recovery process. If the recovery files on the keyboard to a new internal storage drive from your recovery DVDs/media. To purchase an optional external writable optical disc drive or a USB Flash drive..., visit the Toshiba Web site at accessories.toshiba.com. It is complete, a message displays indicating that the C: drive has been recovered. 10 Press any key on your ...
User Guide 2
Page 76
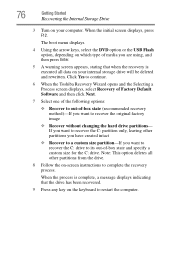
...the C: drive. The boot menu displays. 4 Using the arrow keys, select the DVD option or the USB Flash option, depending on the keyboard to complete the recovery process. If you want to recover the C: drive to recover the original factory image ❖ Recover without changing the hard... drive partitions- When the initial screen displays, press F12. Click Yes to continue. 6 When the Toshiba Recovery Wizard opens and the Selecting a Process screen displays, select Recovery of Factory Default Software and then click Next. 7 Select one of ...
...the C: drive. The boot menu displays. 4 Using the arrow keys, select the DVD option or the USB Flash option, depending on the keyboard to complete the recovery process. If you want to recover the C: drive to recover the original factory image ❖ Recover without changing the hard... drive partitions- When the initial screen displays, press F12. Click Yes to continue. 6 When the Toshiba Recovery Wizard opens and the Selecting a Process screen displays, select Recovery of Factory Default Software and then click Next. 7 Select one of ...
User Guide 2
Page 78
... erased. 6 Press any key on the internal storage drive will be lost. When the process is complete, a message displays, indicating that all data on the keyboard to external media (see "Creating recovery DVDs/media" on page 109) and created recovery DVDs/media (see "Backing up your internal storage drive. (Sample Image...
... erased. 6 Press any key on the internal storage drive will be lost. When the process is complete, a message displays, indicating that all data on the keyboard to external media (see "Creating recovery DVDs/media" on page 109) and created recovery DVDs/media (see "Backing up your internal storage drive. (Sample Image...
User Guide 2
Page 79
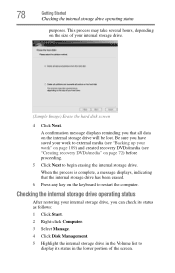
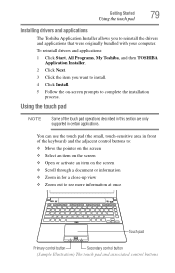
... Touch pad Primary control button Secondary control button (Sample Illustration) The touch pad and associated control buttons Using the touch pad NOTE Some of the keyboard) and the adjacent control buttons to: ❖ Move the pointer on the screen ❖ Select an item on the screen ❖ Open ... to reinstall the drivers and applications that were originally bundled with your computer. To reinstall drivers and applications: 1 Click Start, All Programs, My Toshiba, and then TOSHIBA Application Installer. 2 Click Next. 3 Click the item you to complete the installation process.
... Touch pad Primary control button Secondary control button (Sample Illustration) The touch pad and associated control buttons Using the touch pad NOTE Some of the keyboard) and the adjacent control buttons to: ❖ Move the pointer on the screen ❖ Select an item on the screen ❖ Open ... to reinstall the drivers and applications that were originally bundled with your computer. To reinstall drivers and applications: 1 Click Start, All Programs, My Toshiba, and then TOSHIBA Application Installer. 2 Click Next. 3 Click the item you to complete the installation process.

User Guide 2
Page 86
...your printer documentation for further instructions. the printer is USB-compatible, check its documentation. 86 Getting Started Using an external keyboard Adjusting the quality of the computer's built-in "Setting up the printer as instructed by the printer manufacturer, the printer ...that came with your printer. See the video device documentation for use a USB-compatible mouse. Using an external keyboard If you prefer to use an external keyboard, you do not install the software as described in touch pad™. Follow the manufacturer's instructions when connecting...
...your printer documentation for further instructions. the printer is USB-compatible, check its documentation. 86 Getting Started Using an external keyboard Adjusting the quality of the computer's built-in "Setting up the printer as instructed by the printer manufacturer, the printer ...that came with your printer. See the video device documentation for use a USB-compatible mouse. Using an external keyboard If you prefer to use an external keyboard, you do not install the software as described in touch pad™. Follow the manufacturer's instructions when connecting...
User Guide 2
Page 98
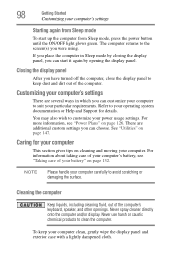
... or damaging the surface. Cleaning the computer Keep liquids, including cleaning fluid, out of the computer. To keep dust and dirt out of the computer's keyboard, speaker, and other openings. Caring for details. The computer returns to clean the computer. You may also wish to keep your computer.
... or damaging the surface. Cleaning the computer Keep liquids, including cleaning fluid, out of the computer. To keep dust and dirt out of the computer's keyboard, speaker, and other openings. Caring for details. The computer returns to clean the computer. You may also wish to keep your computer.
User Guide 2
Page 101
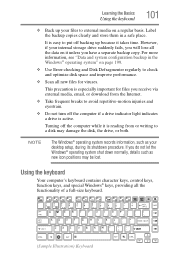
.... Label the backup copies clearly and store them in the Windows® operating system" on a regular basis. Learning the Basics Using the keyboard 101 ❖ Back up because it unless you do not let the Windows® operating system shut down normally, details such as your ...desktop setup, during its shutdown procedure. Using the keyboard Your computer's keyboard contains character keys, control keys, function keys, and special Windows® keys, providing all the functionality of a full-size...
.... Label the backup copies clearly and store them in the Windows® operating system" on a regular basis. Learning the Basics Using the keyboard 101 ❖ Back up because it unless you do not let the Windows® operating system shut down normally, details such as your ...desktop setup, during its shutdown procedure. Using the keyboard Your computer's keyboard contains character keys, control keys, function keys, and special Windows® keys, providing all the functionality of a full-size...
User Guide 2
Page 102
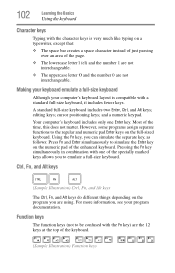
... ❖ The uppercase letter O and the number 0 are using. Your computer's keyboard includes only one of the specially marked keys allows you are not interchangeable. Most of the keyboard. (Sample Illustration) Function keys Pressing the Fn key simultaneously in combination with one Enter ...that: ❖ The space bar creates a space character instead of just passing over an area of the enhanced keyboard. Making your keyboard emulate a full-size keyboard Although your program documentation. and a numeric keypad. However, some programs assign separate functions to be confused with the...
... ❖ The uppercase letter O and the number 0 are using. Your computer's keyboard includes only one of the specially marked keys allows you are not interchangeable. Most of the keyboard. (Sample Illustration) Function keys Pressing the Fn key simultaneously in combination with one Enter ...that: ❖ The space bar creates a space character instead of just passing over an area of the enhanced keyboard. Making your keyboard emulate a full-size keyboard Although your program documentation. and a numeric keypad. However, some programs assign separate functions to be confused with the...
User Guide 2
Page 103
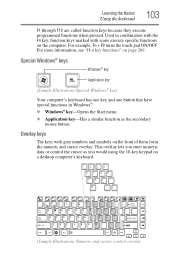
...and cursor overlay. Special Windows® keys Windows® key Application key (Sample Illustration) Special Windows® keys Your computer's keyboard has one key and one button that have special functions in combination with the Fn key, function keys marked with gray numbers ... mouse button Overlay keys The keys with icons execute specific functions on a desktop computer's keyboard. (Sample Illustration) Numeric and cursor control overlay Learning the Basics Using the keyboard 103 F1 through F12 are called function keys because they execute programmed functions when pressed. ...
...and cursor overlay. Special Windows® keys Windows® key Application key (Sample Illustration) Special Windows® keys Your computer's keyboard has one key and one button that have special functions in combination with the Fn key, function keys marked with gray numbers ... mouse button Overlay keys The keys with icons execute specific functions on a desktop computer's keyboard. (Sample Illustration) Numeric and cursor control overlay Learning the Basics Using the keyboard 103 F1 through F12 are called function keys because they execute programmed functions when pressed. ...


