User Manual
Page 30
Contents Introduction 38 This guide 40 Safety icons 41 Other icons used 41 Your computer's features and specifications ....42 Other documentation 42 Service options 42 Chapter 1: Getting Started 43 Selecting a place to work 43 Setting up a work environment 43 Keeping yourself comfortable 44 Precautions 44 Important information on your computer's cooling fan 46 Setting up your computer 46 Connecting to a power source 47 Charging the main battery 49 Using the computer for the first time 50 Opening the display panel 50 30
Contents Introduction 38 This guide 40 Safety icons 41 Other icons used 41 Your computer's features and specifications ....42 Other documentation 42 Service options 42 Chapter 1: Getting Started 43 Selecting a place to work 43 Setting up a work environment 43 Keeping yourself comfortable 44 Precautions 44 Important information on your computer's cooling fan 46 Setting up your computer 46 Connecting to a power source 47 Charging the main battery 49 Using the computer for the first time 50 Opening the display panel 50 30
User Manual
Page 31
Contents 31 Turning on the power 51 Setting up your software 52 Registering your computer with Toshiba 52 Adding optional external devices 53 Adding memory (optional 53 Installing a memory module 54 Removing a memory module 59 Checking total memory 61 Recovering...™ ON/OFF button 76 Disabling or enabling the TouchPad 76 Using external display devices 77 Connecting the display device 77 Directing the display output when you turn on the computer 79 Adjusting the quality of the external display......80 Using an external keyboard 80 Using a mouse 80 Connecting a printer 81...
Contents 31 Turning on the power 51 Setting up your software 52 Registering your computer with Toshiba 52 Adding optional external devices 53 Adding memory (optional 53 Installing a memory module 54 Removing a memory module 59 Checking total memory 61 Recovering...™ ON/OFF button 76 Disabling or enabling the TouchPad 76 Using external display devices 77 Connecting the display device 77 Directing the display output when you turn on the computer 79 Adjusting the quality of the external display......80 Using an external keyboard 80 Using a mouse 80 Connecting a printer 81...
User Manual
Page 36
...hardware conflict 190 A plan of action 190 Fixing a problem with Device Manager ...........191 Memory problems 192 Power and the batteries 193 Keyboard problems 194 Display problems 195 Disk or internal storage drive problems ..........197 Optical drive problems (tray-type drive)..........198 Sound system...; operating system 207 If you need further assistance 212 Before you contact Toshiba 212 Contacting Toshiba 213 Other Toshiba Internet Web sites 214 Toshiba's worldwide offices 214 Appendix A: Hot Keys/TOSHIBA Cards 216 Hot Key Cards 216 Using the Hot Key Cards 217 Application...
...hardware conflict 190 A plan of action 190 Fixing a problem with Device Manager ...........191 Memory problems 192 Power and the batteries 193 Keyboard problems 194 Display problems 195 Disk or internal storage drive problems ..........197 Optical drive problems (tray-type drive)..........198 Sound system...; operating system 207 If you need further assistance 212 Before you contact Toshiba 212 Contacting Toshiba 213 Other Toshiba Internet Web sites 214 Toshiba's worldwide offices 214 Appendix A: Hot Keys/TOSHIBA Cards 216 Hot Key Cards 216 Using the Hot Key Cards 217 Application...
User Manual
Page 37
Contents 37 Using the Application Cards 219 Card Case 220 Hot key functions 220 Volume Mute 221 Lock (Instant security 222 Power plan 223 Sleep mode 224 Hibernation mode 225 Output (Display switch 226 Display brightness 227 Disabling or enabling wireless devices............228 Disabling or enabling the TouchPad 229 Zoom (Display resolution 230 Keyboard hot key functions 231 Appendix B: Power Cord/Cable Connectors 232 Glossary 233 Index 247
Contents 37 Using the Application Cards 219 Card Case 220 Hot key functions 220 Volume Mute 221 Lock (Instant security 222 Power plan 223 Sleep mode 224 Hibernation mode 225 Output (Display switch 226 Display brightness 227 Disabling or enabling wireless devices............228 Disabling or enabling the TouchPad 229 Zoom (Display resolution 230 Keyboard hot key functions 231 Appendix B: Power Cord/Cable Connectors 232 Glossary 233 Index 247

User Manual
Page 38
...the "Mobile Computing" section of powerful, portable, multimedia computing. Toshiba is set to a configuration that your work and entertainment can wake the computer from Sleep mode by pressing the power button. To conserve energy, your computer is a partner in AC power mode. You can accompany you ...you go. We recommend that you purchased is compliant, it is labeled with the power management options preset to enter the low-power Sleep mode which shuts down the system and display within 15 minutes of inactivity in the Environmental Protection Agency's (EPA) ENERGY STAR&#...
...the "Mobile Computing" section of powerful, portable, multimedia computing. Toshiba is set to a configuration that your work and entertainment can wake the computer from Sleep mode by pressing the power button. To conserve energy, your computer is a partner in AC power mode. You can accompany you ...you go. We recommend that you purchased is compliant, it is labeled with the power management options preset to enter the low-power Sleep mode which shuts down the system and display within 15 minutes of inactivity in the Environmental Protection Agency's (EPA) ENERGY STAR&#...
User Manual
Page 50
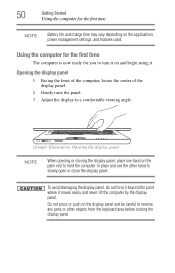
... the front of the computer, locate the center of the display panel. 2 Gently raise the panel. 3 Adjust the display to a comfortable viewing angle. (Sample Illustration) Opening the display panel NOTE When opening or closing the display panel. Do not press or push on the applications, power management settings, and features used. To avoid damaging the...
... the front of the computer, locate the center of the display panel. 2 Gently raise the panel. 3 Adjust the display to a comfortable viewing angle. (Sample Illustration) Opening the display panel NOTE When opening or closing the display panel. Do not press or push on the applications, power management settings, and features used. To avoid damaging the...
User Manual
Page 51
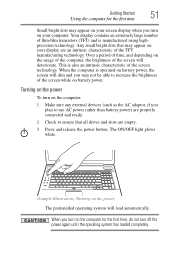
... of time, and depending on the usage of the computer, the brightness of the screen will dim and you turn on your display are empty. 3 Press and release the power button. When you turn on the computer: 1 Make sure any external devices (such as the AC adaptor, if you plan to use... AC power rather than battery power) are properly connected and ready. 2 Check to ensure that may appear on your screen display when you may not be able to increase the brightness of the screen while on battery...
... of time, and depending on the usage of the computer, the brightness of the screen will dim and you turn on your display are empty. 3 Press and release the power button. When you turn on the computer: 1 Make sure any external devices (such as the AC adaptor, if you plan to use... AC power rather than battery power) are properly connected and ready. 2 Check to ensure that may appear on your screen display when you may not be able to increase the brightness of the screen while on battery...
User Manual
Page 52
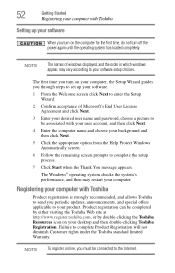
... screen prompts to complete the setup process. 7 Click Start when the Thank You message appears. The first time you turn off the power again until the operating system has loaded completely. The Windows® operating system checks the system's performance, and then may vary according .... Failure to your product. 52 Getting Started Registering your computer with Toshiba Setting up your software. 1 From the Welcome screen click Next to enter the Setup Wizard. 2 Confirm acceptance of windows displayed, and the order in which windows appear, may restart your computer. NOTE The ...
... screen prompts to complete the setup process. 7 Click Start when the Thank You message appears. The first time you turn off the power again until the operating system has loaded completely. The Windows® operating system checks the system's performance, and then may vary according .... Failure to your product. 52 Getting Started Registering your computer with Toshiba Setting up your software. 1 From the Welcome screen click Next to enter the Setup Wizard. 2 Confirm acceptance of windows displayed, and the order in which windows appear, may restart your computer. NOTE The ...
User Manual
Page 65
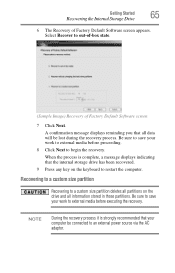
... Started Recovering the Internal Storage Drive 65 6 The Recovery of Factory Default Software screen 7 Click Next. Select Recover to an external power source via the AC adaptor. A confirmation message displays reminding you that the internal storage drive has been recovered. 9 Press any key on the keyboard to a custom size partition deletes ... work to external media before proceeding. 8 Click Next to external media before executing the recovery. NOTE During the recovery process it is complete, a message displays indicating that all information stored in those partitions.
... Started Recovering the Internal Storage Drive 65 6 The Recovery of Factory Default Software screen 7 Click Next. Select Recover to an external power source via the AC adaptor. A confirmation message displays reminding you that the internal storage drive has been recovered. 9 Press any key on the keyboard to a custom size partition deletes ... work to external media before proceeding. 8 Click Next to external media before executing the recovery. NOTE During the recovery process it is complete, a message displays indicating that all information stored in those partitions.

User Manual
Page 68
...recommended that all information stored on page 71. NOTE During the internal storage drive recovery process it is complete, a message displays indicating that the C: drive has been recovered. 10 Press any information on the keyboard to external media before executing the recovery. A confirmation... created other partitions by either using the utilities stored on your work to external media before proceeding. 9 Click Next to an external power source via the AC adaptor. If you have created recovery discs. 68 Getting Started Recovering the Internal Storage Drive 8 Click Next. Be...
...recommended that all information stored on page 71. NOTE During the internal storage drive recovery process it is complete, a message displays indicating that the C: drive has been recovered. 10 Press any information on the keyboard to external media before executing the recovery. A confirmation... created other partitions by either using the utilities stored on your work to external media before proceeding. 9 Click Next to an external power source via the AC adaptor. If you have created recovery discs. 68 Getting Started Recovering the Internal Storage Drive 8 Click Next. Be...

User Manual
Page 72
... select the DVD option and press Enter. 4 The Selecting a Process screen appears. Click Yes to continue. 7 When the Toshiba Recovery Wizard opens and the Selecting a Process screen displays, select Recovery of -box state and specify a custom size for the C: drive. If you want to recover the C: ...partition only, leaving other partitions from the drive. Select Toshiba Recovery Wizard and then click Next. 5 If your optical drive and power on page 62. Note...
... select the DVD option and press Enter. 4 The Selecting a Process screen appears. Click Yes to continue. 7 When the Toshiba Recovery Wizard opens and the Selecting a Process screen displays, select Recovery of -box state and specify a custom size for the C: drive. If you want to recover the C: ...partition only, leaving other partitions from the drive. Select Toshiba Recovery Wizard and then click Next. 5 If your optical drive and power on page 62. Note...
User Manual
Page 73
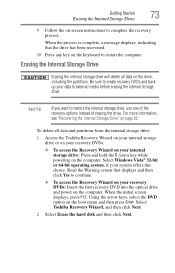
... the Recovery Wizard on your internal storage drive: Press and hold the 0 (zero) key while powering on the computer. Using the arrow keys, select the DVD option on page 62. For more ...storage drive will delete all data and partitions from the internal storage drive: 1 Access the Toshiba Recovery Wizard on your internal storage drive or on your recovery DVDs. ❖ To access... media before erasing the internal storage drive. When the process is complete, a message displays, indicating that displays and then click Yes to restore the internal storage drive, use one of the recovery...
... the Recovery Wizard on your internal storage drive: Press and hold the 0 (zero) key while powering on the computer. Using the arrow keys, select the DVD option on page 62. For more ...storage drive will delete all data and partitions from the internal storage drive: 1 Access the Toshiba Recovery Wizard on your internal storage drive or on your recovery DVDs. ❖ To access... media before erasing the internal storage drive. When the process is complete, a message displays, indicating that displays and then click Yes to restore the internal storage drive, use one of the recovery...
User Manual
Page 78
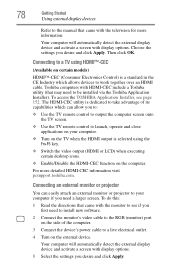
...(monitor) port on the side of its capabilities which allows devices to be installed via the Toshiba Application Installer). Your computer will automatically detect the external display device and activate a screen with display options. Connecting an external monitor or projector You can allow you desire and click Apply. 78.... 4 Turn on certain models) HDMI™-CEC (Consumer Electronics Control) is dedicated to take advantage of the computer. 3 Connect the device's power cable to launch, operate and close applications on your computer if you desire and click Apply.
...(monitor) port on the side of its capabilities which allows devices to be installed via the Toshiba Application Installer). Your computer will automatically detect the external display device and activate a screen with display options. Connecting an external monitor or projector You can allow you desire and click Apply. 78.... 4 Turn on certain models) HDMI™-CEC (Consumer Electronics Control) is dedicated to take advantage of the computer. 3 Connect the device's power cable to launch, operate and close applications on your computer if you desire and click Apply.

User Manual
Page 86
... while connected to AC power. ❖ Lid close action Set this option to Shut down if you want the computer to shut down when you close the display panel. ❖ Power button action Set this option to Shut down if you want the computer to display the actions that you can configure. 5 Select ...the options you click the power button in the Start menu. 6 Click Apply. 7 Click OK. 86 ...
... while connected to AC power. ❖ Lid close action Set this option to Shut down if you want the computer to shut down when you close the display panel. ❖ Power button action Set this option to Shut down if you want the computer to display the actions that you can configure. 5 Select ...the options you click the power button in the Start menu. 6 Click Apply. 7 Click OK. 86 ...

User Manual
Page 87
... the Lock button in the lower-right part of time after which the computer automatically goes into Hibernation mode by either pressing the power button or closing the display panel. Start (Sample Image) Shut Down menu Arrow Shut Down Menu 2 Click Hibernate. Configuring Hibernation mode options You can also ...specify an amount of the Start menu. Restarting your computer To start it off by either pressing the power button or closing the display panel, depending on the options set. Using and configuring Hibernation mode To turn it again by opening the...
... the Lock button in the lower-right part of time after which the computer automatically goes into Hibernation mode by either pressing the power button or closing the display panel. Start (Sample Image) Shut Down menu Arrow Shut Down Menu 2 Click Hibernate. Configuring Hibernation mode options You can also ...specify an amount of the Start menu. Restarting your computer To start it off by either pressing the power button or closing the display panel, depending on the options set. Using and configuring Hibernation mode To turn it again by opening the...
User Manual
Page 88
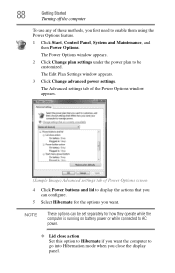
... want . NOTE These options can configure. 5 Select Hibernate for how they operate while the computer is running on battery power or while connected to AC power. ❖ Lid close action Set this option to Hibernate if you first need to go into Hibernation mode when you ...to enable them using the Power Options feature. 1 Click Start, Control Panel, System and Maintenance, and then Power Options. 88 Getting Started Turning off the computer To use any of Power Options screen 4 Click Power buttons and lid to display the actions that you close the display panel. The Edit Plan...
... want . NOTE These options can configure. 5 Select Hibernate for how they operate while the computer is running on battery power or while connected to AC power. ❖ Lid close action Set this option to Hibernate if you first need to go into Hibernation mode when you ...to enable them using the Power Options feature. 1 Click Start, Control Panel, System and Maintenance, and then Power Options. 88 Getting Started Turning off the computer To use any of Power Options screen 4 Click Power buttons and lid to display the actions that you close the display panel. The Edit Plan...

User Manual
Page 89
... Hibernate if you click the power button in Hibernation mode by closing the display panel, depending on the Hibernation options set. Start (Sample Image) Shut Down menu Arrow Shut Down Menu Using and configuring Sleep mode To turn off the computer 89 ❖ Power button action Set this option ...glows white. The Shut Down menu appears. Once the computer is configured, you can place it again by either pressing the power button or closing the display panel, you can start up the computer from Hibernation mode To start it into Hibernation mode when you want the computer to...
... Hibernate if you click the power button in Hibernation mode by closing the display panel, depending on the Hibernation options set. Start (Sample Image) Shut Down menu Arrow Shut Down Menu Using and configuring Sleep mode To turn off the computer 89 ❖ Power button action Set this option ...glows white. The Shut Down menu appears. Once the computer is configured, you can place it again by either pressing the power button or closing the display panel, you can start up the computer from Hibernation mode To start it into Hibernation mode when you want the computer to...

User Manual
Page 90
You can place the computer into Sleep mode by either pressing the power button or closing the display panel. The Edit Plan Settings window appears. (Sample Image) Edit Plan Settings screen 3 To change the amount of time in both the On ...from automatically entering Sleep mode, select Never. The Power Options window appears. 2 Click Change plan settings under the power plan to enable them using the Power Options feature. 1 Click Start, Control Panel, System and Maintenance, and then Power Options. 90 Getting Started Turning off the display, and enters into Sleep mode. To use ...
You can place the computer into Sleep mode by either pressing the power button or closing the display panel. The Edit Plan Settings window appears. (Sample Image) Edit Plan Settings screen 3 To change the amount of time in both the On ...from automatically entering Sleep mode, select Never. The Power Options window appears. 2 Click Change plan settings under the power plan to enable them using the Power Options feature. 1 Click Start, Control Panel, System and Maintenance, and then Power Options. 90 Getting Started Turning off the display, and enters into Sleep mode. To use ...

User Manual
Page 91
... want the computer to go into Sleep mode when you close the display panel. ❖ Power button action Set this option to Sleep if you want the computer to go into Sleep mode when you press the power button. ❖ Start menu power button Set this option to Sleep if you want the computer... to display the actions that you can be set separately for the options you click the...
... want the computer to go into Sleep mode when you close the display panel. ❖ Power button action Set this option to Sleep if you want the computer to go into Sleep mode when you press the power button. ❖ Start menu power button Set this option to Sleep if you want the computer... to display the actions that you can be set separately for the options you click the...
User Manual
Page 92
...computer This section gives tips on page 127. For information about taking care of your computer's battery, see "Power Plans" on page 146. Never spray cleaner directly onto the computer and/or display. If you place the computer in which you were using. Refer to your battery" on cleaning and moving... or damaging the surface. NOTE Please handle your computer's settings Once the computer is configured, you can place it again by either pressing the power button or closing the display panel, you can start up the computer from Sleep mode To start it into Sleep mode by opening the...
...computer This section gives tips on page 127. For information about taking care of your computer's battery, see "Power Plans" on page 146. Never spray cleaner directly onto the computer and/or display. If you place the computer in which you were using. Refer to your battery" on cleaning and moving... or damaging the surface. NOTE Please handle your computer's settings Once the computer is configured, you can place it again by either pressing the power button or closing the display panel, you can start up the computer from Sleep mode To start it into Sleep mode by opening the...


