
User Manual
Page 9
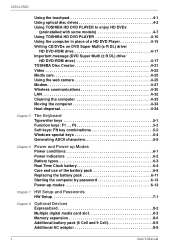
... 1 Introduction Equipment checklist 1-1 Features 1-2 Special features 1-8 TOSHIBA Value Added Package 1-10 Utilities and applications 1-11 Options 1-13 Chapter 2 The Grand Tour Front with the display closed 2-1 Left side 2-3 Right side 2-5 Back side 2-6 Underside 2-7 Front with the display open 2-8 Function Buttons 2-10 System indicators 2-11 Keyboard indicators 2-12 Optical disc drives 2-12 AC...
... 1 Introduction Equipment checklist 1-1 Features 1-2 Special features 1-8 TOSHIBA Value Added Package 1-10 Utilities and applications 1-11 Options 1-13 Chapter 2 The Grand Tour Front with the display closed 2-1 Left side 2-3 Right side 2-5 Back side 2-6 Underside 2-7 Front with the display open 2-8 Function Buttons 2-10 System indicators 2-11 Keyboard indicators 2-12 Optical disc drives 2-12 AC...
User Manual
Page 10
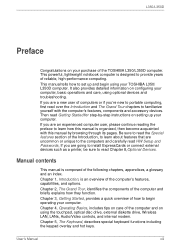
... DL) drive/ HD DVD-ROM drive 4-17 Important message (DVD Super Multi (± R DL) drive/ HD DVD-ROM drive 4-17 TOSHIBA Disc Creator 4-21 Video 4-22 Media care 4-25 Using the web camera 4-25 Modem 4-27 Wireless communications 4-30 LAN 4-32 Cleaning the ...computer 4-33 Moving the computer 4-33 Heat dispersal 4-34 Chapter 5 The Keyboard Typewriter keys 5-1 Function keys: F1 ... F9 5-2 Soft keys: FN key combinations 5-2 Windows special keys 5-4 Generating ASCII characters 5-5 Chapter 6 Power...
... DL) drive/ HD DVD-ROM drive 4-17 Important message (DVD Super Multi (± R DL) drive/ HD DVD-ROM drive 4-17 TOSHIBA Disc Creator 4-21 Video 4-22 Media care 4-25 Using the web camera 4-25 Modem 4-27 Wireless communications 4-30 LAN 4-32 Cleaning the ...computer 4-33 Moving the computer 4-33 Heat dispersal 4-34 Chapter 5 The Keyboard Typewriter keys 5-1 Function keys: F1 ... F9 5-2 Soft keys: FN key combinations 5-2 Windows special keys 5-4 Generating ASCII characters 5-5 Chapter 6 Power...
User Manual
Page 13
...and on using optional devices and troubleshooting. Chapter 4, Operating Basics, includes tips on care of the TOSHIBA L350/L350D computer. Chapter 5, The Keyboard, describes special keyboard functions including the keypad overlay and hot keys. Be sure to read the Special features section of ... function. Manual contents This manual is designed to read over the Introduction and The Grand Tour chapters to set up your TOSHIBA L350/ L350D computer. L350/L350D Preface Congratulations on your computer. This powerful, lightweight notebook computer is composed of reliable, ...
...and on using optional devices and troubleshooting. Chapter 4, Operating Basics, includes tips on care of the TOSHIBA L350/L350D computer. Chapter 5, The Keyboard, describes special keyboard functions including the keypad overlay and hot keys. Be sure to read the Special features section of ... function. Manual contents This manual is designed to read over the Introduction and The Grand Tour chapters to set up your TOSHIBA L350/ L350D computer. L350/L350D Preface Congratulations on your computer. This powerful, lightweight notebook computer is composed of reliable, ...

User Manual
Page 14
L350/L350D Chapter 6, Power and Power-up Modes, gives details on the keyboard. The Index quickly directs you see to the left. The indicator panel also uses icons to identify the components it is represented in the typeface ... information related to type in is providing information on how to the information contained in this manual. Acronyms are used in the Glossary. Keys The keyboard keys are also defined in the text to be working properly. If three keys are enclosed in the text. Icons Icons identify ports, dials, and...
L350/L350D Chapter 6, Power and Power-up Modes, gives details on the keyboard. The Index quickly directs you see to the left. The indicator panel also uses icons to identify the components it is represented in the typeface ... information related to type in is providing information on how to the information contained in this manual. Acronyms are used in the Glossary. Keys The keyboard keys are also defined in the text to be working properly. If three keys are enclosed in the text. Icons Icons identify ports, dials, and...

User Manual
Page 17
L350/L350D General Precautions TOSHIBA computers are designed to optimize safety, minimize strain and withstand the rigors of personal injury or damage to the computer. However, certain precautions should be caused by extensive keyboard use. Stress injury Carefully read the general precautions below and to your hands and wrists that is large enough...
L350/L350D General Precautions TOSHIBA computers are designed to optimize safety, minimize strain and withstand the rigors of personal injury or damage to the computer. However, certain precautions should be caused by extensive keyboard use. Stress injury Carefully read the general precautions below and to your hands and wrists that is large enough...
User Manual
Page 23
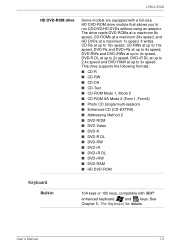
See Chapter 5, The Keyboard, for details. The drive reads DVD-ROMs at a maximum 8x speed, CD-ROMs at a maximum 24x speed, and HD DVDs at up to 2.4x speed ...; DVD-Video ■ DVD-R ■ DVD-R DL ■ DVD-RW ■ DVD+R ■ DVD+R DL ■ DVD+RW ■ DVD-RAM ■ HD DVD-ROM Keyboard Built-in 104 keys or 105 keys, compatible with a full-size HD DVD-ROM drive module that allows you to 3x speed. User's Manual 1-5 L350...
See Chapter 5, The Keyboard, for details. The drive reads DVD-ROMs at a maximum 8x speed, CD-ROMs at a maximum 24x speed, and HD DVDs at up to 2.4x speed ...; DVD-Video ■ DVD-R ■ DVD-R DL ■ DVD-RW ■ DVD+R ■ DVD+R DL ■ DVD+RW ■ DVD-RAM ■ HD DVD-ROM Keyboard Built-in 104 keys or 105 keys, compatible with a full-size HD DVD-ROM drive module that allows you to 3x speed. User's Manual 1-5 L350...
User Manual
Page 26
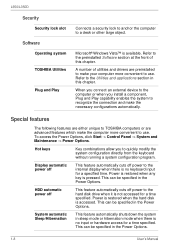
...the system to recognize the connection and make the computer more convenient to quickly modify the system configuration directly from the keyboard without running a system configuration program. This can be specified in the Power Options. 1-8 User's Manual Special features ...The following features are advanced features which make the necessary configurations automatically. L350/L350D Security Security lock slot Software Operating system TOSHIBA Utilities Plug and Play Connects a security lock to anchor the computer to the Utilities and applications section in this chapter...
...the system to recognize the connection and make the computer more convenient to quickly modify the system configuration directly from the keyboard without running a system configuration program. This can be specified in the Power Options. 1-8 User's Manual Special features ...The following features are advanced features which make the necessary configurations automatically. L350/L350D Security Security lock slot Software Operating system TOSHIBA Utilities Plug and Play Connects a security lock to anchor the computer to the Utilities and applications section in this chapter...

User Manual
Page 44
...audio and video. The storage capacity and data transfer rate of playback-only discs in your computer. When the CAPS LOCK indicator glows the keyboard is configured in single-sided singlelayer 15GB and single-sided dual-layer 30GB (Gigabyte) formats. ■ Unfinalized DVDs created on home DVD ...recorders may not be playable on the drive glows. L350/L350D Keyboard indicators The following figure shows the position of HD DVD and HD DVD Media. About the HD DVD This section describes the features, use...
...audio and video. The storage capacity and data transfer rate of playback-only discs in your computer. When the CAPS LOCK indicator glows the keyboard is configured in single-sided singlelayer 15GB and single-sided dual-layer 30GB (Gigabyte) formats. ■ Unfinalized DVDs created on home DVD ...recorders may not be playable on the drive glows. L350/L350D Keyboard indicators The following figure shows the position of HD DVD and HD DVD Media. About the HD DVD This section describes the features, use...

User Manual
Page 53
... time, the Disk indicator will enter hibernation mode automatically when you turn off the power in hibernation mode, the computer takes a moment to Chapter 5, The Keyboard, for the duration set by pressing FN + F4 - After you turn the computer or devices back on the computer. ■ Saves power by shutting down...
... time, the Disk indicator will enter hibernation mode automatically when you turn off the power in hibernation mode, the computer takes a moment to Chapter 5, The Keyboard, for the duration set by pressing FN + F4 - After you turn the computer or devices back on the computer. ■ Saves power by shutting down...

User Manual
Page 54
.... Data in memory will not function under the following benefits: ■ Restores the previous working environment more power. Benefits of three ways: 1. See Chapter 5, The Keyboard, for the duration set by the system sleep feature. ■ You can also enable sleep mode by shutting down in hibernation mode. Press the power...
.... Data in memory will not function under the following benefits: ■ Restores the previous working environment more power. Benefits of three ways: 1. See Chapter 5, The Keyboard, for the duration set by the system sleep feature. ■ You can also enable sleep mode by shutting down in hibernation mode. Press the power...

User Manual
Page 55
The System Recovery Options feature will be displayed. Follow the instructions shown on the computer and when the TOSHIBA screen appears repeatedly press the F8 key. 3. Use the arrow keys to repair startup problems, run manually to repair problems. The procedure is ...the hard disk drive for example, if: ■ You change certain computer settings. ■ An error occurs and the computer does not respond to your keyboard commands. Press CTRL, ALT and DEL simultaneously (once) to display the menu window, then click the arrow button in the power management buttons ( ) ...
The System Recovery Options feature will be displayed. Follow the instructions shown on the computer and when the TOSHIBA screen appears repeatedly press the F8 key. 3. Use the arrow keys to repair startup problems, run manually to repair problems. The procedure is ...the hard disk drive for example, if: ■ You change certain computer settings. ■ An error occurs and the computer does not respond to your keyboard commands. Press CTRL, ALT and DEL simultaneously (once) to display the menu window, then click the arrow button in the power management buttons ( ) ...

User Manual
Page 57
... Creator starts, select the type of the above media may not be compatible with the optical disc drive installed into your computer when the TOSHIBA logo screen appears, release the F12 key. 3. When you reinstall the Windows operating system, the hard disk will be reformatted and all ...from your computer and allow sounds to load the Windows Vista® operating system from the hard disk drive as normal. 4. Turn on the keyboard, turn off the computer's power. 2. Restoring the pre-installed software from which you should therefore verify the optical disc drive supports the blank ...
... Creator starts, select the type of the above media may not be compatible with the optical disc drive installed into your computer when the TOSHIBA logo screen appears, release the F12 key. 3. When you reinstall the Windows operating system, the hard disk will be reformatted and all ...from your computer and allow sounds to load the Windows Vista® operating system from the hard disk drive as normal. 4. Turn on the keyboard, turn off the computer's power. 2. Restoring the pre-installed software from which you should therefore verify the optical disc drive supports the blank ...

User Manual
Page 58
...up your preferred keyboard layout and press Next. 5. Please refer to Chapter 5, The Keyboard, for the required software is not available. Turn on as an enabled user with sufficent rights. 6. To access the recovery process please log on the computer and when the TOSHIBA screen appears repeatedly... folder "HDDRecovery". Be sure to connect the AC adaptor, otherwise you use a third-party partitioning program to reconfigure the partitions on the TOSHIBA HDD Recovery dialog. Select your hard disk drive again, do not change, delete or add partitions in a manner other than specified in ...
...up your preferred keyboard layout and press Next. 5. Please refer to Chapter 5, The Keyboard, for the required software is not available. Turn on as an enabled user with sufficent rights. 6. To access the recovery process please log on the computer and when the TOSHIBA screen appears repeatedly... folder "HDDRecovery". Be sure to connect the AC adaptor, otherwise you use a third-party partitioning program to reconfigure the partitions on the TOSHIBA HDD Recovery dialog. Select your hard disk drive again, do not change, delete or add partitions in a manner other than specified in ...

User Manual
Page 59
When the TOSHIBA logo screen appears, release the F12 key. 3. If your computer. When you should follow the steps below. Use the cursor keys to the Boot Priority ... all preinstalled software, follow the on your computer came with additional software installed, this to allow sounds to Chapter 5, The Keyboard, for further information. 4. While holding down F12 key on the keyboard, turn off the computer's power. 2. L350/L350D Restoring the pre-installed software from other media. To restore the operating system...
When the TOSHIBA logo screen appears, release the F12 key. 3. If your computer. When you should follow the steps below. Use the cursor keys to the Boot Priority ... all preinstalled software, follow the on your computer came with additional software installed, this to allow sounds to Chapter 5, The Keyboard, for further information. 4. While holding down F12 key on the keyboard, turn off the computer's power. 2. L350/L350D Restoring the pre-installed software from other media. To restore the operating system...

User Manual
Page 70
... in the HD DVD drive while Windows Vista™ is running. Select Start -> All Programs -> TOSHIBA HD DVD PLAYER to start TOSHIBA HD DVD PLAYER. Insert a HD DVD-Video in the HD DVD drive, the following corresponding keyboard keys. If this type appears, use the following application selection screen may appear. Figure 4-9 Application...
... in the HD DVD drive while Windows Vista™ is running. Select Start -> All Programs -> TOSHIBA HD DVD PLAYER to start TOSHIBA HD DVD PLAYER. Insert a HD DVD-Video in the HD DVD drive, the following corresponding keyboard keys. If this type appears, use the following application selection screen may appear. Figure 4-9 Application...

User Manual
Page 95
...shift lock on a typewriter. ■ The uppercase O (oh) and the 0 (zero) are some differences, however, between using a typewriter and using a computer keyboard: ■ Letters and numbers produced in computer text vary in the shifted position. ■ The SHIFT keys, the TAB key, and the BACK SPACE key... the number 1 (one) are not interchangeable on computers as their typewriter counterparts but also have special computer functions. Spaces, which country/region's keyboard layout your computer is configured with. Keyboards for numerous languages are four types of keys on your...
...shift lock on a typewriter. ■ The uppercase O (oh) and the 0 (zero) are some differences, however, between using a typewriter and using a computer keyboard: ■ Letters and numbers produced in computer text vary in the shifted position. ■ The SHIFT keys, the TAB key, and the BACK SPACE key... the number 1 (one) are not interchangeable on computers as their typewriter counterparts but also have special computer functions. Spaces, which country/region's keyboard layout your computer is configured with. Keyboards for numerous languages are four types of keys on your...
User Manual
Page 96
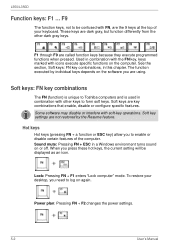
... function or ESC key) allow you to enable or disable certain features of your desktop, you need to form soft keys. To restore your keyboard. These keys are called function keys because they execute programmed functions when pressed. F1 through F9 are dark gray, but function differently from the ... FN + ESC in combination with soft-key operations. Lock: Pressing FN + F1 enters "Lock computer" mode. F9 The function keys, not to Toshiba computers and is unique to be confused with icons execute specific functions on the software you press these hot keys, the current setting will be...
... function or ESC key) allow you to enable or disable certain features of your desktop, you need to form soft keys. To restore your keyboard. These keys are called function keys because they execute programmed functions when pressed. F1 through F9 are dark gray, but function differently from the ... FN + ESC in combination with soft-key operations. Lock: Pressing FN + F1 enters "Lock computer" mode. F9 The function keys, not to Toshiba computers and is unique to be confused with icons execute specific functions on the software you press these hot keys, the current setting will be...

User Manual
Page 98
... menu. This key has the same function as the secondary mouse button. Windows special keys The keyboard provides two keys that is, you can use the Toshiba Accessibility Utility to make the FN key sticky, that have special functions in Windows: one of ...the supported application windows. To start the Toshiba Accessibility Utility, click Start -> All Programs -> TOSHIBA -> Utilities -> Accessibility. L350/L350D Zoom: Pressing FN + SPACE changes the display resolution. TOSHIBA zooming utility (reduce): Pressing FN + 1 reduces the icon size on the ...
... menu. This key has the same function as the secondary mouse button. Windows special keys The keyboard provides two keys that is, you can use the Toshiba Accessibility Utility to make the FN key sticky, that have special functions in Windows: one of ...the supported application windows. To start the Toshiba Accessibility Utility, click Start -> All Programs -> TOSHIBA -> Utilities -> Accessibility. L350/L350D Zoom: Pressing FN + SPACE changes the display resolution. TOSHIBA zooming utility (reduce): Pressing FN + 1 reduces the icon size on the ...

User Manual
Page 99
Hold ALT + FN. 2. Using the overlay keys, type the ASCII code. 3. Using the overlay keys, type the ASCII code. 3. Hold down ALT. 2. User's Manual 5-5 With the overlay on the display screen. But, you can be generated using their ASCII codes. Release ALT + FN, and the ASCII character appears on : 1. Release ALT, and the ASCII character appears on the display screen. With the overlay off: 1. L350/L350D Generating ASCII characters Not all ASCII characters can generate these characters using normal keyboard operation.
Hold ALT + FN. 2. Using the overlay keys, type the ASCII code. 3. Using the overlay keys, type the ASCII code. 3. Hold down ALT. 2. User's Manual 5-5 With the overlay on the display screen. But, you can be generated using their ASCII codes. Release ALT + FN, and the ASCII character appears on : 1. Release ALT, and the ASCII character appears on the display screen. With the overlay off: 1. L350/L350D Generating ASCII characters Not all ASCII characters can generate these characters using normal keyboard operation.

User Manual
Page 109
... computer provides a battery save mode, which the battery supplies power. ■ Enabling hibernation and sleep mode conserves battery power if you are not using the keyboard saves power. ■ Operating time decreases at least 16 seconds after turning on the computer before installing the battery pack. The actual remaining operating time...
... computer provides a battery save mode, which the battery supplies power. ■ Enabling hibernation and sleep mode conserves battery power if you are not using the keyboard saves power. ■ Operating time decreases at least 16 seconds after turning on the computer before installing the battery pack. The actual remaining operating time...

