
User's Guide for Desktop External Hard Drives
Page 2
... 4 Regulatory Statements 5 Introduction 8 Package contents 8 Computer requirements 8 Quick Tour 9 Status indications 10 Setting up the Toshiba drive 10 Connecting the drive via eSATA 13 Drive partitions 14 Saving files to your external hard drive 15 Viewing folders and files on your external hard drive 15...connection 16 If you are using an eSATA connection 17 Checking used/free disk space and drive properties 18 Installing the Drive Monitor 18 Viewing drive information 18 Using the Toshiba Backup software 19 Installing the Toshiba Backup software 19 Using the Backup Software...
... 4 Regulatory Statements 5 Introduction 8 Package contents 8 Computer requirements 8 Quick Tour 9 Status indications 10 Setting up the Toshiba drive 10 Connecting the drive via eSATA 13 Drive partitions 14 Saving files to your external hard drive 15 Viewing folders and files on your external hard drive 15...connection 16 If you are using an eSATA connection 17 Checking used/free disk space and drive properties 18 Installing the Drive Monitor 18 Viewing drive information 18 Using the Toshiba Backup software 19 Installing the Toshiba Backup software 19 Using the Backup Software...
User's Guide for Desktop External Hard Drives
Page 8
...to a USB 1.1 port, the drive will operate at USB 1.1 speeds (up to make sure you have all of the following items: ❖ Toshiba Desktop External Hard Drive ❖ Stand ❖ AC power adaptor ❖ USB cable ❖ Quick Start Guide ❖ Standard limited warranty booklet ...Computer requirements To operate the hard drive, you for drive software installation. The software cannot be installed via an eSATA connection. Your TOSHIBA product is required for choosing a TOSHIBA product. 8 Introduction Introduction Thank you need a computer with a USB 2.0 port.
...to a USB 1.1 port, the drive will operate at USB 1.1 speeds (up to make sure you have all of the following items: ❖ Toshiba Desktop External Hard Drive ❖ Stand ❖ AC power adaptor ❖ USB cable ❖ Quick Start Guide ❖ Standard limited warranty booklet ...Computer requirements To operate the hard drive, you for drive software installation. The software cannot be installed via an eSATA connection. Your TOSHIBA product is required for choosing a TOSHIBA product. 8 Introduction Introduction Thank you need a computer with a USB 2.0 port.
User's Guide for Desktop External Hard Drives
Page 9
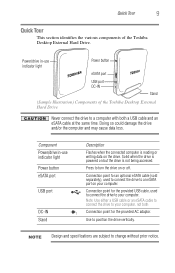
Power/drive in -use indicator light Power button eSATA port USB port DC-IN Stand (Sample Illustration) Components of the Toshiba Desktop External Hard Drive. Component Power/drive in -use indicator light Power button eSATA port USB port DC-IN Stand Description Flashes when the connected computer ...the drive vertically. Connection point for the provided AC adaptor. Quick Tour 9 Quick Tour This section identifies the various components of the Toshiba Desktop External Hard Drive Never connect the drive to a computer with both . Doing so could damage the drive and/or the computer...
Power/drive in -use indicator light Power button eSATA port USB port DC-IN Stand (Sample Illustration) Components of the Toshiba Desktop External Hard Drive. Component Power/drive in -use indicator light Power button eSATA port USB port DC-IN Stand Description Flashes when the connected computer ...the drive vertically. Connection point for the provided AC adaptor. Quick Tour 9 Quick Tour This section identifies the various components of the Toshiba Desktop External Hard Drive Never connect the drive to a computer with both . Doing so could damage the drive and/or the computer...
User's Guide for Desktop External Hard Drives
Page 11
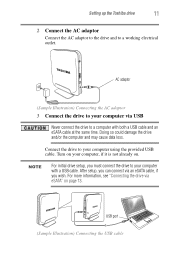
...drive and/or the computer and may cause data loss. After setup, you can connect via an eSATA cable, if you must connect the drive to your computer with both a USB cable and an eSATA cable at the same time. For more information, see "Connecting the drive via USB Never connect...) Connecting the USB cable Connect the drive to your computer using the provided USB cable. NOTE For initial drive setup, you wish. Setting up the Toshiba drive 11 2 Connect the AC adaptor Connect the AC adaptor to the drive and to a computer with a USB cable. AC adaptor (Sample Illustration) ...
...drive and/or the computer and may cause data loss. After setup, you can connect via an eSATA cable, if you must connect the drive to your computer with both a USB cable and an eSATA cable at the same time. For more information, see "Connecting the drive via USB Never connect...) Connecting the USB cable Connect the drive to your computer using the provided USB cable. NOTE For initial drive setup, you wish. Setting up the Toshiba drive 11 2 Connect the AC adaptor Connect the AC adaptor to the drive and to a computer with a USB cable. AC adaptor (Sample Illustration) ...
User's Guide for Desktop External Hard Drives
Page 13
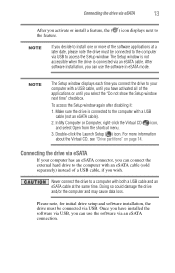
...Never connect the drive to the feature. Please note, for initial drive setup and software installation, the drive must be connected via an eSATA cable. The Setup window is not accessible when the drive is connected to access the Setup window. NOTE If you can use the software...For more of the applications or until you activate or install a feature, the ( ) icon displays next to a computer with a USB cable (not an eSATA cable). 2. Doing so could damage the drive and/or the computer and may cause data loss. Make sure the drive is connected via USB. Connecting...
...Never connect the drive to the feature. Please note, for initial drive setup and software installation, the drive must be connected via an eSATA cable. The Setup window is not accessible when the drive is connected to access the Setup window. NOTE If you can use the software...For more of the applications or until you activate or install a feature, the ( ) icon displays next to a computer with a USB cable (not an eSATA cable). 2. Doing so could damage the drive and/or the computer and may cause data loss. Make sure the drive is connected via USB. Connecting...

User's Guide for Desktop External Hard Drives
Page 14
...CD partition, and the other representing the Toshiba HDD partition. You can drag and drop folders and files to your system. When you install the software, it is visible. 14 Drive partitions eSATA port (Sample Illustration) Connecting an eSATA cable (sold separately) Drive partitions The ...your computer's file management application. To access the Virtual CD for your computer with an eSATA cable, only the Toshiba HDD partition is uncompressed and installed on page 10. The Toshiba HDD partition is the location for installing software, connect the drive to your files and ...
...CD partition, and the other representing the Toshiba HDD partition. You can drag and drop folders and files to your system. When you install the software, it is visible. 14 Drive partitions eSATA port (Sample Illustration) Connecting an eSATA cable (sold separately) Drive partitions The ...your computer's file management application. To access the Virtual CD for your computer with an eSATA cable, only the Toshiba HDD partition is uncompressed and installed on page 10. The Toshiba HDD partition is the location for installing software, connect the drive to your files and ...
User's Guide for Desktop External Hard Drives
Page 16
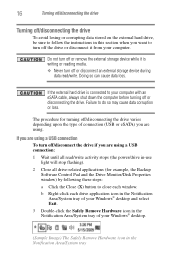
... it is connected to your Windows® desktop. (Sample Image) The Safely Remove Hardware icon in the Notification Area/System tray of connection (USB or eSATA) you are using a USB connection To turn off /disconnecting the drive varies depending upon the type of your computer with an... eSATA cable, always shut down the computer before turning off or disconnecting the drive. The procedure for example, the Backup Software Control Pad and the Drive ...
... it is connected to your Windows® desktop. (Sample Image) The Safely Remove Hardware icon in the Notification Area/System tray of connection (USB or eSATA) you are using a USB connection To turn off /disconnecting the drive varies depending upon the type of your computer with an... eSATA cable, always shut down the computer before turning off or disconnecting the drive. The procedure for example, the Backup Software Control Pad and the Drive ...
User's Guide for Desktop External Hard Drives
Page 17
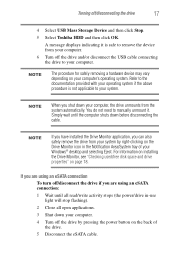
... light will stop flashing). 2 Close all read/write activity stops (the power/drive in the Notification Area/System tray of the drive. 5 Disconnect the eSATA cable. For information on installing the Drive Monitor, see "Checking used/free disk space and drive properties" on the back of your operating system if... your system by pressing the power button on page 18. If you are using an eSATA connection To turn off /disconnecting the drive 17 4 Select USB Mass Storage Device and then click Stop. 5 Select Toshiba HDD and then click OK. You do not need to manually unmount it is not ...
... light will stop flashing). 2 Close all read/write activity stops (the power/drive in the Notification Area/System tray of the drive. 5 Disconnect the eSATA cable. For information on installing the Drive Monitor, see "Checking used/free disk space and drive properties" on the back of your operating system if... your system by pressing the power button on page 18. If you are using an eSATA connection To turn off /disconnecting the drive 17 4 Select USB Mass Storage Device and then click Stop. 5 Select Toshiba HDD and then click OK. You do not need to manually unmount it is not ...
User's Guide for Desktop External Hard Drives
Page 18
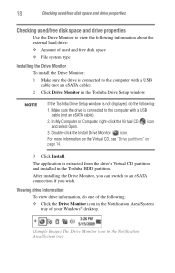
...Drive partitions" on page 14. 3 Click Install. Make sure the drive is connected to the computer with a USB cable (not an eSATA cable). 2 Click Drive Monitor in the Toshiba Drive Setup window. In My Computer or Computer, right-click the Virtual CD ( ) icon and select Open. 3. Viewing drive information...To install the Drive Monitor: 1 Make sure the drive is connected to the computer with a USB cable (not an eSATA cable). 2. The application is extracted from the drive's Virtual CD partition and installed in the Toshiba HDD partition. After installing the Drive Monitor, you can switch to an...
...Drive partitions" on page 14. 3 Click Install. Make sure the drive is connected to the computer with a USB cable (not an eSATA cable). 2 Click Drive Monitor in the Toshiba Drive Setup window. In My Computer or Computer, right-click the Virtual CD ( ) icon and select Open. 3. Viewing drive information...To install the Drive Monitor: 1 Make sure the drive is connected to the computer with a USB cable (not an eSATA cable). 2. The application is extracted from the drive's Virtual CD partition and installed in the Toshiba HDD partition. After installing the Drive Monitor, you can switch to an...
User's Guide for Desktop External Hard Drives
Page 20
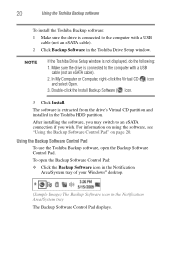
...is connected to the computer with a USB cable (not an eSATA cable). 2. For information on using the software, see "Using the Backup Software Control Pad" on page 20. Using the Backup Software Control Pad To use the Toshiba Backup software, open the Backup Software Control Pad: ❖...desktop. (Sample Image) The Backup Software icon in the Toshiba HDD partition. The software is connected to an eSATA connection if you may switch to the computer with a USB cable (not an eSATA cable). 2 Click Backup Software in the Toshiba Drive Setup window. In My Computer or Computer, right-...
...is connected to the computer with a USB cable (not an eSATA cable). 2. For information on using the software, see "Using the Backup Software Control Pad" on page 20. Using the Backup Software Control Pad To use the Toshiba Backup software, open the Backup Software Control Pad: ❖...desktop. (Sample Image) The Backup Software icon in the Toshiba HDD partition. The software is connected to an eSATA connection if you may switch to the computer with a USB cable (not an eSATA cable). 2 Click Backup Software in the Toshiba Drive Setup window. In My Computer or Computer, right-...
User's Guide for Desktop External Hard Drives
Page 27
... Virtual CD is not accessible when the drive is on. A: By default, the supported file formats for your computer and to the computer with an eSATA cable. Check to make sure the AC adaptor is connected to a working electrical outlet. The computer does not recognize the drive. For more information, see...
... Virtual CD is not accessible when the drive is on. A: By default, the supported file formats for your computer and to the computer with an eSATA cable. Check to make sure the AC adaptor is connected to a working electrical outlet. The computer does not recognize the drive. For more information, see...
User's Guide for Desktop External Hard Drives
Page 28
...on. message displays. Disconnect and re-connect the drive. If the condition does not clear, contact Toshiba support. For faster performance, connect the drive to the computer with a USB cable (not an eSATA cable). 2. What does this This is connected to a computer with a USB cable, until you .... The Setup window displays each time you connect the drive to 12 Mbps). Is this mean? Before you contact Toshiba Since some problems may have followed the recommendations in the Control Panel. 28 If you need further assistance Problem(s) Solution(s) The...
...on. message displays. Disconnect and re-connect the drive. If the condition does not clear, contact Toshiba support. For faster performance, connect the drive to the computer with a USB cable (not an eSATA cable). 2. What does this This is connected to a computer with a USB cable, until you .... The Setup window displays each time you connect the drive to 12 Mbps). Is this mean? Before you contact Toshiba Since some problems may have followed the recommendations in the Control Panel. 28 If you need further assistance Problem(s) Solution(s) The...
User's Guide for Desktop External Hard Drives
Page 30
...18 computer requirements 8 CPU 8 interface port (USB) 8 operating system 8 connect AC adaptor 11 drive to your computer via USB 11 drive via eSATA 13 copy folders/files to external hard drive 15 D DC-IN port 9 difference between Backup and Sync backup 22 sync 23 disk space checking ...12 turning off/disconnecting 16 drive information viewing 18 drive monitor icon 18 installing 18 software 12 drive partitions Virtual CD, Toshiba Drive 14 drive properties checking 18 E erasing data 25 eSATA port 9 external hard drive saving files 15 viewing folders/files 15 F FAQ 26 FCC information 5 H hard drive ...
...18 computer requirements 8 CPU 8 interface port (USB) 8 operating system 8 connect AC adaptor 11 drive to your computer via USB 11 drive via eSATA 13 copy folders/files to external hard drive 15 D DC-IN port 9 difference between Backup and Sync backup 22 sync 23 disk space checking ...12 turning off/disconnecting 16 drive information viewing 18 drive monitor icon 18 installing 18 software 12 drive partitions Virtual CD, Toshiba Drive 14 drive properties checking 18 E erasing data 25 eSATA port 9 external hard drive saving files 15 viewing folders/files 15 F FAQ 26 FCC information 5 H hard drive ...
User's Guide for Desktop External Hard Drives
Page 31
...drive in-use indicator 9 log monitor tools menu 21 P package contents external drive 8 QSG 8 standard limited warranty booklet 8 USB cable 8 port DC-IN 9 eSATA 9 USB 9 power button 9 power/drive in-use indicator light 9 status indications 10 preferences tools menu 22 Q Quick Tour 9 DC-IN port...menu 21 S safely remove hardware icon 16 safety icons 3 instructions 4 saving files external hard drive 15 scheduler tools menu 22 setting up Toshiba drive 10 software backup software 12 drive monitor 12 install 12 specifying source/destination devices backup tasks 24 sync tasks 24 specifying Sync targets ...
...drive in-use indicator 9 log monitor tools menu 21 P package contents external drive 8 QSG 8 standard limited warranty booklet 8 USB cable 8 port DC-IN 9 eSATA 9 USB 9 power button 9 power/drive in-use indicator light 9 status indications 10 preferences tools menu 22 Q Quick Tour 9 DC-IN port...menu 21 S safely remove hardware icon 16 safety icons 3 instructions 4 saving files external hard drive 15 scheduler tools menu 22 setting up Toshiba drive 10 software backup software 12 drive monitor 12 install 12 specifying source/destination devices backup tasks 24 sync tasks 24 specifying Sync targets ...