

User's guide for FlashAir
Page 1
FlashAir™ Configuration Software User's Manual (Windows) Revision 2 For the (MAC) User's Manual click here 1
FlashAir™ Configuration Software User's Manual (Windows) Revision 2 For the (MAC) User's Manual click here 1
User's guide for FlashAir
Page 2
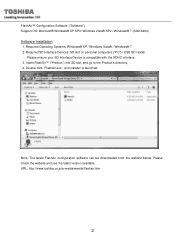
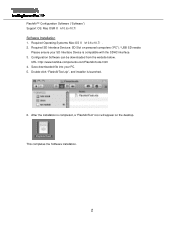
... computers ("PC") / USB SD reader Please ensure your SD Interface Device is launched. Insert FlashAir™ ("Product") into SD slot, and go to the Product's directory. 4. Required Operating Systems: Windows® XP / Windows Vista® / Windows® 7 2. FlashAir™ Configuration Software ("Software") Support OS: Microsoft® Windows® XP SP3/ Windows Vista® SP2 / Windows® 7 (32bit/64bit) Software Installation 1. Note: The latest FlashAir configuration software can be downloaded from the...
... computers ("PC") / USB SD reader Please ensure your SD Interface Device is launched. Insert FlashAir™ ("Product") into SD slot, and go to the Product's directory. 4. Required Operating Systems: Windows® XP / Windows Vista® / Windows® 7 2. FlashAir™ Configuration Software ("Software") Support OS: Microsoft® Windows® XP SP3/ Windows Vista® SP2 / Windows® 7 (32bit/64bit) Software Installation 1. Note: The latest FlashAir configuration software can be downloaded from the...

User's guide for FlashAir
Page 4
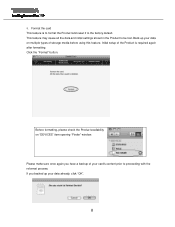
Click "Next >". 7. Choose Destination location for installing Software and click "Next >". 6. After preparation is not changed. 4 In this manual, the destination location is finished, the screen below will be displayed.
Click "Next >". 7. Choose Destination location for installing Software and click "Next >". 6. After preparation is not changed. 4 In this manual, the destination location is finished, the screen below will be displayed.
User's guide for FlashAir
Page 7
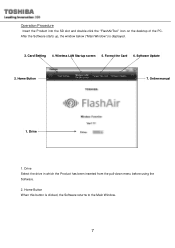
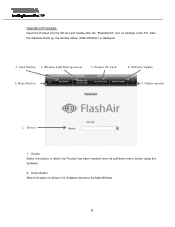
Card Setting 4. Wireless LAN Startup screen 5. Home Button When this button is displayed. 3. Operation Procedure Insert the Product into the SD slot and double-click the "FlashAirTool" icon on the desktop of the PC. Software Update 2. Home Button 7. Drive 1. Drive Select the drive in which the Product has been inserted from the pull-down menu before using the Software. 2. After the Software starts up, the window below ("Main Window") is clicked, the Software returns to the Main Window. 7 Format the Card 6. Online manual 1.
Card Setting 4. Wireless LAN Startup screen 5. Home Button When this button is displayed. 3. Operation Procedure Insert the Product into the SD slot and double-click the "FlashAirTool" icon on the desktop of the PC. Software Update 2. Home Button 7. Drive 1. Drive Select the drive in which the Product has been inserted from the pull-down menu before using the Software. 2. After the Software starts up, the window below ("Main Window") is clicked, the Software returns to the Main Window. 7 Format the Card 6. Online manual 1.
User's guide for FlashAir
Page 8
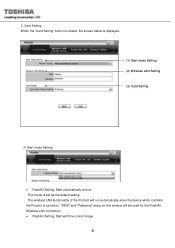
Card Setting When the "Card Setting" button is clicked, the screen below is displayed. (1) Start mode Setting (2) Wireless LAN Setting (3) Card Setting (1) Start mode Setting FlashAir Setting: Start automatically at boot This mode is turned on this window will run automatically when the device which contains the Product is set as the default setting. 3. The wireless LAN functionality of the Product will be used for the FlashAir Wireless LAN connection. FlashAir Setting: Start with the control image 8 "SSID" and "Password" setup on .
Card Setting When the "Card Setting" button is clicked, the screen below is displayed. (1) Start mode Setting (2) Wireless LAN Setting (3) Card Setting (1) Start mode Setting FlashAir Setting: Start automatically at boot This mode is turned on this window will run automatically when the device which contains the Product is set as the default setting. 3. The wireless LAN functionality of the Product will be used for the FlashAir Wireless LAN connection. FlashAir Setting: Start with the control image 8 "SSID" and "Password" setup on .
User's guide for FlashAir
Page 9
... wireless LAN functionality can be controlled by changing the status of time (which is no connection from hacking or stealing data transmitted wirelessly by device. If the field is blank, the Product is the input field for wireless LAN communications. Do not use easy-to control the on security. Encryption mode is turned on automatically when the digital still camera is WPA2...
... wireless LAN functionality can be controlled by changing the status of time (which is no connection from hacking or stealing data transmitted wirelessly by device. If the field is blank, the Product is the input field for wireless LAN communications. Do not use easy-to control the on security. Encryption mode is turned on automatically when the digital still camera is WPA2...
User's guide for FlashAir
Page 11
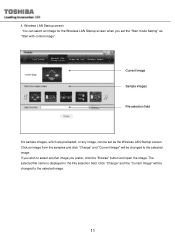
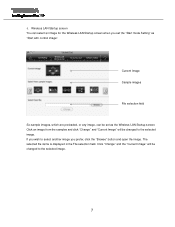
... Image" will be set the "Start mode Setting" as the Wireless LAN Startup screen. Click "Change" and the "Current Image" will be changed to the selected image. If you wish to select another image you set as "Start with control image". Wireless LAN Startup screen You can be changed to the selected image. 11 Current Image Sample images File selection field Six sample...
... Image" will be set the "Start mode Setting" as the Wireless LAN Startup screen. Click "Change" and the "Current Image" will be changed to the selected image. If you wish to select another image you set as "Start with control image". Wireless LAN Startup screen You can be changed to the selected image. 11 Current Image Sample images File selection field Six sample...
User's guide for FlashAir
Page 12
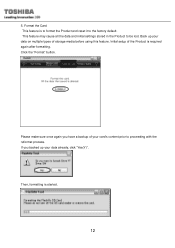
Initial setup of your data already, click "Yes(Y)". Then, formatting is to format the Product and reset it to be lost. This feature may cause all the data and initial settings stored in the Product to the factory default. Please make sure once again you backed up your data on multiple types of storage media before using this feature. If you have a backup of the Product is required again after formatting. Back up your card's content prior to proceeding with the reformat process. 5. Click the "Format" button. Format the Card This feature is started. 12
Initial setup of your data already, click "Yes(Y)". Then, formatting is to format the Product and reset it to be lost. This feature may cause all the data and initial settings stored in the Product to the factory default. Please make sure once again you backed up your data on multiple types of storage media before using this feature. If you have a backup of the Product is required again after formatting. Back up your card's content prior to proceeding with the reformat process. 5. Click the "Format" button. Format the Card This feature is started. 12

User's guide for FlashAir
Page 14
After selecting the stored file, click the "Update" button. Download the latest version of the Product. When the below window is to update the software of the software from the website (http://www.toshiba.co.jp/p-media/wwsite/flashair.htm) and store it to your PC. Click "Browse" and select the stored file. 6. Software Update This feature is displayed, click "Yes(Y)". 14
After selecting the stored file, click the "Update" button. Download the latest version of the Product. When the below window is to update the software of the software from the website (http://www.toshiba.co.jp/p-media/wwsite/flashair.htm) and store it to your PC. Click "Browse" and select the stored file. 6. Software Update This feature is displayed, click "Yes(Y)". 14

User's guide for FlashAir
Page 16
FlashAir™ Configuration Software User's Manual (Mac) Revision 2 For the (Windows) User's manual Click Here 1
FlashAir™ Configuration Software User's Manual (Mac) Revision 2 For the (Windows) User's manual Click Here 1
User's guide for FlashAir
Page 17
FlashAir™ Configuratio n Software ("Software") Support OS: Mac OS® X(v10.6,v10.7) Software Installation 1. Configuration Software can be downloaded from the website below. Save downloaded file into your SD Interface Device is compatible with the SDHC interface. 3. After the installation is launched. 6. This completes the Software installation. 2 Required SD Interface Devices: SD Slot on the desktop. URL: http://www.toshiba-components.com/FlashAir/tools.html 4. Please ensure your PC. 5. Double...
FlashAir™ Configuratio n Software ("Software") Support OS: Mac OS® X(v10.6,v10.7) Software Installation 1. Configuration Software can be downloaded from the website below. Save downloaded file into your SD Interface Device is compatible with the SDHC interface. 3. After the installation is launched. 6. This completes the Software installation. 2 Required SD Interface Devices: SD Slot on the desktop. URL: http://www.toshiba-components.com/FlashAir/tools.html 4. Please ensure your PC. 5. Double...
User's guide for FlashAir
Page 18
Home Button When this button is displayed. 3. Wireless LAN Startup screen 5. Format the Card 6. Software Update 2. Card Setting 4. Online manual 1. Operation Procedure: Insert the Product into the SD slot and double-click the "FlashAirTool" icon on desktop of the PC. Device 1. After the Software starts up, the window below ("Main Window") is clicked, the Software returns to the Main Window. 3 Device Select the device in which the Product has been inserted from the pull-down menu before using the Software. 2. Home Button 7.
Home Button When this button is displayed. 3. Wireless LAN Startup screen 5. Format the Card 6. Software Update 2. Card Setting 4. Online manual 1. Operation Procedure: Insert the Product into the SD slot and double-click the "FlashAirTool" icon on desktop of the PC. Device 1. After the Software starts up, the window below ("Main Window") is clicked, the Software returns to the Main Window. 3 Device Select the device in which the Product has been inserted from the pull-down menu before using the Software. 2. Home Button 7.

User's guide for FlashAir
Page 19
Card Setting When the "Card Setting" button is clicked, the screen below is displayed. (1) Start mode Setting (2) Wireless LAN Setting (3) Card Setting 4 3.
Card Setting When the "Card Setting" button is clicked, the screen below is displayed. (1) Start mode Setting (2) Wireless LAN Setting (3) Card Setting 4 3.

User's guide for FlashAir
Page 20
... review your device manual. Push the "Menu" button and select "Protect". How to control the on . Push "Play" button on . When the image above is unprotected, the wireless LAN functio nality is turned on the digital still camera and display the image below (FA000001.JPG). To turn off operation with the digital still camera as the default setting. "SSID" and "Password" setup...
... review your device manual. Push the "Menu" button and select "Protect". How to control the on . Push "Play" button on . When the image above is unprotected, the wireless LAN functio nality is turned on the digital still camera and display the image below (FA000001.JPG). To turn off operation with the digital still camera as the default setting. "SSID" and "Password" setup...
User's guide for FlashAir
Page 21
... image above again, select "Protect" from a device (e.g. Toshiba recommends you to make a note of time (which is set with this , the wireless LAN functionality will be turned on automatically when the digital still camera is lax on security. Smartphone) within a predetermined amount of your SSID and security key. (3) Card Setting If there is WPA2. This results in the Product working as a normal...
... image above again, select "Protect" from a device (e.g. Toshiba recommends you to make a note of time (which is set with this , the wireless LAN functionality will be turned on automatically when the digital still camera is lax on security. Smartphone) within a predetermined amount of your SSID and security key. (3) Card Setting If there is WPA2. This results in the Product working as a normal...
User's guide for FlashAir
Page 22
... can be changed to select another image you set as "Start with control image". Click an image from the samples and click "Change" and "Curre nt Image" will be changed to the selected image. The selected file name is displayed in the File selection field. 4. If you wish to the selected image. 7 Click "Change" and the "Current Image" will be set the "Start mode Setting" as...
... can be changed to select another image you set as "Start with control image". Click an image from the samples and click "Change" and "Curre nt Image" will be changed to the selected image. The selected file name is displayed in the File selection field. 4. If you wish to the selected image. 7 Click "Change" and the "Current Image" will be set the "Start mode Setting" as...
User's guide for FlashAir
Page 23
... a backup of the Product is to format the Product and reset it to be lost. Please make sure once again you backed up your data on "DEVICES" item opening "Finder" window. Back up your card's content prior to proceeding with the reformat process. This feature may cause all the data and initial settings stored in the Product to the factory default. Click the "Format" button. Format the...
... a backup of the Product is to format the Product and reset it to be lost. Please make sure once again you backed up your data on "DEVICES" item opening "Finder" window. Back up your card's content prior to proceeding with the reformat process. This feature may cause all the data and initial settings stored in the Product to the factory default. Click the "Format" button. Format the...

User's guide for FlashAir
Page 25
... [ ] on the Product on the "DEVICE" item list in this window, take out the Product from SD slot and insert it out. Because, it is completed, the window below will be displayed. Then click "OK". [How to the Product. After formatting is impossible to take the Product out during access to remove the Product] Before you are able to the factory default. 10
... [ ] on the Product on the "DEVICE" item list in this window, take out the Product from SD slot and insert it out. Because, it is completed, the window below will be displayed. Then click "OK". [How to the Product. After formatting is impossible to take the Product out during access to remove the Product] Before you are able to the factory default. 10

User's guide for FlashAir
Page 26
After selecting the stored file, click the "Update" button. 11 Click "Browse" and select the stored file. 6. Software Update This feature is to update the Software of the software from the website (http://www.toshiba-components.com/FlashAir/tools.html) and store it to your PC. Download the latest version of the Product.
After selecting the stored file, click the "Update" button. 11 Click "Browse" and select the stored file. 6. Software Update This feature is to update the Software of the software from the website (http://www.toshiba-components.com/FlashAir/tools.html) and store it to your PC. Download the latest version of the Product.

User's guide for FlashAir
Page 27
... out. When there is accessing to remove the Product] Before you are able to the Product. 12 The Progress window will be displayed when the software updating has started. [How to the Product before take it is impossible to take the Product out during access to take the product out, click the "Eject" button [ ] on the Product on the "DEVICE" item list, then...
... out. When there is accessing to remove the Product] Before you are able to the Product. 12 The Progress window will be displayed when the software updating has started. [How to the Product before take it is impossible to take the Product out during access to take the product out, click the "Eject" button [ ] on the Product on the "DEVICE" item list, then...


