
User Guide
Page 3
...TOSHIBA America Information Systems, Inc. 9740 Irvine Boulevard Irvine, California 92618-1697 Telephone: (949) 583-3000 Safety Instructions 1 Do not drop, puncture or disassemble the camcorder; Following information is only valid for serious damage. 7 Remove the battery during long periods between usage, as a deteriorated battery...EU-member States: Disposal of products This symbol indicates that may affect the functionality of the camcorder. 8 Remove the battery if it in direct sunlight. otherwise the warranty will be voided. 2 Avoid all contact with normal household waste. Avoid...
...TOSHIBA America Information Systems, Inc. 9740 Irvine Boulevard Irvine, California 92618-1697 Telephone: (949) 583-3000 Safety Instructions 1 Do not drop, puncture or disassemble the camcorder; Following information is only valid for serious damage. 7 Remove the battery during long periods between usage, as a deteriorated battery...EU-member States: Disposal of products This symbol indicates that may affect the functionality of the camcorder. 8 Remove the battery if it in direct sunlight. otherwise the warranty will be voided. 2 Avoid all contact with normal household waste. Avoid...
User Guide
Page 4
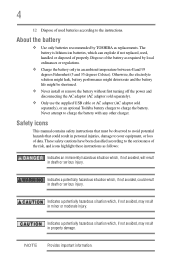
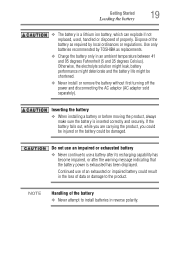
Indicates a potentially hazardous situation which , if not avoided, will result in property damage. Dispose of the battery as required by TOSHIBA as follows: Indicates an imminently hazardous situation which , if not avoided, could result in an ambient temperature ... install or remove the battery without first turning off the power and disconnecting the AC adaptor (AC adaptor sold separately). ❖ Only use the supplied USB cable or AC adaptor (AC adaptor sold separately), or an optional Toshiba battery charger to charge the battery. NOTE Provides important information...
Indicates a potentially hazardous situation which , if not avoided, will result in property damage. Dispose of the battery as required by TOSHIBA as follows: Indicates an imminently hazardous situation which , if not avoided, could result in an ambient temperature ... install or remove the battery without first turning off the power and disconnecting the AC adaptor (AC adaptor sold separately). ❖ Only use the supplied USB cable or AC adaptor (AC adaptor sold separately), or an optional Toshiba battery charger to charge the battery. NOTE Provides important information...
User Guide
Page 6
Contents Chapter 1: Getting to Know Your Camcorder 9 Overview 9 Check the Components 10 System Requirements 11 Front view 12 Rear view 13 Underside view 13 Chapter 2: Getting Started 14 Loading the battery 14 Charging the battery 15 Inserting and removing an SD™ Card (optional 20 Protecting data on an SD™ Card 20 Turning the camcorder on and getting started ........21 Turning off the camcorder 21 Chapter 3: Record Mode 22 Button functions 22 LCD screen information 23 Notification icons 24 6
Contents Chapter 1: Getting to Know Your Camcorder 9 Overview 9 Check the Components 10 System Requirements 11 Front view 12 Rear view 13 Underside view 13 Chapter 2: Getting Started 14 Loading the battery 14 Charging the battery 15 Inserting and removing an SD™ Card (optional 20 Protecting data on an SD™ Card 20 Turning the camcorder on and getting started ........21 Turning off the camcorder 21 Chapter 3: Record Mode 22 Button functions 22 LCD screen information 23 Notification icons 24 6
User Guide
Page 10
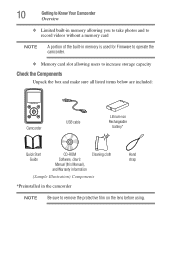
... allowing users to increase storage capacity Check the Components Unpack the box and make sure all listed items below are included: CAMILEO B10 MENU OK Camcorder USB cable Lithium-ion Rechargeable battery* Quick Start CD-ROM Cleaning cloth Hand Guide Software, User's strap Manual (this Manual), and Warranty information (Sample Illustration) Components *Preinstalled...
... allowing users to increase storage capacity Check the Components Unpack the box and make sure all listed items below are included: CAMILEO B10 MENU OK Camcorder USB cable Lithium-ion Rechargeable battery* Quick Start CD-ROM Cleaning cloth Hand Guide Software, User's strap Manual (this Manual), and Warranty information (Sample Illustration) Components *Preinstalled...
User Guide
Page 13
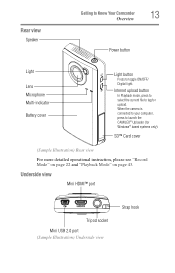
When the camera is connected to your computer, press to launch the CAMILEO® Uploader (for upload. SD™ Card cover (Sample Illustration) Rear view For more detailed operational instruction, please see "Record Mode" on page 22 and "... USB 2.0 port (Sample Illustration) Underside view Strap hook Rear view Speaker Getting to Know Your Camcorder 13 Overview Power button Light Lens Microphone Multi-indicator Battery cover Light button Press to tag for Windows® based systems only).
When the camera is connected to your computer, press to launch the CAMILEO® Uploader (for upload. SD™ Card cover (Sample Illustration) Rear view For more detailed operational instruction, please see "Record Mode" on page 22 and "... USB 2.0 port (Sample Illustration) Underside view Strap hook Rear view Speaker Getting to Know Your Camcorder 13 Overview Power button Light Lens Microphone Multi-indicator Battery cover Light button Press to tag for Windows® based systems only).
User Guide
Page 14
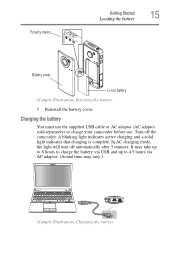
Protective film Li-ion battery (Sample Illustration) Removing the protective film 4 Reinsert the battery, making sure it is lined-up and remove. 2 Remove the battery. 3 Pull the protective film off. To properly connect the battery: 1 Slide the battery cover up with the correct polarity marks. 14 Chapter 2 Getting Started Loading the battery The battery comes pre-installed in the camcorder, however you must remove the protective film on the battery before use.
Protective film Li-ion battery (Sample Illustration) Removing the protective film 4 Reinsert the battery, making sure it is lined-up and remove. 2 Remove the battery. 3 Pull the protective film off. To properly connect the battery: 1 Slide the battery cover up with the correct polarity marks. 14 Chapter 2 Getting Started Loading the battery The battery comes pre-installed in the camcorder, however you must remove the protective film on the battery before use.
User Guide
Page 15
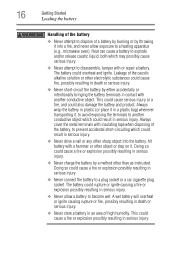
... charging is complete. Polarity marks Getting Started 15 Loading the battery Battery cover Li-ion battery (Sample Illustration) Inserting the battery 5 Reinstall the battery cover. In AC charging mode, the light will turn off the camcorder. Charging the battery You must use the supplied USB cable or AC adaptor (...AC adaptor sold separately) to 4.5 hours via USB and up to 8 hours to charge the battery via AC adaptor. (Actual time may take up to charge your camcorder before use. Turn off automatically after 5 minutes. It may vary.)...
... charging is complete. Polarity marks Getting Started 15 Loading the battery Battery cover Li-ion battery (Sample Illustration) Inserting the battery 5 Reinstall the battery cover. In AC charging mode, the light will turn off the camcorder. Charging the battery You must use the supplied USB cable or AC adaptor (...AC adaptor sold separately) to 4.5 hours via USB and up to 8 hours to charge the battery via AC adaptor. (Actual time may take up to charge your camcorder before use. Turn off automatically after 5 minutes. It may vary.)...
User Guide
Page 16
... or explosion possibly resulting in an area of high humidity. Always cover the metal terminals with insulating tape when disposing of the battery, to prevent accidental short-circuiting which may possibly cause serious injury. ❖ Never attempt to disassemble, tamper with another conductive ... fire or explosion possibly resulting in serious injury. This could cause serious injury or a fire, and could overheat and ignite. The battery could cause a fire or explosion possibly resulting in serious injury. ❖ Never allow exposure to a heating apparatus (e.g., microwave oven). 16...
... or explosion possibly resulting in an area of high humidity. Always cover the metal terminals with insulating tape when disposing of the battery, to prevent accidental short-circuiting which may possibly cause serious injury. ❖ Never attempt to disassemble, tamper with another conductive ... fire or explosion possibly resulting in serious injury. This could cause serious injury or a fire, and could overheat and ignite. The battery could cause a fire or explosion possibly resulting in serious injury. ❖ Never allow exposure to a heating apparatus (e.g., microwave oven). 16...
User Guide
Page 17
... help prevent skin rashes. It can also cause failure, malfunction, or loss of correct battery ❖ Always use a battery which has been exposed to abnormal shock, vibration or pressure. Battery safety ❖ Never allow caustic electrolyte fluid leaked from contacting your eyes, body or ...in caustic liquid leakage, or explosion or fire, possibly resulting in serious injury. The battery could also cause caustic liquid to help prevent the electrolyte fluid from the battery to heat could ignite or explode when heated or burned, possibly resulting in serious injury....
... help prevent skin rashes. It can also cause failure, malfunction, or loss of correct battery ❖ Always use a battery which has been exposed to abnormal shock, vibration or pressure. Battery safety ❖ Never allow caustic electrolyte fluid leaked from contacting your eyes, body or ...in caustic liquid leakage, or explosion or fire, possibly resulting in serious injury. The battery could also cause caustic liquid to help prevent the electrolyte fluid from the battery to heat could ignite or explode when heated or burned, possibly resulting in serious injury....
User Guide
Page 18
...such as abnormal sound In such an event, carefully and immediately remove the battery from the product. Continued use , such as cellophane tape, on the product's power again until an authorized Toshiba service provider has checked it for the product to cool down before attempting to... charge the battery. ❖ Improper installation could cause a fire or rupture possibly resulting in compliance with all...
...such as abnormal sound In such an event, carefully and immediately remove the battery from the product. Continued use , such as cellophane tape, on the product's power again until an authorized Toshiba service provider has checked it for the product to cool down before attempting to... charge the battery. ❖ Improper installation could cause a fire or rupture possibly resulting in compliance with all...
User Guide
Page 19
... in the loss of an exhausted or impaired battery could be damaged. Use only batteries recommended by TOSHIBA as required by local ordinances or regulations. Otherwise, the electrolyte solution might leak, battery performance might deteriorate and the battery life might be injured or the battery could result in an ambient temperature between 41 and 95 degrees...
... in the loss of an exhausted or impaired battery could be damaged. Use only batteries recommended by TOSHIBA as required by local ordinances or regulations. Otherwise, the electrolyte solution might leak, battery performance might deteriorate and the battery life might be injured or the battery could result in an ambient temperature between 41 and 95 degrees...

User Guide
Page 24
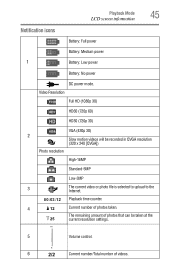
24 Record Mode LCD screen information Notification icons Battery: Full power Battery: Medium power 1 Battery: Low power Battery: No power DC power mode Video Resolution Full HD (1080p 30) HD60 (720p 60) HD30 (720p 30) VGA (430p 30) 2 Slow motion videos will be recorded in QVGA resolution (320 x 240 [QVGA]) Photo resolution High-16MP Standard-5MP Low-3MP Digital light ON 3 Light ON Video Record mode Stabilization ON 4 Photo Record mode Self-timer ON
24 Record Mode LCD screen information Notification icons Battery: Full power Battery: Medium power 1 Battery: Low power Battery: No power DC power mode Video Resolution Full HD (1080p 30) HD60 (720p 60) HD30 (720p 30) VGA (430p 30) 2 Slow motion videos will be recorded in QVGA resolution (320 x 240 [QVGA]) Photo resolution High-16MP Standard-5MP Low-3MP Digital light ON 3 Light ON Video Record mode Stabilization ON 4 Photo Record mode Self-timer ON
User Guide
Page 26
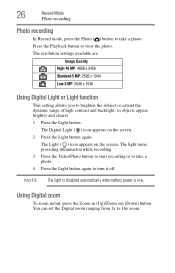
.... 26 Record Mode Photo recording Photo recording In Record mode, press the Photo ( ) button to view the photo. NOTE The light is disabled automatically when battery power is low. The resolution settings available are: Image Quality High-16 MP: 4608 x 3456 Standard-5 MP: 2592 x 1944 Low-3 MP: 2048 x 1536 Using Digital...
.... 26 Record Mode Photo recording Photo recording In Record mode, press the Photo ( ) button to view the photo. NOTE The light is disabled automatically when battery power is low. The resolution settings available are: Image Quality High-16 MP: 4608 x 3456 Standard-5 MP: 2592 x 1944 Low-3 MP: 2048 x 1536 Using Digital...
User Guide
Page 45
Playback Mode 45 LCD screen information Notification icons Battery: Full power Battery: Medium power 1 Battery: Low power Battery: No power DC power mode. Video Resolution Full HD (1080p 30) HD60 (720p 60) HD30 (720p 30) VGA (430p 30) 2 Slow motion videos will be ...
Playback Mode 45 LCD screen information Notification icons Battery: Full power Battery: Medium power 1 Battery: Low power Battery: No power DC power mode. Video Resolution Full HD (1080p 30) HD60 (720p 60) HD30 (720p 30) VGA (430p 30) 2 Slow motion videos will be ...
User Guide
Page 66
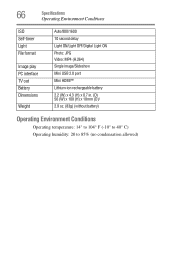
66 Specifications Operating Environment Conditions ISO Self-timer Light File format Image play PC interface TV out Battery Dimensions Weight Auto/800/1600 10 second delay Light ON/Light OFF/Digital Light ON Photo: JPG Video: MP4 (H.264) Single image/Slideshow Mini USB 2.0 port Mini HDMI™ Lithium-ion rechargeable battery 2.2 (W) x 4.3 (H) x 0.7 in. (D) 56 (W) x 108 (H) x 18mm (D)/ 2.9 oz. (83g) (without battery) Operating Environment Conditions Operating temperature: 14° to 104° F (-10° to 40° C) Operating humidity: 20 to 85% (no condensation allowed)
66 Specifications Operating Environment Conditions ISO Self-timer Light File format Image play PC interface TV out Battery Dimensions Weight Auto/800/1600 10 second delay Light ON/Light OFF/Digital Light ON Photo: JPG Video: MP4 (H.264) Single image/Slideshow Mini USB 2.0 port Mini HDMI™ Lithium-ion rechargeable battery 2.2 (W) x 4.3 (H) x 0.7 in. (D) 56 (W) x 108 (H) x 18mm (D)/ 2.9 oz. (83g) (without battery) Operating Environment Conditions Operating temperature: 14° to 104° F (-10° to 40° C) Operating humidity: 20 to 85% (no condensation allowed)
User Guide
Page 67
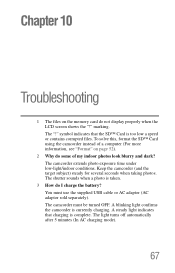
... indoor photos look blurry and dark? The shutter sounds when a photo is currently charging. A blinking light confirms the camcorder is taken. 3 How do I charge the battery? Chapter 10 Troubleshooting 1 The files on page 52). 2 Why do some of a computer (For more information, see "Format" on the memory card do not display...
... indoor photos look blurry and dark? The shutter sounds when a photo is currently charging. A blinking light confirms the camcorder is taken. 3 How do I charge the battery? Chapter 10 Troubleshooting 1 The files on page 52). 2 Why do some of a computer (For more information, see "Format" on the memory card do not display...

B10.pdf
Page 1
..., Tungsten Exposure: Auto Scene mode: Filter mode: Self-timer: Light: Video stabilization: File format: Interface: TV output Power saving mode: Battery information: Approximate photo capacity (1GB SD): Approximate video recording capacity - On, Off, Digital Light Digital image stabilization MP4/H.264 (video), JPG..., Intel® Core™ 2 or above, 1GB RAM, 1GB free hard disk space, DVD-ROM, USB 2.0 port CAMILEO® B10 with Li-Ion rechargeable battery, hand strap, USB cable, cleaning cloth, Quick Start Guide, Software CD (User's Manual, warranty information, ArcSoft® video...
..., Tungsten Exposure: Auto Scene mode: Filter mode: Self-timer: Light: Video stabilization: File format: Interface: TV output Power saving mode: Battery information: Approximate photo capacity (1GB SD): Approximate video recording capacity - On, Off, Digital Light Digital image stabilization MP4/H.264 (video), JPG..., Intel® Core™ 2 or above, 1GB RAM, 1GB free hard disk space, DVD-ROM, USB 2.0 port CAMILEO® B10 with Li-Ion rechargeable battery, hand strap, USB cable, cleaning cloth, Quick Start Guide, Software CD (User's Manual, warranty information, ArcSoft® video...
