
User Guide 1
Page 19
Contents 19 Setting up your software 38 Registering your computer with Toshiba 39 Adding optional external devices 39 Adding memory (optional 40 Installing a memory module 40 Removing a memory module 45 Checking total memory 46 Hard Drive Recovery ... display devices 58 Directing the display output when you turn on the computer 59 Adjusting the quality of the external display......60 Using an external keyboard 60 Using a mouse 60 Connecting a printer 60 Setting up a printer 61 Turning off the computer 62 Options for turning off the computer 62 Using the...
Contents 19 Setting up your software 38 Registering your computer with Toshiba 39 Adding optional external devices 39 Adding memory (optional 40 Installing a memory module 40 Removing a memory module 45 Checking total memory 46 Hard Drive Recovery ... display devices 58 Directing the display output when you turn on the computer 59 Adjusting the quality of the external display......60 Using an external keyboard 60 Using a mouse 60 Connecting a printer 60 Setting up a printer 61 Turning off the computer 62 Options for turning off the computer 62 Using the...
User Guide 1
Page 20
20 Contents Chapter 2: Learning the Basics 72 Computing tips 72 Using the keyboard 74 Character keys 74 Making your keyboard emulate a full-size keyboard 74 Ctrl, Fn, and Alt keys 75 Function keys 75 Special Windows® keys 75 Overlay keys 76 Starting a program 77 Starting ...dialog box ....78 Saving your work 79 Printing your work 81 Backing up your work 82 Restoring your work 83 Toshiba's online resources 83 Chapter 3: Mobile Computing 84 Toshiba's energy-saver design 84 Running the computer on battery power 84 Battery Notice 85 Power management 86 Using additional ...
20 Contents Chapter 2: Learning the Basics 72 Computing tips 72 Using the keyboard 74 Character keys 74 Making your keyboard emulate a full-size keyboard 74 Ctrl, Fn, and Alt keys 75 Function keys 75 Special Windows® keys 75 Overlay keys 76 Starting a program 77 Starting ...dialog box ....78 Saving your work 79 Printing your work 81 Backing up your work 82 Restoring your work 83 Toshiba's online resources 83 Chapter 3: Mobile Computing 84 Toshiba's energy-saver design 84 Running the computer on battery power 84 Battery Notice 85 Power management 86 Using additional ...
User Guide 1
Page 22
... Preset Power Profiles 121 Quickly creating a new power profile 121 Customizing a power profile 121 Mouse Utility 122 TOSHIBA Hardware Setup 123 TOSHIBA Zooming Utility 127 TOSHIBA Accessibility 128 Chapter 6: If Something Goes Wrong 129 Problems that are easy to fix 129 Problems when you...conflicts on your own .....136 Fixing a problem with Device Manager ...........137 Memory problems 139 Power and the batteries 139 Keyboard problems 141 Display problems 141 Disk, diskette, or storage drive problems........143 Sound system problems 145 Printer problems 146 Wireless networking problems...
... Preset Power Profiles 121 Quickly creating a new power profile 121 Customizing a power profile 121 Mouse Utility 122 TOSHIBA Hardware Setup 123 TOSHIBA Zooming Utility 127 TOSHIBA Accessibility 128 Chapter 6: If Something Goes Wrong 129 Problems that are easy to fix 129 Problems when you...conflicts on your own .....136 Fixing a problem with Device Manager ...........137 Memory problems 139 Power and the batteries 139 Keyboard problems 141 Display problems 141 Disk, diskette, or storage drive problems........143 Sound system problems 145 Printer problems 146 Wireless networking problems...
User Guide 1
Page 32
... and including "Setting up your computer Important information on your computer's cooling fan Your computer may have adequate ventilation and are not limited to, a mouse, keyboard, printer and memory. NOTE The cooling fan location will vary depending on page 33. See "Connecting to your computer and AC adaptor have a CPU cooling...
... and including "Setting up your computer Important information on your computer's cooling fan Your computer may have adequate ventilation and are not limited to, a mouse, keyboard, printer and memory. NOTE The cooling fan location will vary depending on page 33. See "Connecting to your computer and AC adaptor have a CPU cooling...
User Guide 1
Page 36
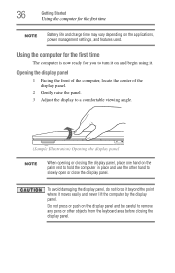
Do not press or push on the display panel and be careful to remove any pens or other objects from the keyboard area before closing the display panel, place one hand on the palm rest to hold the computer in place and use the other hand to ...
Do not press or push on the display panel and be careful to remove any pens or other objects from the keyboard area before closing the display panel, place one hand on the palm rest to hold the computer in place and use the other hand to ...

User Guide 1
Page 39
...-size keyboard (see "Using an external keyboard" on page 60) ❖ Connect an external monitor (see "Using external display devices" on page 58) ❖ Connect a local printer (see "Connecting a printer" on page 60) ❖ Connect an optional external optical drive Getting Started Registering your computer with Toshiba 39 Registering your computer with Toshiba Product...
...-size keyboard (see "Using an external keyboard" on page 60) ❖ Connect an external monitor (see "Using external display devices" on page 58) ❖ Connect a local printer (see "Connecting a printer" on page 60) ❖ Connect an optional external optical drive Getting Started Registering your computer with Toshiba 39 Registering your computer with Toshiba Product...
User Guide 1
Page 48
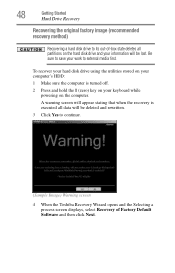
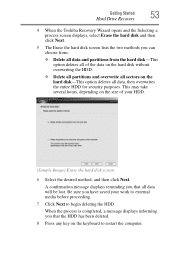
... stating that when the recovery is turned off. 2 Press and hold the 0 (zero) key on your keyboard while powering on the hard disk drive and your work to continue. (Sample Image) Warning screen 4 When the Toshiba Recovery Wizard opens and the Selecting a process screen displays, select Recovery of -box state deletes all...
... stating that when the recovery is turned off. 2 Press and hold the 0 (zero) key on your keyboard while powering on the hard disk drive and your work to continue. (Sample Image) Warning screen 4 When the Toshiba Recovery Wizard opens and the Selecting a process screen displays, select Recovery of -box state deletes all...

User Guide 1
Page 49
Be sure to save your work to external media before proceeding. (Sample Image) Recovery of Factory Default Software screen appears. Getting Started Hard Drive Recovery 49 (Sample Image) Selecting a process screen 5 The Recovery of Factory Default Software screen 6 Click Next to begin the recovery. Once complete, a message displays that all data will be lost during the recovery process. A confirmation message displays reminding you that the HDD has been recovered. 7 Press any key on the keyboard to out-of-box state, and then click Next. Select Recover to restart the computer.
Be sure to save your work to external media before proceeding. (Sample Image) Recovery of Factory Default Software screen appears. Getting Started Hard Drive Recovery 49 (Sample Image) Selecting a process screen 5 The Recovery of Factory Default Software screen 6 Click Next to begin the recovery. Once complete, a message displays that all data will be lost during the recovery process. A confirmation message displays reminding you that the HDD has been recovered. 7 Press any key on the keyboard to out-of-box state, and then click Next. Select Recover to restart the computer.
User Guide 1
Page 50
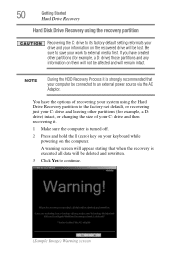
... remain intact. If you have the options of your C: drive and then recovering it is turned off. 2 Press and hold the 0 (zero) key on your keyboard while powering on the computer. NOTE During the HDD Recovery Process it . 1 Make sure the computer is strongly recommended that when the recovery is executed...
... remain intact. If you have the options of your C: drive and then recovering it is turned off. 2 Press and hold the 0 (zero) key on your keyboard while powering on the computer. NOTE During the HDD Recovery Process it . 1 Make sure the computer is strongly recommended that when the recovery is executed...
User Guide 1
Page 52
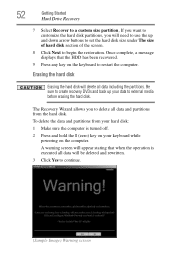
Erasing the hard disk Erasing the hard disk will need to use the up your keyboard while powering on the keyboard to continue. (Sample Image) Warning screen The Recovery Wizard allows you will delete all data including the partitions. 52 Getting Started Hard Drive Recovery 7 Select ...
Erasing the hard disk Erasing the hard disk will need to use the up your keyboard while powering on the keyboard to continue. (Sample Image) Warning screen The Recovery Wizard allows you will delete all data including the partitions. 52 Getting Started Hard Drive Recovery 7 Select ...
User Guide 1
Page 53
... your HDD. (Sample Image) Erase the hard disk screen 6 Select the desired method, and then click Next. Getting Started Hard Drive Recovery 53 4 When the Toshiba Recovery Wizard opens and the Selecting a process screen displays, select Erase the hard disk and then click Next. 5 The Erase the hard disk screen lists..., depending on the size of the data on the hard disk without overwriting the HDD. ❖ Delete all partitions and overwrite all sectors on the keyboard to begin deleting the HDD.
... your HDD. (Sample Image) Erase the hard disk screen 6 Select the desired method, and then click Next. Getting Started Hard Drive Recovery 53 4 When the Toshiba Recovery Wizard opens and the Selecting a process screen displays, select Erase the hard disk and then click Next. 5 The Erase the hard disk screen lists..., depending on the size of the data on the hard disk without overwriting the HDD. ❖ Delete all partitions and overwrite all sectors on the keyboard to begin deleting the HDD.
User Guide 1
Page 57
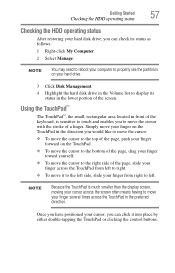
... to move your finger several times across the TouchPad from right to left to right. ❖ To move the cursor with the stroke of the keyboard, is sensitive to touch and enables you to move it into place by either double-tapping the TouchPad or clicking the control buttons. NOTE You...
... to move your finger several times across the TouchPad from right to left to right. ❖ To move the cursor with the stroke of the keyboard, is sensitive to touch and enables you to move it into place by either double-tapping the TouchPad or clicking the control buttons. NOTE You...

User Guide 1
Page 60
... of the external display To obtain the best picture quality from a computer or electronics store. 60 Getting Started Using an external keyboard Adjusting the quality of the computer's built-in TouchPad™. See the video device documentation for additional configuration steps. The computer's... USB ports support most USBcompatible keyboards. You can purchase one to use . Read the documentation that came with your printer supports Plug and Play, check its documentation...
... of the external display To obtain the best picture quality from a computer or electronics store. 60 Getting Started Using an external keyboard Adjusting the quality of the computer's built-in TouchPad™. See the video device documentation for additional configuration steps. The computer's... USB ports support most USBcompatible keyboards. You can purchase one to use . Read the documentation that came with your printer supports Plug and Play, check its documentation...
User Guide 1
Page 70
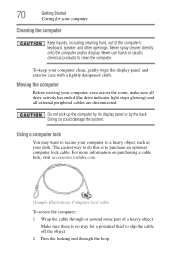
... off the object. 2 Pass the locking end through or around some part of the computer's keyboard, speaker, and other openings. Moving the computer Before moving your desk. For more information on purchasing a cable lock, visit accessories.toshiba.com. (Sample Illustration) Computer lock cable To secure the computer: 1 Wrap the cable through the...
... off the object. 2 Pass the locking end through or around some part of the computer's keyboard, speaker, and other openings. Moving the computer Before moving your desk. For more information on purchasing a cable lock, visit accessories.toshiba.com. (Sample Illustration) Computer lock cable To secure the computer: 1 Wrap the cable through the...
User Guide 1
Page 74
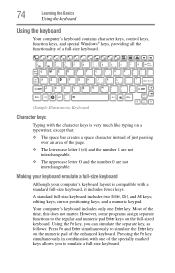
...Pressing the Fn key simultaneously in combination with the character keys is compatible with a standard full-size keyboard, it includes fewer keys. Making your keyboard emulate a full-size keyboard Although your computer's keyboard layout is very much like typing on a typewriter, except that: ❖ The space bar creates ... the separate key, as follows: Press Fn and Enter simultaneously to simulate the Enter key on the full-sized keyboard. Most of the enhanced keyboard. However, some programs assign separate functions to the regular and numeric pad Enter keys on the numeric pad of the...
...Pressing the Fn key simultaneously in combination with the character keys is compatible with a standard full-size keyboard, it includes fewer keys. Making your keyboard emulate a full-size keyboard Although your computer's keyboard layout is very much like typing on a typewriter, except that: ❖ The space bar creates ... the separate key, as follows: Press Fn and Enter simultaneously to simulate the Enter key on the full-sized keyboard. Most of the enhanced keyboard. However, some programs assign separate functions to the regular and numeric pad Enter keys on the numeric pad of the...
User Guide 1
Page 75
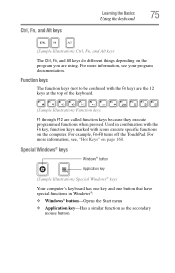
..., Fn+F9 turns off the TouchPad. Special Windows® keys Windows® button Application key (Sample Illustration) Special Windows® keys Your computer's keyboard has one key and one button that have special functions in combination with the Fn key, function keys marked with the Fn key) are the... 12 keys at the top of the keyboard. (Sample Illustration) Function keys F1 through F12 are using. Function keys The function keys (not to be confused with icons execute specific functions...
..., Fn+F9 turns off the TouchPad. Special Windows® keys Windows® button Application key (Sample Illustration) Special Windows® keys Your computer's keyboard has one key and one button that have special functions in combination with the Fn key, function keys marked with the Fn key) are the... 12 keys at the top of the keyboard. (Sample Illustration) Function keys F1 through F12 are using. Function keys The function keys (not to be confused with icons execute specific functions...
User Guide 1
Page 76
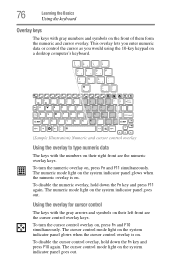
...goes out. This overlay lets you enter numeric data or control the cursor as you would using the 10-key keypad on a desktop computer's keyboard. (Sample Illustration) Numeric and cursor control overlay Using the overlay to type numeric data The keys with gray numbers and symbols on the front of.... The cursor control mode light on the system indicator panel glows when the cursor control overlay is on. 76 Learning the Basics Using the keyboard Overlay keys The keys with the numbers on their left front are the numeric overlay keys. Using the overlay for cursor control The keys with...
...goes out. This overlay lets you enter numeric data or control the cursor as you would using the 10-key keypad on a desktop computer's keyboard. (Sample Illustration) Numeric and cursor control overlay Using the overlay to type numeric data The keys with gray numbers and symbols on the front of.... The cursor control mode light on the system indicator panel glows when the cursor control overlay is on. 76 Learning the Basics Using the keyboard Overlay keys The keys with the numbers on their left front are the numeric overlay keys. Using the overlay for cursor control The keys with...

User Guide 1
Page 81
... the program is assumed to be a Microsoft® Word file. For example, Microsoft® Word saves files with the additional printer(s). For information on the keyboard plus these characters and '. Learning the Basics Printing your work Ensure the operating system is set up to 255 characters and can contain up the...
... the program is assumed to be a Microsoft® Word file. For example, Microsoft® Word saves files with the additional printer(s). For information on the keyboard plus these characters and '. Learning the Basics Printing your work Ensure the operating system is set up to 255 characters and can contain up the...
User Guide 1
Page 118
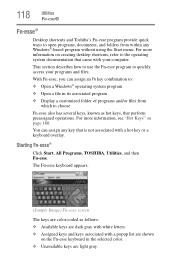
...Fn-esse, you can assign any Windows®-based program without using the Start menu. The Fn-esse keyboard appears. (Sample Image) Fn-esse screen The keys are color-coded as hot keys, that perform preassigned... operations. For more information, see "Hot Keys" on the Fn-esse keyboard in its associated program ❖ Display a customized folder of programs and/or files from within any key... that is not associated with a hot key or a keyboard overlay. Starting Fn-esse® Click Start, All Programs, TOSHIBA, Utilities, and then Fn-esse.
...Fn-esse, you can assign any Windows®-based program without using the Start menu. The Fn-esse keyboard appears. (Sample Image) Fn-esse screen The keys are color-coded as hot keys, that perform preassigned... operations. For more information, see "Hot Keys" on the Fn-esse keyboard in its associated program ❖ Display a customized folder of programs and/or files from within any key... that is not associated with a hot key or a keyboard overlay. Starting Fn-esse® Click Start, All Programs, TOSHIBA, Utilities, and then Fn-esse.

User Guide 1
Page 119
... 1 Click Start, All Programs, TOSHIBA, Utilities, and then SD Memory Card Format. Utilities TOSHIBA SD™ Memory Card Format Utility 119 There are two ways to assign a key to open a program or document: ❖ Using drag-and-drop ❖ Using the keyboard or pointing device The method most ...often used with the Bridge Media Adapter slot. The formatting progress is displayed in the horizontal bar in the window. 5 When formatting is drag-and-drop. The TOSHIBA SD Memory Card Format screen appears. (Sample...
... 1 Click Start, All Programs, TOSHIBA, Utilities, and then SD Memory Card Format. Utilities TOSHIBA SD™ Memory Card Format Utility 119 There are two ways to assign a key to open a program or document: ❖ Using drag-and-drop ❖ Using the keyboard or pointing device The method most ...often used with the Bridge Media Adapter slot. The formatting progress is displayed in the horizontal bar in the window. 5 When formatting is drag-and-drop. The TOSHIBA SD Memory Card Format screen appears. (Sample...


