

User Guide
Page 16
xvi Lower door security 19 Rear view 20 Power supply 20 Security loop 20 I/O connectors 21 DC power switch 22 Expansion slot 23 Power supply unit slot 23 Removing the front doors 24 Removing and replacing the server panels ...
xvi Lower door security 19 Rear view 20 Power supply 20 Security loop 20 I/O connectors 21 DC power switch 22 Expansion slot 23 Power supply unit slot 23 Removing the front doors 24 Removing and replacing the server panels ...

User Guide
Page 23
... 2 Mounting optional internal devices 4 Environmental considerations 5 Power requirements 8 Front view (with the front doors closed 9 Front view (with the front doors opened 11 Rear view 20 Removing the front doors 24 Removing and replacing the server panels 25 Setting up server security 29 Inside the server 31 Maintenance 34 Connecting peripheral...
... 2 Mounting optional internal devices 4 Environmental considerations 5 Power requirements 8 Front view (with the front doors closed 9 Front view (with the front doors opened 11 Rear view 20 Removing the front doors 24 Removing and replacing the server panels 25 Setting up server security 29 Inside the server 31 Maintenance 34 Connecting peripheral...
User Guide
Page 29
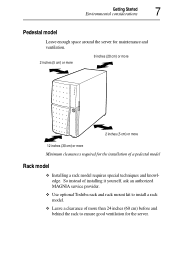
Getting Started Environmental considerations 7 Pedestal model Leave enough space around the server for maintenance and ventilation. 2 inches (5 cm) or more 8 inches (20 cm) or more 2 inches (5 cm) or more 12 inches (30 cm) or more than 24 inches (60 cm) before and behind the rack ... model Rack model c Installing a rack model requires special techniques and knowledge. c Leave a clearance of more Minimum clearances required for the server. c Use optional Toshiba rack and rack mount kit to ensure good ventilation for the installation of installing it yourself, ask an authorized...
Getting Started Environmental considerations 7 Pedestal model Leave enough space around the server for maintenance and ventilation. 2 inches (5 cm) or more 8 inches (20 cm) or more 2 inches (5 cm) or more 12 inches (30 cm) or more than 24 inches (60 cm) before and behind the rack ... model Rack model c Installing a rack model requires special techniques and knowledge. c Leave a clearance of more Minimum clearances required for the server. c Use optional Toshiba rack and rack mount kit to ensure good ventilation for the installation of installing it yourself, ask an authorized...

User Guide
Page 42
... sharing ability. See "Access to make the system redundant. See "Power supply unit" on page 30. Every model has a built-in EPS-R unit as standard. 20 Getting Started Rear view Rear view Power supply AC Power connector DC power switches Securing loop Standard EPS-R unit Additional EPS-R unit I/O connectors Expansion slots...
... sharing ability. See "Access to make the system redundant. See "Power supply unit" on page 30. Every model has a built-in EPS-R unit as standard. 20 Getting Started Rear view Rear view Power supply AC Power connector DC power switches Securing loop Standard EPS-R unit Additional EPS-R unit I/O connectors Expansion slots...

User Guide
Page 131
... one controller in it, which controls hard disk drives and other devices capable of the controller connected with it is displayed. +Removable Devices -Hard Drive #20 ID00 LUN0 SEAGATE STXXXXXXXX Bootable Add-in Cards 2 Use the or key to change priority to select the hard disk drive: 1 Start BIOS Setup Utilities...
... one controller in it, which controls hard disk drives and other devices capable of the controller connected with it is displayed. +Removable Devices -Hard Drive #20 ID00 LUN0 SEAGATE STXXXXXXXX Bootable Add-in Cards 2 Use the or key to change priority to select the hard disk drive: 1 Start BIOS Setup Utilities...

User Guide
Page 160
Specifies a data item. Returns control to the next data item. Only "SYM53C1010" is added). Advances control to the previous data item. Basic operations on the main menu. 138 System Configuration Setup Onboard SCSI utility Menu configuration When the SCSI Utility is started, the monitor will enter the following main menu display mode: Symbios PCI SCSI Configuration Utility Ver PCI-X.XX.XX LSI Logic Host Bus Adapters Adapter PCI Bus 2400 XX NVM Boot Symbios Order Control Yes 0 Enabled Yes 1 Enabled F1 =help Arrowkeys =Select Item -/+ =Change [Item] Esc =Abort/Exit ...
Specifies a data item. Returns control to the next data item. Only "SYM53C1010" is added). Advances control to the previous data item. Basic operations on the main menu. 138 System Configuration Setup Onboard SCSI utility Menu configuration When the SCSI Utility is started, the monitor will enter the following main menu display mode: Symbios PCI SCSI Configuration Utility Ver PCI-X.XX.XX LSI Logic Host Bus Adapters Adapter PCI Bus 2400 XX NVM Boot Symbios Order Control Yes 0 Enabled Yes 1 Enabled F1 =help Arrowkeys =Select Item -/+ =Change [Item] Esc =Abort/Exit ...

User Guide
Page 162
...) or not (No) the on -board SCSI controller. Symbios PCI SCSI Configuration Utility Ver PCI-X.XX.XX Adapter Properties Adapter PCI Dev/ Bus Func SYM53C1010 1 20 SCSI Parity [Yes] Host SCSI ID [ 7] SCSI Bus Scan Order [Low to High(0...Max)] Removable Media Support [None] CHS Mapping [SCSI Plug and Play Mapping...
...) or not (No) the on -board SCSI controller. Symbios PCI SCSI Configuration Utility Ver PCI-X.XX.XX Adapter Properties Adapter PCI Dev/ Bus Func SYM53C1010 1 20 SCSI Parity [Yes] Host SCSI ID [ 7] SCSI Bus Scan Order [Low to High(0...Max)] Removable Media Support [None] CHS Mapping [SCSI Plug and Play Mapping...

User Guide
Page 216
... Connector key 13 Connector key Connector key 14 Reserved Reserved 15 GND RST_L O 16 PCICLK O +3.3V 17 GND GNT_L O 18 REQ_L I/O GND 19 +3.3V Reserved 20 AD31 I/O AD30 I/O 21 AD29 I/O +3.3V 22 GND AD28 I /O" denotes the input/output when seen from the server. 194 Expansion slots (64bit/66MHz PCI slot) NOTE...
... Connector key 13 Connector key Connector key 14 Reserved Reserved 15 GND RST_L O 16 PCICLK O +3.3V 17 GND GNT_L O 18 REQ_L I/O GND 19 +3.3V Reserved 20 AD31 I/O AD30 I/O 21 AD29 I/O +3.3V 22 GND AD28 I /O" denotes the input/output when seen from the server. 194 Expansion slots (64bit/66MHz PCI slot) NOTE...

User Guide
Page 224
...# O Reserved 12 GND GND 13 GND GND 14 Reserved Reserved 15 GND RST# I 16 CLK I +5V(I/O) 17 GND GNT# I/O 18 REQ# I/O GND 19 +5V(I/O) Reserved 20 AD[31] I/O AD[30] I/O 21 AD[29] I/O (3.3V) 22 GND AD[28] I/O
...# O Reserved 12 GND GND 13 GND GND 14 Reserved Reserved 15 GND RST# I 16 CLK I +5V(I/O) 17 GND GNT# I/O 18 REQ# I/O GND 19 +5V(I/O) Reserved 20 AD[31] I/O AD[30] I/O 21 AD[29] I/O (3.3V) 22 GND AD[28] I/O