User Manual
Page 58
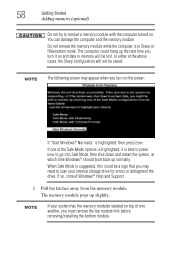
... Started Adding memory (optional) Do not try to go into Safe Mode, then shut down and restart the system, at which time Windows® should boot back up slightly. You can damage the computer and the memory module. If one of one another, you turn on . When Safe Mode is suggested...
... Started Adding memory (optional) Do not try to go into Safe Mode, then shut down and restart the system, at which time Windows® should boot back up slightly. You can damage the computer and the memory module. If one of one another, you turn on . When Safe Mode is suggested...
User Manual
Page 70
...you want to recover the original factory image (returning the computer to its out-of-box state and specify a custom size for the C: drive. Select Toshiba Recovery Wizard and then click Next. 5 If your optical drive and power on page 60. Click Yes to continue. 7 When the... of Factory Default Software and then click Next. 8 Select one at this time. Note: This option deletes all data will be deleted and rewritten. The boot menu appears. 3 Using the arrow keys, select the DVD option and press Enter. 4 The Selecting a Process screen appears. To recover your internal storage drive ...
...you want to recover the original factory image (returning the computer to its out-of-box state and specify a custom size for the C: drive. Select Toshiba Recovery Wizard and then click Next. 5 If your optical drive and power on page 60. Click Yes to continue. 7 When the... of Factory Default Software and then click Next. 8 Select one at this time. Note: This option deletes all data will be deleted and rewritten. The boot menu appears. 3 Using the arrow keys, select the DVD option and press Enter. 4 The Selecting a Process screen appears. To recover your internal storage drive ...
User Manual
Page 71
...of the following options on the Erase the hard disk screen: ❖ Delete all data and partitions from the internal storage drive: 1 Access the Toshiba Recovery Wizard on your internal storage drive or on your recovery DVDs/media. ❖ To access the Recovery Wizard on your internal storage drive: ...then click Next. 2 Select Erase the hard disk and then click Next. 3 Choose one of the recovery options instead of the data on the boot menu and then press Enter. Erasing the Internal Storage Drive Erasing the internal storage drive will delete all of erasing the drive. When the process...
...of the following options on the Erase the hard disk screen: ❖ Delete all data and partitions from the internal storage drive: 1 Access the Toshiba Recovery Wizard on your internal storage drive or on your recovery DVDs/media. ❖ To access the Recovery Wizard on your internal storage drive: ...then click Next. 2 Select Erase the hard disk and then click Next. 3 Choose one of the recovery options instead of the data on the boot menu and then press Enter. Erasing the Internal Storage Drive Erasing the internal storage drive will delete all of erasing the drive. When the process...
User Manual
Page 152
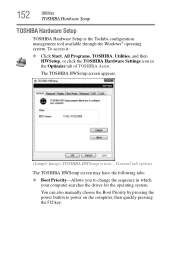
... management tool available through the Windows® operating system. The TOSHIBA HWSetup screen appears. (Sample Image) TOSHIBA HWSetup screen - General tab options The TOSHIBA HWSetup screen may have the following tabs: ❖ Boot Priority-Allows you to change the sequence in the Optimize tab of TOSHIBA Assist. To access it: ❖ Click Start, All Programs...
... management tool available through the Windows® operating system. The TOSHIBA HWSetup screen appears. (Sample Image) TOSHIBA HWSetup screen - General tab options The TOSHIBA HWSetup screen may have the following tabs: ❖ Boot Priority-Allows you to change the sequence in the Optimize tab of TOSHIBA Assist. To access it: ❖ Click Start, All Programs...
User Manual
Page 153
NOTE Since the system is a quick-booting system, you must press the keys immediately after starting in display NOTE When the computer restarts, it remembers the last configuration. For more information, see ".... ❖ Display-Allows you to view the current BIOS version or change various default settings for the built-in Sleep mode, press Fn + F5. Utilities TOSHIBA Hardware Setup 153 Select the boot device by pressing the arrow keys, then pressing the Enter key.
NOTE Since the system is a quick-booting system, you must press the keys immediately after starting in display NOTE When the computer restarts, it remembers the last configuration. For more information, see ".... ❖ Display-Allows you to view the current BIOS version or change various default settings for the built-in Sleep mode, press Fn + F5. Utilities TOSHIBA Hardware Setup 153 Select the boot device by pressing the arrow keys, then pressing the Enter key.

User Manual
Page 162
... optional external diskette drive and press F12 when the machine starts and use the arrow keys to warn you will be configured to select the boot-up device. (You may have a software or resource conflict. Your computer can be lost . 162 If Something Goes Wrong Problems when you turn on the...
... optional external diskette drive and press F12 when the machine starts and use the arrow keys to warn you will be configured to select the boot-up device. (You may have a software or resource conflict. Your computer can be lost . 162 If Something Goes Wrong Problems when you turn on the...

User Manual
Page 165
...each option using the arrow keys, Windows® displays information about each option at the bottom after Description. The Windows® Advanced Boot Options menu displays these options: ❖ Repair Your Computer ❖ Safe Mode ❖ Safe Mode with Networking ❖ Safe ...Mode with Command Prompt ❖ Enable Boot Logging ❖ Enable low-resolution video (640x480) ❖ Last Known Good Configuration (advanced) ❖ Directory Services Restore Mode ❖ Debugging...
...each option using the arrow keys, Windows® displays information about each option at the bottom after Description. The Windows® Advanced Boot Options menu displays these options: ❖ Repair Your Computer ❖ Safe Mode ❖ Safe Mode with Networking ❖ Safe ...Mode with Command Prompt ❖ Enable Boot Logging ❖ Enable low-resolution video (640x480) ❖ Last Known Good Configuration (advanced) ❖ Directory Services Restore Mode ❖ Debugging...
User Manual
Page 206
...spreadsheets, and database management systems. See also program. BIOS (basic input/output system) - The term "boot" originates from one device to locate the startup files. boot priority (startup sequence) - C cache - Basic instructions, stored in case the original file is duplicated ...which the central processing unit (CPU) communicates with other parts of the computer, such as a printer or modem, transmits information. boot - boot disk - See also bus speed, frontside bus. A section of measuring the speed at which the computer accesses its bootstraps"), ...
...spreadsheets, and database management systems. See also program. BIOS (basic input/output system) - The term "boot" originates from one device to locate the startup files. boot priority (startup sequence) - C cache - Basic instructions, stored in case the original file is duplicated ...which the central processing unit (CPU) communicates with other parts of the computer, such as a printer or modem, transmits information. boot - boot disk - See also bus speed, frontside bus. A section of measuring the speed at which the computer accesses its bootstraps"), ...
User Manual
Page 214
... doing. This type of pixels available horizontally and vertically. See RAM. Any device, such as icons, menu items, and buttons. random access memory - read . See boot, restart. A socket on a screen. pointer - Used to point to move a mouse. R RAM (random access memory) - A measure of the sharpness of the images that enables you...
... doing. This type of pixels available horizontally and vertically. See RAM. Any device, such as icons, menu items, and buttons. random access memory - read . See boot, restart. A socket on a screen. pointer - Used to point to move a mouse. R RAM (random access memory) - A measure of the sharpness of the images that enables you...

User Manual
Page 215
See also boot. ROM (read but not written to continue from where you left off when you turn off the computer without turning the computer off when you ...
See also boot. ROM (read but not written to continue from where you left off when you turn off the computer without turning the computer off when you ...


