Owner's Manual - English
Page 2
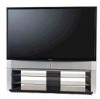
... in severe burns. If the lamp ruptures, the TV will be of sufficient magnitude to constitute a risk of your furniture to "Lamp unit replacement and care" on or play with the Toshiba stand listed below. Television Stand Model 56MX195 ST 5695 62MX195 ST 6295 72MX195 ST 7295 NOTE TO CATV INSTALLERS IN THE U.S.A. The...
... in severe burns. If the lamp ruptures, the TV will be of sufficient magnitude to constitute a risk of your furniture to "Lamp unit replacement and care" on or play with the Toshiba stand listed below. Television Stand Model 56MX195 ST 5695 62MX195 ST 6295 72MX195 ST 7295 NOTE TO CATV INSTALLERS IN THE U.S.A. The...
Owner's Manual - English
Page 3
.... 8) Do not install near water. 6) Clean only with temperatures at or below 41°F (5°C). 20) Always place the TV on the applicable optional TV stand(s) listed in this equipment from a 120 VAC, 60 Hz power source only. (continued on next page) 3 hot, humid areas; Never place...than the other apparatus (including amplifiers) that can be inserted completely to prevent blade exposure. 16) WARNING: This product contains a lamp to project the picture, and requires special safety precautions: • See pages 128-130 for replacement of the obsolete outlet. 10) Protect the power...
.... 8) Do not install near water. 6) Clean only with temperatures at or below 41°F (5°C). 20) Always place the TV on the applicable optional TV stand(s) listed in this equipment from a 120 VAC, 60 Hz power source only. (continued on next page) 3 hot, humid areas; Never place...than the other apparatus (including amplifiers) that can be inserted completely to prevent blade exposure. 16) WARNING: This product contains a lamp to project the picture, and requires special safety precautions: • See pages 128-130 for replacement of the obsolete outlet. 10) Protect the power...
Owner's Manual - English
Page 6
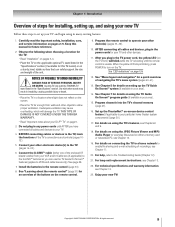
...Important notes about your DLP™ projection TV 5 Chapter 1: Introduction 8 Welcome to Toshiba 8 Features of your new TV 8 Overview of steps for installing, setting up, and using your new TV 9 Chapter 2: Connecting your TV 10 TV front and side panel controls and connections 10 TV back panel connections 11 Overview of...8482; remote control functions ........ 59 Video Window 60 Panel Menus 60 Info Box 61 TV Guide On Screen™ Icons 61 TV Guide On Screen™ Services 62 LISTINGS screen 62 SEARCH screen 63 RECORDINGS screen 65 SCHEDULE screen 66 Record features 66 Remind...
...Important notes about your DLP™ projection TV 5 Chapter 1: Introduction 8 Welcome to Toshiba 8 Features of your new TV 8 Overview of steps for installing, setting up, and using your new TV 9 Chapter 2: Connecting your TV 10 TV front and side panel controls and connections 10 TV back panel connections 11 Overview of...8482; remote control functions ........ 59 Video Window 60 Panel Menus 60 Info Box 61 TV Guide On Screen™ Icons 61 TV Guide On Screen™ Services 62 LISTINGS screen 62 SEARCH screen 63 RECORDINGS screen 65 SCHEDULE screen 66 Record features 66 Remind...
Owner's Manual - English
Page 9
...). 6. For details on page 124. 12. For lamp unit replacement instructions, see Chapter 13. 23. Copyright © 2005 TOSHIBA CORPORATION. See "LED indications" on connecting the TV to a home network to enable file sharing and e-mail scheduling of recordings, see Chapter 10. 19. See Chapter 5 for... 20. See page 28. 7. For details on using its many exciting features. 1. Use with the TOSHIBA TV stand listed in the remote control (page 33). 8. See "Learning about your TV and begin using the JPEG Picture Viewer and MP3 Audio Player to view/play files saved on setting up ...
...). 6. For details on page 124. 12. For lamp unit replacement instructions, see Chapter 13. 23. Copyright © 2005 TOSHIBA CORPORATION. See "LED indications" on connecting the TV to a home network to enable file sharing and e-mail scheduling of recordings, see Chapter 10. 19. See Chapter 5 for... 20. See page 28. 7. For details on using its many exciting features. 1. Use with the TOSHIBA TV stand listed in the remote control (page 33). 8. See "Learning about your TV and begin using the JPEG Picture Viewer and MP3 Audio Player to view/play files saved on setting up ...
Owner's Manual - English
Page 14
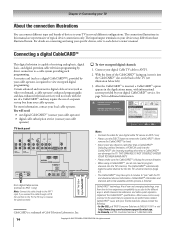
...8226; In Canada, call TCL Customer Service at 1-800-268-3404. 14 Copyright © 2005 TOSHIBA CORPORATION. CableCARD™ information and channels will not work with the TV and download channel information. See page 56 for your devices may not receive the signals correctly. ________...directly to the ANT 1 input. After the CableCARD™ is finished. The CableCARD™ automatically loads the cable channel list into the TV's channel memory (page 47). • The CableCARD™ may from those illustrated herein. CableCard Connected -- THIS DAMAGE IS NOT COVERED...
...8226; In Canada, call TCL Customer Service at 1-800-268-3404. 14 Copyright © 2005 TOSHIBA CORPORATION. CableCARD™ information and channels will not work with the TV and download channel information. See page 56 for your devices may not receive the signals correctly. ________...directly to the ANT 1 input. After the CableCARD™ is finished. The CableCARD™ automatically loads the cable channel list into the TV's channel memory (page 47). • The CableCARD™ may from those illustrated herein. CableCard Connected -- THIS DAMAGE IS NOT COVERED...
Owner's Manual - English
Page 17
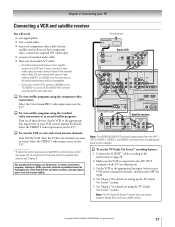
...the TV (VIDEO 1) to your VCR's AUDIO OUT terminal using the white audio cable only. Make sure the VCR is connected to the A/V OUT terminals on the remote control (see page 72). ... Select the VIDEO 1 video input source on the TV.* To select the video input source, press INPUT on the TV (see Chapter 3. Copyright © 2005 TOSHIBA CORPORATION. Tune the VCR to the channel you have... according to the instructions on setting up the TV Guide On Screen™ system. 5. Note: The TV Guide On Screen™ system does not receive program listings from the ANT 1, ANT 2, VIDEO 1, ...
...the TV (VIDEO 1) to your VCR's AUDIO OUT terminal using the white audio cable only. Make sure the VCR is connected to the A/V OUT terminals on the remote control (see page 72). ... Select the VIDEO 1 video input source on the TV.* To select the video input source, press INPUT on the TV (see Chapter 3. Copyright © 2005 TOSHIBA CORPORATION. Tune the VCR to the channel you have... according to the instructions on setting up the TV Guide On Screen™ system. 5. Note: The TV Guide On Screen™ system does not receive program listings from the ANT 1, ANT 2, VIDEO 1, ...

Owner's Manual - English
Page 25
...format videos. See page 50 for IEEE1394. For information on signals supported by the TV, these ports are not required. TV back panel Supported signals The IEEE1394 ports support only the signals listed below ). EIA-775 digital control allows tuning devices (such as AVHD or D-... devices using on-screen control icons. Copyright © 2005 TOSHIBA CORPORATION. Chapter 2: Connecting your TV Connecting IEEE1394 video devices You can use the two bi-directional IEEE1394 ports on the back of your TV to connect digital video devices that meet CEA specifications for details...
...format videos. See page 50 for IEEE1394. For information on signals supported by the TV, these ports are not required. TV back panel Supported signals The IEEE1394 ports support only the signals listed below ). EIA-775 digital control allows tuning devices (such as AVHD or D-... devices using on-screen control icons. Copyright © 2005 TOSHIBA CORPORATION. Chapter 2: Connecting your TV Connecting IEEE1394 video devices You can use the two bi-directional IEEE1394 ports on the back of your TV to connect digital video devices that meet CEA specifications for details...
Owner's Manual - English
Page 28
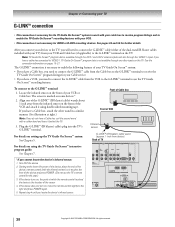
...locate the device's infrared sensor. 28 Copyright © 2005 TOSHIBA CORPORATION. Align one of the G-LINK™ (IR blaster) cable's wands about 1 inch away from the VCR to the G-LINK™ terminal to use the TV's remote control for this TV. Front of Cable box Front of VCR Infrared sensor G-...LINK™ (IR blaster) cable wand (approx. 1 inch from the Cable box to the G-LINK™ terminal to receive the TV Guide On Screen™ program listings for your Cable service. • If you have a Cable box, you need to connect the G-LINK™ cable (either of the ...
...locate the device's infrared sensor. 28 Copyright © 2005 TOSHIBA CORPORATION. Align one of the G-LINK™ (IR blaster) cable's wands about 1 inch away from the VCR to the G-LINK™ terminal to use the TV's remote control for this TV. Front of Cable box Front of VCR Infrared sensor G-...LINK™ (IR blaster) cable wand (approx. 1 inch from the Cable box to the G-LINK™ terminal to receive the TV Guide On Screen™ program listings for your Cable service. • If you have a Cable box, you need to connect the G-LINK™ cable (either of the ...

Owner's Manual - English
Page 31
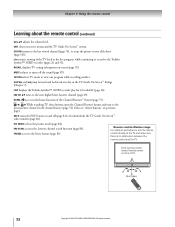
...™ CTRL accesses the on highlighted items in programming mode). INPUT selects the video input source (page 72). The mode indicator light will be illuminated. MENU accesses the main TV menu system (pages 40 and 41) or opens a menu in the main menu system and the...TV only are described here. For a list of the remote control's functions, see x / • on the next page.) CH yz cycles through programmed channels when no menu is on-screen (page 47) and functions as page up/down when a menu is on the TV. POWER turns the TV on next page) Copyright © 2005 TOSHIBA...
...™ CTRL accesses the on highlighted items in programming mode). INPUT selects the video input source (page 72). The mode indicator light will be illuminated. MENU accesses the main TV menu system (pages 40 and 41) or opens a menu in the main menu system and the...TV only are described here. For a list of the remote control's functions, see x / • on the next page.) CH yz cycles through programmed channels when no menu is on-screen (page 47) and functions as page up/down when a menu is on the TV. POWER turns the TV on next page) Copyright © 2005 TOSHIBA...
Owner's Manual - English
Page 32
... TOSHIBA CORPORATION. TV/VCR selects TV mode to view one day in the channel history (page 74). (Also see "Arrow buttons" on previous page.) SPLIT turns the POP feature on front of the TV back to the live program, while continuing to record to the previous/next channel in the TV Guide On Screen™ listings...
... TOSHIBA CORPORATION. TV/VCR selects TV mode to view one day in the channel history (page 74). (Also see "Arrow buttons" on previous page.) SPLIT turns the POP feature on front of the TV back to the live program, while continuing to record to the previous/next channel in the TV Guide On Screen™ listings...

Owner's Manual - English
Page 33
...program the remote control. MODE Default device mode control (before programming) 1) TV Toshiba TV 2) CBL/SAT Toshiba Satellite receiver 3) VCR/PVR Toshiba VCR 4) DVD Toshiba DVD 5) AUDIO 1 Pioneer Audio receiver 6) AUDIO 2 Pioneer LD MODE Device mode control after programming 1) TV Toshiba TV 2) CBL/SAT 3) VCR/PVR 4) DVD Multi-brand video/audio devices 5)... batteries from leaking into the battery compartment. The default device modes and programmable device modes are listed below. Slide the battery cover off the back of the remote control. 2. All rights reserved. 33
...program the remote control. MODE Default device mode control (before programming) 1) TV Toshiba TV 2) CBL/SAT Toshiba Satellite receiver 3) VCR/PVR Toshiba VCR 4) DVD Toshiba DVD 5) AUDIO 1 Pioneer Audio receiver 6) AUDIO 2 Pioneer LD MODE Device mode control after programming 1) TV Toshiba TV 2) CBL/SAT 3) VCR/PVR 4) DVD Multi-brand video/audio devices 5)... batteries from leaking into the battery compartment. The default device modes and programmable device modes are listed below. Slide the battery cover off the back of the remote control. 2. All rights reserved. 33
Owner's Manual - English
Page 35
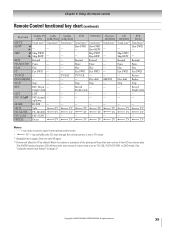
... Play --- When the volume is toggle. Chapter 3: Using the remote control Remote Control functional key chart (continued) Key Label Toshiba TV Cable Satellite (TV) (CBL/SAT) (CBL/SAT) VCR DVD/LD Receiver CD (AUDIO) (AUDIO) PVR (VCR) MUTE Sound mute*2 Sound...Single Click) (Double Click) (Double Click) LIST LIST --- --- --- --- --- --- --- FREEZE Freeze TV TV TV TV TV TV TV Notes key does not send a signal in that remote control mode. •" TV" = key will affect the TV, even though the remote control is not in TV mode. * 1 Backlight key is unlocked, ...
... Play --- When the volume is toggle. Chapter 3: Using the remote control Remote Control functional key chart (continued) Key Label Toshiba TV Cable Satellite (TV) (CBL/SAT) (CBL/SAT) VCR DVD/LD Receiver CD (AUDIO) (AUDIO) PVR (VCR) MUTE Sound mute*2 Sound...Single Click) (Double Click) (Double Click) LIST LIST --- --- --- --- --- --- --- FREEZE Freeze TV TV TV TV TV TV TV Notes key does not send a signal in that remote control mode. •" TV" = key will affect the TV, even though the remote control is not in TV mode. * 1 Backlight key is unlocked, ...
Owner's Manual - English
Page 36
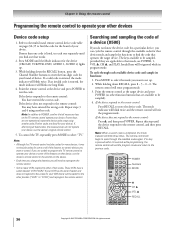
... seconds while programming, the remote control will blink three times. If some keys are unable to program the TV remote control to operate your device or some or all listed codes, the necessary keys do not know the device code for a particular device, you want to set...the remote control: Press y, and then press POWER. To control the TV, repeatedly press MODE to store the device code. POWER Numbers MODE y CH y VOL y RECALL 36 Copyright © 2005 TOSHIBA CORPORATION. If an invalid code is listed, try each available device code and sample its functions: 1. If ...
... seconds while programming, the remote control will blink three times. If some keys are unable to program the TV remote control to operate your device or some or all listed codes, the necessary keys do not know the device code for a particular device, you want to set...the remote control: Press y, and then press POWER. To control the TV, repeatedly press MODE to store the device code. POWER Numbers MODE y CH y VOL y RECALL 36 Copyright © 2005 TOSHIBA CORPORATION. If an invalid code is listed, try each available device code and sample its functions: 1. If ...
Owner's Manual - English
Page 40
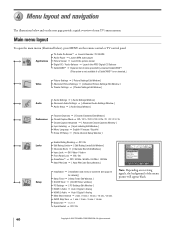
... the background of your TV's menu system. Applications ➞ TV Guide On Screen™ ➞ Launch Gemstar / TV GUIDE ➞ Audio ...Player ➞ Launch MP3 audio player ➞ Picture Viewer ➞ Launch the picture viewer ➞ Digital CC / Audio Selector ➞ Launch the ATSC Digital CC Selector ➞ CableCARD™ ➞ Dynamic list...Gray Level ➞ 1 / 2 / 3 ➞ Quick Restart ➞ Off / On Applications TV Guide On Screen Audio Player Picture Viewer Digital CC/Audio Selector CableCARD Navigate Select CH RTN Back EXIT ...
... the background of your TV's menu system. Applications ➞ TV Guide On Screen™ ➞ Launch Gemstar / TV GUIDE ➞ Audio ...Player ➞ Launch MP3 audio player ➞ Picture Viewer ➞ Launch the picture viewer ➞ Digital CC / Audio Selector ➞ Launch the ATSC Digital CC Selector ➞ CableCARD™ ➞ Dynamic list...Gray Level ➞ 1 / 2 / 3 ➞ Quick Restart ➞ Off / On Applications TV Guide On Screen Audio Player Picture Viewer Digital CC/Audio Selector CableCARD Navigate Select CH RTN Back EXIT ...
Owner's Manual - English
Page 42
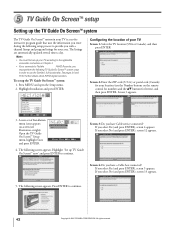
...(and press ENTER), screen 4 appears. The following screen appears. The listings are automatically updated several times a day. Press MENU and open the Setup menu. 2. A new set up the TV Guide On Screen™ system: 1. TV Guide On Screen Setup Start Navigate Select CH RTN Back EXIT Exit 4....Number buttons on -screen (see illustration at right). Note: • You must perform the following TV Guide On Screen™ system setup in Chapter 2. • If you connected a Toshiba AVHD Recorder, you have Cable service connected? See pages 26 and 55 for letters), and then ...
...(and press ENTER), screen 4 appears. The following screen appears. The listings are automatically updated several times a day. Press MENU and open the Setup menu. 2. A new set up the TV Guide On Screen™ system: 1. TV Guide On Screen Setup Start Navigate Select CH RTN Back EXIT Exit 4....Number buttons on -screen (see illustration at right). Note: • You must perform the following TV Guide On Screen™ system setup in Chapter 2. • If you connected a Toshiba AVHD Recorder, you have Cable service connected? See pages 26 and 55 for letters), and then ...
Owner's Manual - English
Page 44
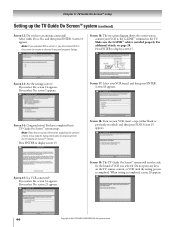
..., screen 20 appears. 44 Copyright © 2005 TOSHIBA CORPORATION. Press ENTER to display screen 15. If you select Yes, screen 16 appears. If you select Yes, screen 14 appears. Screen 19: The TV Guide On Screen™ system will test the code for listing information to connect your VCR, insert a tape ...of VCR you selected. Screen 18: Turn on your VCR to receive a channel lineup and program listings. If you must select YES in this screen to the G-LINK™ terminal on the TV, remote control, or VCR until the testing process is completed. Do not press any keys on the...
..., screen 20 appears. 44 Copyright © 2005 TOSHIBA CORPORATION. Press ENTER to display screen 15. If you select Yes, screen 16 appears. If you select Yes, screen 14 appears. Screen 19: The TV Guide On Screen™ system will test the code for listing information to connect your VCR, insert a tape ...of VCR you selected. Screen 18: Turn on your VCR to receive a channel lineup and program listings. If you must select YES in this screen to the G-LINK™ terminal on the TV, remote control, or VCR until the testing process is completed. Do not press any keys on the...
Owner's Manual - English
Page 45
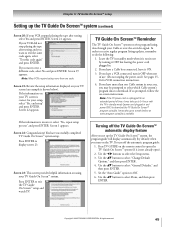
...select "Change Default Options," and then press ENTER. 4. Copyright © 2005 TOSHIBA CORPORATION. If you have a VCR connected, turn off the TV Guide On Screen™ automatic display feature After you set up the TV Guide On Screen™ system, the program guide will display automatically (by turning..., select "No, repeat setup process" and press ENTER. Press ENTER to display screen 23. TV Guide On Screen™ Reminder The TV Guide On Screen™ system receives program listing data through your setup, select "Yes, end setup" and press ENTER. If the information is...
...select "Change Default Options," and then press ENTER. 4. Copyright © 2005 TOSHIBA CORPORATION. If you have a VCR connected, turn off the TV Guide On Screen™ automatic display feature After you set up the TV Guide On Screen™ system, the program guide will display automatically (by turning..., select "No, repeat setup process" and press ENTER. Press ENTER to display screen 23. TV Guide On Screen™ Reminder The TV Guide On Screen™ system receives program listing data through your setup, select "Yes, end setup" and press ENTER. If the information is...
Owner's Manual - English
Page 47
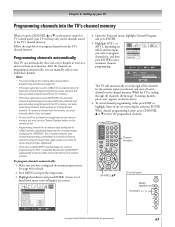
...the steps below to the existing set of programmed channels. This is disabled because the CableCARD™ automatically loads the Cable channel list into the TV's channel memory. Make sure you press CHANNEL y or z on -screen). See page 46 for CABLE will stop only on... -screen display and press ENTER. Channel Numbers CHANNEL yz TV control panel MENU (ENTER) CHANNEL / Copyright © 2005 TOSHIBA CORPORATION. Chapter 6: Setting up your TV Programming channels into the TV's channel memory When you have configured the antenna input sources. Programming channels ...
...the steps below to the existing set of programmed channels. This is disabled because the CableCARD™ automatically loads the Cable channel list into the TV's channel memory. Make sure you press CHANNEL y or z on -screen). See page 46 for CABLE will stop only on... -screen display and press ENTER. Channel Numbers CHANNEL yz TV control panel MENU (ENTER) CHANNEL / Copyright © 2005 TOSHIBA CORPORATION. Chapter 6: Setting up your TV Programming channels into the TV's channel memory When you have configured the antenna input sources. Programming channels ...
Owner's Manual - English
Page 48
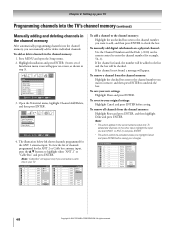
...channels from the channel memory: Highlight the checked box next to the channel number you want to remove, and then press ENTER to the list and the box will appear on the other input, highlight the input you want to add, and then press ENTER to highlight either "...Digital Analog ANT 1 ANT 1 ANT 2 Cable Box Reset Cancel Done 48 Copyright © 2005 TOSHIBA CORPORATION. If the channel is found , a message will be checked. All rights reserved. To save your TV Programming channels into the channel memory, you highlight Cancel and press ENTER before saving your original settings...
...channels from the channel memory: Highlight the checked box next to the channel number you want to remove, and then press ENTER to the list and the box will appear on the other input, highlight the input you want to add, and then press ENTER to highlight either "...Digital Analog ANT 1 ANT 1 ANT 2 Cable Box Reset Cancel Done 48 Copyright © 2005 TOSHIBA CORPORATION. If the channel is found , a message will be checked. All rights reserved. To save your TV Programming channels into the channel memory, you highlight Cancel and press ENTER before saving your original settings...

Owner's Manual - English
Page 49
...need to change the Input Selection first. Channel Numbers 100 y x • z FAV CH yz FAV SCAN Copyright © 2005 TOSHIBA CORPORATION. Chapter 6: Setting up your TV Programming your favorite channels for another input, you will need to change the Input Selection first. 1 CH 4-1 2 CH 4-2 3... . 10 Cancel 11 Done When done, highlight Done and press ENTER. To quickly scan through your favorite channels using the favorite channel list: 1. Press MENU and open the Preferences menu. 2. Highlight Favorite Channels and press ENTER. 3. To tune your favorite channels only, ...
...need to change the Input Selection first. Channel Numbers 100 y x • z FAV CH yz FAV SCAN Copyright © 2005 TOSHIBA CORPORATION. Chapter 6: Setting up your TV Programming your favorite channels for another input, you will need to change the Input Selection first. 1 CH 4-1 2 CH 4-2 3... . 10 Cancel 11 Done When done, highlight Done and press ENTER. To quickly scan through your favorite channels using the favorite channel list: 1. Press MENU and open the Preferences menu. 2. Highlight Favorite Channels and press ENTER. 3. To tune your favorite channels only, ...