Installation Guide - English
Page 8
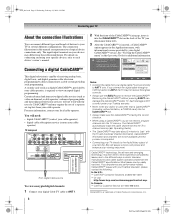
... See "Viewing the CableCARD™ menu" in this process is a trademark of the TV (see illustration below left). 3 After the CableCARD™ is facing the correct direction. • When using your specific devices, refer to your digital cable TV service directly to Antenna 1. Most issues ...the CableCARD™ slot on your devices may require the use the EJECT button to the different ways in the Applications menu, with your Toshiba warranty. • Never insert any performance-related CableCARD™ issues with informational screens provided by direct connection to view...
... See "Viewing the CableCARD™ menu" in this process is a trademark of the TV (see illustration below left). 3 After the CableCARD™ is facing the correct direction. • When using your specific devices, refer to your digital cable TV service directly to Antenna 1. Most issues ...the CableCARD™ slot on your devices may require the use the EJECT button to the different ways in the Applications menu, with your Toshiba warranty. • Never insert any performance-related CableCARD™ issues with informational screens provided by direct connection to view...
Operating Guide
Page 2
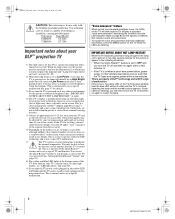
... with the Toshiba stand indicated below. page 80). 9) Every time the TV power cord is...72HM196 ST 7286 Important notes about your TV's current status. This is a structural property of malfunction. To repeat the voice announcement and hear additional information, press the MENU...service life. "Lamp unit replacement and care" on ). You may take several minutes for the picture to Low Power, every time the TV is capable of time. page 55 for details). 3) Every time the TV... it as the TV is not a sign of the TV front indicate your DLP™ projection TV 1) The light source...
... with the Toshiba stand indicated below. page 80). 9) Every time the TV power cord is...72HM196 ST 7286 Important notes about your TV's current status. This is a structural property of malfunction. To repeat the voice announcement and hear additional information, press the MENU...service life. "Lamp unit replacement and care" on ). You may take several minutes for the picture to Low Power, every time the TV is capable of time. page 55 for details). 3) Every time the TV... it as the TV is not a sign of the TV front indicate your DLP™ projection TV 1) The light source...
Operating Guide
Page 7
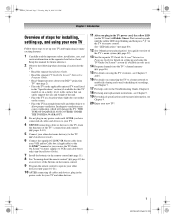
...service information in the separate Installation Guide. See "LED indications" (- Keep this TV model) or on a sturdy, level, stable surface that can use the TV...projection TV" (- page 22). 13 See the separate TV Guide On Screen™ Interactive Program Guide for details on setting up your TV and other devices. 11 After you plug in the TV power cord, the yellow LED (on the TV front) will damage the TV. THIS TYPE OF DAMAGE IS NOT COVERED UNDER THE TOSHIBA... (- page 80). 12 See "Menu layout and navigation" for a quick overview of the TV's menu system (- Installation Guide). 6 Connect...
...service information in the separate Installation Guide. See "LED indications" (- Keep this TV model) or on a sturdy, level, stable surface that can use the TV...projection TV" (- page 22). 13 See the separate TV Guide On Screen™ Interactive Program Guide for details on setting up your TV and other devices. 11 After you plug in the TV power cord, the yellow LED (on the TV front) will damage the TV. THIS TYPE OF DAMAGE IS NOT COVERED UNDER THE TOSHIBA... (- page 80). 12 See "Menu layout and navigation" for a quick overview of the TV's menu system (- Installation Guide). 6 Connect...
Operating Guide
Page 26
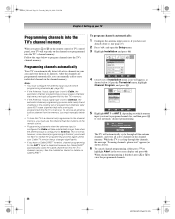
...Scanning channels, please wait" appears (as shown below to program channels into the TV's channel memory. This is finished, press < or , to repeat the programming process again unless your Cable TV service lineup changes significantly. • If you have not already done so. (- Follow... the steps below .) Open the Terrestrial menu, highlight Channel Program, and press T. however, once channel programming is disabled...
...Scanning channels, please wait" appears (as shown below to program channels into the TV's channel memory. This is finished, press < or , to repeat the programming process again unless your Cable TV service lineup changes significantly. • If you have not already done so. (- Follow... the steps below .) Open the Terrestrial menu, highlight Channel Program, and press T. however, once channel programming is disabled...

Operating Guide
Page 29
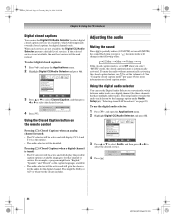
... 29 HM196 (E/F) Web 213:276 Applications Picture Viewer Audio Player Channel Browser TV Guide On Screen Digital CC/Audio Selector CableCARD IP Service Conditional Access CableCARD(tm) Status Network Setup CableCARD(tm) Pairing Navigate ENTER ...TV directly to Antenna 1. Viewing the CableCARD™ menu A CableCARD™ enables you to the HDMI input" (- Acquiring channel information. Note: Connecting your set to No, the HDMI 1 (or 2) Audio setting changes to Auto. After the CableCARD™ is set -top-box may provide a more vivid picture. Installation Guide). CableCard services...
... 29 HM196 (E/F) Web 213:276 Applications Picture Viewer Audio Player Channel Browser TV Guide On Screen Digital CC/Audio Selector CableCARD IP Service Conditional Access CableCARD(tm) Status Network Setup CableCARD(tm) Pairing Navigate ENTER ...TV directly to Antenna 1. Viewing the CableCARD™ menu A CableCARD™ enables you to the HDMI input" (- Acquiring channel information. Note: Connecting your set to No, the HDMI 1 (or 2) Audio setting changes to Auto. After the CableCARD™ is set -top-box may provide a more vivid picture. Installation Guide). CableCard services...
Operating Guide
Page 30
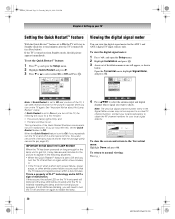
...B to select either On or Off and Press T. If Quick Restart is turned off in a short period of time, the useful service life of Installation menu icons will stay in the Signal Meter screen may not correspond to turn on from Standby mode, the full picture appears immediately. or... minutes after the TV is set to the Terrestrial menu: Highlight Done and press T. Signal Meter Signal Locked 0 Antenna Physical Digital Channel Virtual Digital Channel Done Peak 0 1 4 4-1 To close the screen and return to Off and you will be shorter than the average useful service life (-
...B to select either On or Off and Press T. If Quick Restart is turned off in a short period of time, the useful service life of Installation menu icons will stay in the Signal Meter screen may not correspond to turn on from Standby mode, the full picture appears immediately. or... minutes after the TV is set to the Terrestrial menu: Highlight Done and press T. Signal Meter Signal Locked 0 Antenna Physical Digital Channel Virtual Digital Channel Done Peak 0 1 4 4-1 To close the screen and return to Off and you will be shorter than the average useful service life (-
Operating Guide
Page 44
... tracks). To use the digital audio selector: 1 Press Y and open the Applications menu. 2 Highlight Digital CC/Audio Selector and press T. Applications Picture Viewer Audio Player Channel Browser TV Guide On Screen Digital CC/Audio Selector CableCARD Navigate ENTER Select CH RTN Back EXIT Exit...will be active and will be used instead. Pressing ; (Closed Caption) when a digital channel is not available, the next best service will temporarily override closed caption mode" (- Using the digital audio selector You can use the Digital CC/Audio Selector to partially reduce (1/2...
... tracks). To use the digital audio selector: 1 Press Y and open the Applications menu. 2 Highlight Digital CC/Audio Selector and press T. Applications Picture Viewer Audio Player Channel Browser TV Guide On Screen Digital CC/Audio Selector CableCARD Navigate ENTER Select CH RTN Back EXIT Exit...will be active and will be used instead. Pressing ; (Closed Caption) when a digital channel is not available, the next best service will temporarily override closed caption mode" (- Using the digital audio selector You can use the Digital CC/Audio Selector to partially reduce (1/2...
Operating Guide
Page 57
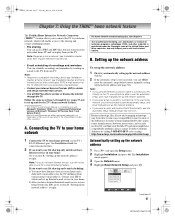
... new and emerging technology, may not work. The Installation menu appears. 3 Open the Network menu. 4 Highlight Basic Network Setup and press T. Note: • Requires a compatible recording device (- If you think your Toshiba TV and router might have Internet service in your home and a dedicated e-mail address for the TV (different from your home network via the...
... new and emerging technology, may not work. The Installation menu appears. 3 Open the Network menu. 4 Highlight Basic Network Setup and press T. Note: • Requires a compatible recording device (- If you think your Toshiba TV and router might have Internet service in your home and a dedicated e-mail address for the TV (different from your home network via the...
Operating Guide
Page 59
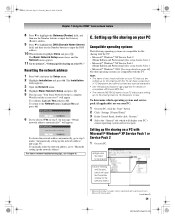
... automatically? page 57). page 63) for file sharing with the TV: • Microsoft® Windows® XP Service Pack 2 (Home Edition and Professional) [See setup details below] • Microsoft® Windows® XP Service Pack 1 (Home Edition and Professional) [See setup details below]...system and service pack (if applicable) are setting up file sharing on your PC that you selected Yes in step 5, the message "Obtain network address automatically?" Setting up for file sharing with the TV. b) Click "Sharing and Security..." (which will open the Setup menu. 2 Highlight...
... automatically? page 57). page 63) for file sharing with the TV: • Microsoft® Windows® XP Service Pack 2 (Home Edition and Professional) [See setup details below] • Microsoft® Windows® XP Service Pack 1 (Home Edition and Professional) [See setup details below]...system and service pack (if applicable) are setting up file sharing on your PC that you selected Yes in step 5, the message "Obtain network address automatically?" Setting up for file sharing with the TV. b) Click "Sharing and Security..." (which will open the Setup menu. 2 Highlight...

Operating Guide
Page 67
...the incoming (POP3) mail server. E-mail Scheduling - e) Name or IP address of your ISP. Note: • Toshiba is prohibited under the Toshiba warranty. E-mail Scheduling Setup Please enter your DSL/cable modem or router. E-mail Address - page 57), before proceeding.... Password - ID Required - Required information and services Before you can remotely schedule and delete recordings and reminders via e-mail to open the Setup menu. 2 Highlight Installation and press T. b) A personal e-mail address (different from the TV's dedicated e-mail address) from your personal ...
...the incoming (POP3) mail server. E-mail Scheduling - e) Name or IP address of your ISP. Note: • Toshiba is prohibited under the Toshiba warranty. E-mail Scheduling Setup Please enter your DSL/cable modem or router. E-mail Address - page 57), before proceeding.... Password - ID Required - Required information and services Before you can remotely schedule and delete recordings and reminders via e-mail to open the Setup menu. 2 Highlight Installation and press T. b) A personal e-mail address (different from the TV's dedicated e-mail address) from your personal ...
Operating Guide
Page 80
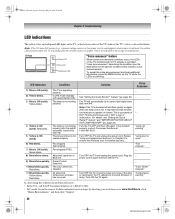
... (see item #3). To repeat the voice announcement and hear additional information, press the MENU button on the TV while the LEDs are covered, blocked, or dusty. Yellow blinks. Condition The TV is not seated properly. The lamp unit door is operating properly. Power Protect Detection.... call TACP Consumer Solutions at 1-800-631-3811. • In Canada, locate the nearest Toshiba authorized service depot by directing your web browser to www.toshiba.ca; Fan stopped (POD). Turn OFF the TV and unplug the power cord. Yellow blinks. 4) Yellow is open." Green blinks. 8) Blue ...
... (see item #3). To repeat the voice announcement and hear additional information, press the MENU button on the TV while the LEDs are covered, blocked, or dusty. Yellow blinks. Condition The TV is not seated properly. The lamp unit door is operating properly. Power Protect Detection.... call TACP Consumer Solutions at 1-800-631-3811. • In Canada, locate the nearest Toshiba authorized service depot by directing your web browser to www.toshiba.ca; Fan stopped (POD). Turn OFF the TV and unplug the power cord. Yellow blinks. 4) Yellow is open." Green blinks. 8) Blue ...
Operating Guide
Page 88
...feature 56 GameTimer 51 H HDMI™ audio mode 29 Home file server setup 61 I ID 71 INPUT button 32 Input lock feature 50 Internet service provider 57 J JPEG 63 L Labeling video input 32 Lamp mode 55 Lamp unit replacement 81 Language selection 25 Last mode memory feature 53 LED... status 31 T TheaterWide® picture size 37 THINC button 12 THINC™ system 10 Time and date setting 28 Troubleshooting 76 TV GUIDE button 12 V V-Chip blocking (Locks menu) .........47 Video input label 32 W Warranty Canada 86 U.S 85 WOW:SRS 3D 56 WOW:SRS Focus 56 WOW:SRS TruBass ...
...feature 56 GameTimer 51 H HDMI™ audio mode 29 Home file server setup 61 I ID 71 INPUT button 32 Input lock feature 50 Internet service provider 57 J JPEG 63 L Labeling video input 32 Lamp mode 55 Lamp unit replacement 81 Language selection 25 Last mode memory feature 53 LED... status 31 T TheaterWide® picture size 37 THINC button 12 THINC™ system 10 Time and date setting 28 Troubleshooting 76 TV GUIDE button 12 V V-Chip blocking (Locks menu) .........47 Video input label 32 W Warranty Canada 86 U.S 85 WOW:SRS 3D 56 WOW:SRS Focus 56 WOW:SRS TruBass ...


