User Manual
Page 12
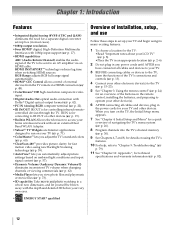
... and QAM) eliminates the need for a separate digital converter set up your TV and begin using the TV's features. 10 For help, refer to an AV amplifier via HDMI connection (p. 48). •ColorStream® HD high-resolution component video input. •Digital Audio Out optical audio connection with 1080p input support...
... and QAM) eliminates the need for a separate digital converter set up your TV and begin using the TV's features. 10 For help, refer to an AV amplifier via HDMI connection (p. 48). •ColorStream® HD high-resolution component video input. •Digital Audio Out optical audio connection with 1080p input support...

User Manual
Page 16
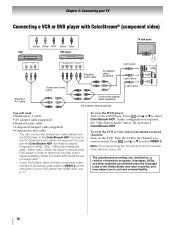
...receiver with component video Y PB PR AUDIO OUT L Satellite COMPONENT VIDEO VIDEO R IN OUT Standard audio cable Component video cable TV back panel AV adapter cable (supplied) Component adapter cable (supplied) VHF/UHF Antenna Cable TV Cable box CH 3 CH 4 IN OUT You will need: &#...8226;Coaxial cables •AV adapter cable (supplied) •Standard audio cable •Component adapter cable (supplied) •Component video cable Coaxial cable To view satellite programs ...
...receiver with component video Y PB PR AUDIO OUT L Satellite COMPONENT VIDEO VIDEO R IN OUT Standard audio cable Component video cable TV back panel AV adapter cable (supplied) Component adapter cable (supplied) VHF/UHF Antenna Cable TV Cable box CH 3 CH 4 IN OUT You will need: &#...8226;Coaxial cables •AV adapter cable (supplied) •Standard audio cable •Component adapter cable (supplied) •Component video cable Coaxial cable To view satellite programs ...
User Manual
Page 18
... TV back panel VIDEO AUDIO L R Y W R COMPONENT VIDEO Y PB PR AUDIO OUT L R G B R W R Standard audio cable AV adapter cable (supplied) Light green Light yellow R Standard A/V cable R W Y Component video cable G B R W Light yellow Component adapter cable (supplied...) AV adapter cable (supplied) You will need: •Standard A/V cable •AV adapter cable (supplied) •Standard audio cable •Component adapter cable (supplied) •Component video cable...
... TV back panel VIDEO AUDIO L R Y W R COMPONENT VIDEO Y PB PR AUDIO OUT L R G B R W R Standard audio cable AV adapter cable (supplied) Light green Light yellow R Standard A/V cable R W Y Component video cable G B R W Light yellow Component adapter cable (supplied...) AV adapter cable (supplied) You will need: •Standard A/V cable •AV adapter cable (supplied) •Standard audio cable •Component adapter cable (supplied) •Component video cable...
User Manual
Page 21
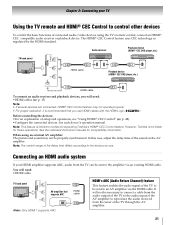
...with the HDMI Logo ( ). Chapter 2: Connecting your HDMI amplifier supports ARC, audio from the tuner of the TV through the AV amplifier. 21 However, Toshiba is not liable for compatibility information. Audio receiver Playback device (HDMI® CEC DVD player,etc.) TV back panel HDMI OUT ... ARC. HDMI's ARC (Audio Return Channel) feature This feature enables the audio signal of the TV to be sent to models incorporating Toshiba's HDMI® CEC Control feature. p. 15) Note: • If several devices are connected, HDMI® CEC Control feature may not be...
...with the HDMI Logo ( ). Chapter 2: Connecting your HDMI amplifier supports ARC, audio from the tuner of the TV through the AV amplifier. 21 However, Toshiba is not liable for compatibility information. Audio receiver Playback device (HDMI® CEC DVD player,etc.) TV back panel HDMI OUT ... ARC. HDMI's ARC (Audio Return Channel) feature This feature enables the audio signal of the TV to be sent to models incorporating Toshiba's HDMI® CEC Control feature. p. 15) Note: • If several devices are connected, HDMI® CEC Control feature may not be...

User Manual
Page 28
... 3D Setup HDMI-CEC Control Setup Network Setup Netflix Setup VUDU Deactivation Wallpaper Setup Channel Browser Setup PIN Setting Parental Control and Locks Display Settings AV Connection Auto Input IR Control Energy Saving Settings HDMI Information Display POWER LED Page 71 69 73 41 42 51 52 39- 40 48 65...
... 3D Setup HDMI-CEC Control Setup Network Setup Netflix Setup VUDU Deactivation Wallpaper Setup Channel Browser Setup PIN Setting Parental Control and Locks Display Settings AV Connection Auto Input IR Control Energy Saving Settings HDMI Information Display POWER LED Page 71 69 73 41 42 51 52 39- 40 48 65...
User Manual
Page 31
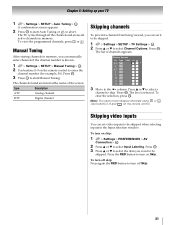
... 2 Press B or b to select Channel Options. To turn off Skip. 31 OK 3 Press OK to start Auto Tuning or to turn on skip: 1 > Settings > PREFERENCES > AV Connection > . Channel Options Ch. OK Note: You cannot tune skipped channels using CH or . Press the RED button to enter the channel number (for example...
... 2 Press B or b to select Channel Options. To turn off Skip. 31 OK 3 Press OK to start Auto Tuning or to turn on skip: 1 > Settings > PREFERENCES > AV Connection > . Channel Options Ch. OK Note: You cannot tune skipped channels using CH or . Press the RED button to enter the channel number (for example...

User Manual
Page 32
... Channel Options. OK 2 Press B or b to 10 characters) using the Software Keyboard (- Rear Shared Audio 1 > Settings > PREFERENCES > AV Connection > . Chapter 5: Setting up to select ColorStream HD1, Video 1, or HDMI 3. Press . Channel Options Ch. Note: Input the desired...input. OK 2 Press B or b to select Side Shared Audio. 3 Press C or c to 7 characters. Shared PC Input 1 > Settings > PREFERENCES > AV Connection > . Press C or c to select --, Amplifier, Cable, DVD, Game, PC, Recorder, Satellite, or VCR or press the GREEN button to the TV. 1...
... Channel Options. OK 2 Press B or b to 10 characters) using the Software Keyboard (- Rear Shared Audio 1 > Settings > PREFERENCES > AV Connection > . Chapter 5: Setting up to select ColorStream HD1, Video 1, or HDMI 3. Press . Channel Options Ch. Note: Input the desired...input. OK 2 Press B or b to select Side Shared Audio. 3 Press C or c to 7 characters. Shared PC Input 1 > Settings > PREFERENCES > AV Connection > . Press C or c to select --, Amplifier, Cable, DVD, Game, PC, Recorder, Satellite, or VCR or press the GREEN button to the TV. 1...

User Manual
Page 50
When this mode. 1 Select the appropriate HDMI input mode (HDMI 1, HDMI 2, HDMI 3, or HDMI 4). 2 > Settings > PREFERENCES > AV Connection > . When Full is selected, the RGB output signal is enabled. Press . OK 2 Press B or b to highlight Speaker Preference. 3 Press C or c to select HDMI Settings. ...
When this mode. 1 Select the appropriate HDMI input mode (HDMI 1, HDMI 2, HDMI 3, or HDMI 4). 2 > Settings > PREFERENCES > AV Connection > . When Full is selected, the RGB output signal is enabled. Press . OK 2 Press B or b to highlight Speaker Preference. 3 Press C or c to select HDMI Settings. ...
User Manual
Page 51
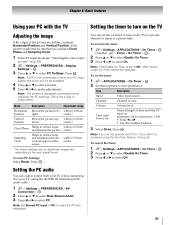
... Timer > OK .) 2 Press B or b to select Enable On Timer. 3 Press C or c to your TV, using the AUDIO IN terminal and PC audio cable. 1 > Settings > PREFERENCES > AV Connection > . Volume Volume level. To set the on timer to a preset channel or input at a preset time. within ±15 from down. This is disrupted...
... Timer > OK .) 2 Press B or b to select Enable On Timer. 3 Press C or c to your TV, using the AUDIO IN terminal and PC audio cable. 1 > Settings > PREFERENCES > AV Connection > . Volume Volume level. To set the on timer to a preset channel or input at a preset time. within ±15 from down. This is disrupted...

User Manual
Page 62
... to analog broadcasts at the same dynamic range. 1 > Settings > SOUND > Dynamic Range Control. 2 Press C or c to a digital source on the ANT/CABLE input. 2 > Settings > PREFERENCES > AV Connection > . Adjusting the range You can select the optical audio output format when you connect a Dolby Digital decoder or other digital audio systems to the...
... to analog broadcasts at the same dynamic range. 1 > Settings > SOUND > Dynamic Range Control. 2 Press C or c to a digital source on the ANT/CABLE input. 2 > Settings > PREFERENCES > AV Connection > . Adjusting the range You can select the optical audio output format when you connect a Dolby Digital decoder or other digital audio systems to the...
User Manual
Page 83
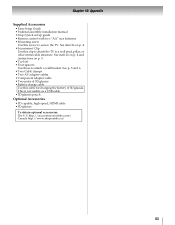
... the TV to a wall stud, pillar, or other immovable structure. See p. 5 and 6. • Two Cable clamps • Two AV adapter cables • Component adapter cable • Two pairs of 3D glasses. http://ceaccessories.toshiba.com/ Canada http://www.shoptoshiba.ca/ 83 Chapter 10: Appendix Supplied Accessories • Easy Setup Guide • Pedestal...
... the TV to a wall stud, pillar, or other immovable structure. See p. 5 and 6. • Two Cable clamps • Two AV adapter cables • Component adapter cable • Two pairs of 3D glasses. http://ceaccessories.toshiba.com/ Canada http://www.shoptoshiba.ca/ 83 Chapter 10: Appendix Supplied Accessories • Easy Setup Guide • Pedestal...


