Owner's Manual - English
Page 5
...a Cable box 16 Connecting a DVD player with a limited service life. If you sit too closely to the TV for too long, you may see a "rainbow effect" ...Using the remote control 26 Learning about your DLP projection TV 5 Chapter 1: Introduction 7 Welcome to Toshiba 7 Features of your new TV 7 Overview of malfunction. See "Selecting the ...Menu layout and navigation 34 Main menu layout 34 Setup/Installation menu layout 35 Navigating the menu system 35 Chapter 5: TV Guide On Screen™ system setup 36 TV Guide On Screen reminder 39 Chapter 6: Setting up your TV 40 Selecting the menu...
...a Cable box 16 Connecting a DVD player with a limited service life. If you sit too closely to the TV for too long, you may see a "rainbow effect" ...Using the remote control 26 Learning about your DLP projection TV 5 Chapter 1: Introduction 7 Welcome to Toshiba 7 Features of your new TV 7 Overview of malfunction. See "Selecting the ...Menu layout and navigation 34 Main menu layout 34 Setup/Installation menu layout 35 Navigating the menu system 35 Chapter 5: TV Guide On Screen™ system setup 36 TV Guide On Screen reminder 39 Chapter 6: Setting up your TV 40 Selecting the menu...
Owner's Manual - English
Page 6
...the CableCARD™ menu 50 Setting the Quick Restart feature 50 ...52 Setting up the TV Guide On Screen system 52 Navigating the TV Guide On Screen system 53 TV Guide On Screen remote control functions .......... 53 Video Window 54 Panel Menus 54 Info Box 55 TV Guide On Screen Icons 55 TV Guide On Screen Services...the sleep timer 86 Displaying TV setting information on-screen 87 Understanding the...menu 88 Entering the PIN code 88 If you cannot remember your PIN code 88 Changing your PIN code 88 Blocking TV...92 General troubleshooting 92 LED indications 94 TV Guide On Screen FAQs 95-97 Chapter...
...the CableCARD™ menu 50 Setting the Quick Restart feature 50 ...52 Setting up the TV Guide On Screen system 52 Navigating the TV Guide On Screen system 53 TV Guide On Screen remote control functions .......... 53 Video Window 54 Panel Menus 54 Info Box 55 TV Guide On Screen Icons 55 TV Guide On Screen Services...the sleep timer 86 Displaying TV setting information on-screen 87 Understanding the...menu 88 Entering the PIN code 88 If you cannot remember your PIN code 88 Changing your PIN code 88 Blocking TV...92 General troubleshooting 92 LED indications 94 TV Guide On Screen FAQs 95-97 Chapter...

Owner's Manual - English
Page 8
... power OFF) to download the entire TV Guide On Screen program schedule. BEFORE connecting cables or devices to the TV, learn the functions of navigating the TV's menu structure (pages 34-35). 13. ...your new TV Follow these steps to set up properly. • If the TV power cord is unplugged for future reference. 2. Carefully read the important safety, installation, care, and service information on...press ENTER. 14. For help, refer to your PIN code." 8 Copyright © 2004 TOSHIBA CORPORATION. Connect the G-LINK™ cable (either one of time, it is not already open). 2)...
... power OFF) to download the entire TV Guide On Screen program schedule. BEFORE connecting cables or devices to the TV, learn the functions of navigating the TV's menu structure (pages 34-35). 13. ...your new TV Follow these steps to set up properly. • If the TV power cord is unplugged for future reference. 2. Carefully read the important safety, installation, care, and service information on...press ENTER. 14. For help, refer to your PIN code." 8 Copyright © 2004 TOSHIBA CORPORATION. Connect the G-LINK™ cable (either one of time, it is not already open). 2)...
Owner's Manual - English
Page 12
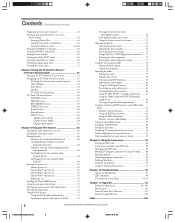
... the CableCARD slot. • Always make sure the CableCARD is facing the correct direction. • Connect the cable for your digital cable TV service to ANT-1 only. • A digital cable subscription is inserted, a CableCARD option appears in again, and press POWER. • When... ) 1 G-LINK DIGITAL AUDIO OUT ________ CableCARD is completed. 12 Copyright © 2004 TOSHIBA CORPORATION. With the front of the CableCARD™ facing right, insert it in the APPLICATIONS menu, with the use of a CableCARD and may differ from your cable operator. Acquiring channel information...
... the CableCARD slot. • Always make sure the CableCARD is facing the correct direction. • Connect the cable for your digital cable TV service to ANT-1 only. • A digital cable subscription is inserted, a CableCARD option appears in again, and press POWER. • When... ) 1 G-LINK DIGITAL AUDIO OUT ________ CableCARD is completed. 12 Copyright © 2004 TOSHIBA CORPORATION. With the front of the CableCARD™ facing right, insert it in the APPLICATIONS menu, with the use of a CableCARD and may differ from your cable operator. Acquiring channel information...

Owner's Manual - English
Page 36
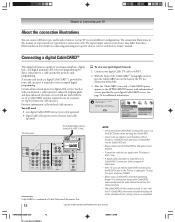
Note: • You must perform the following TV Guide On Screen system setup in Chapter 2. • If you connected a Toshiba Symbio™ AVHD, you must first set up your area. Screen 4: Do you have Cable service connected? If you select NO (and press ENTER), screen 13 appears. 5. If ...), screen 12 appears. See pages 23 and 49 for your TV Screen 1: Select the TV location (USA or Canada), and then press ENTER. Highlight INSTALLATION and press ENTER. Press MENU and open the SETUP menu. 2. Open the TV GUIDE Navigate Select DVD RTN CH RTN Ba ck EXIT Exit ...
Note: • You must perform the following TV Guide On Screen system setup in Chapter 2. • If you connected a Toshiba Symbio™ AVHD, you must first set up your area. Screen 4: Do you have Cable service connected? If you select NO (and press ENTER), screen 13 appears. 5. If ...), screen 12 appears. See pages 23 and 49 for your TV Screen 1: Select the TV location (USA or Canada), and then press ENTER. Highlight INSTALLATION and press ENTER. Press MENU and open the SETUP menu. 2. Open the TV GUIDE Navigate Select DVD RTN CH RTN Ba ck EXIT Exit ...

Owner's Manual - English
Page 41
...antenna input you selected, and store all active channels in your Cable TV service lineup changes significantly. • If you must manually delete it (see next page). • To tune the TV to a channel not programmed in the channel memory. Terrestrial Input Configuration... channels. (Continued on next page) ACTION MENU +10 - 100 ENTER Channel Numbers CHANNEL y z TV front touchpad TV/VIDEO EXIT CHANNEL CHANNEL z / y VOLUME MENU POWER HMX94(E)040-43(6a-Setup) 41 Copyright © 2004 TOSHIBA CORPORATION. Abort 39% The TV will stop only on -screen display and press...
...antenna input you selected, and store all active channels in your Cable TV service lineup changes significantly. • If you must manually delete it (see next page). • To tune the TV to a channel not programmed in the channel memory. Terrestrial Input Configuration... channels. (Continued on next page) ACTION MENU +10 - 100 ENTER Channel Numbers CHANNEL y z TV front touchpad TV/VIDEO EXIT CHANNEL CHANNEL z / y VOLUME MENU POWER HMX94(E)040-43(6a-Setup) 41 Copyright © 2004 TOSHIBA CORPORATION. Abort 39% The TV will stop only on -screen display and press...
Owner's Manual - English
Page 50
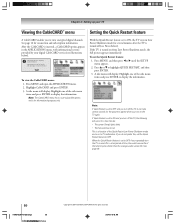
...the information. Note: If Quick Restart is turned on the TV again. CableCard Connected -- A side menu will display. Chapter 6: Setting up your digital CableCARD service (see Notes below ). See page 12 for informational purposes only. Note: The CableCARD menu has no user-adjustable options and is turned off the... and press ENTER to OFF. See page 98. 50 HMX94(E)044-51(6b-Setup) 50 Copyright © 2004 TOSHIBA CORPORATION. Highlight one of the side menu items and press ENTER to OFF and you turn off (see illustrations below ). If you do not prefer this, set...
...the information. Note: If Quick Restart is turned on the TV again. CableCard Connected -- A side menu will display. Chapter 6: Setting up your digital CableCARD service (see Notes below ). See page 12 for informational purposes only. Note: The CableCARD menu has no user-adjustable options and is turned off the... and press ENTER to OFF. See page 98. 50 HMX94(E)044-51(6b-Setup) 50 Copyright © 2004 TOSHIBA CORPORATION. Highlight one of the side menu items and press ENTER to OFF and you turn off (see illustrations below ). If you do not prefer this, set...

Owner's Manual - English
Page 52
...• While watching TV, press the TV GUIDE button on the remote control; -or- • Press MENU, open the SETUP menu. 2. Note: If you move the TV to a different ZIP/postal code, you will not function. Go to Chapter 3 for instructions on completing the setup. Read this service. TACP is not ...: • Streamlined on-screen assisted setup-Quickly and easily set up your TV Guide On Screen system using the TV Guide On Screen interactive program guide. 52 HMX94(E)052-55(7a-TVG) 52 Copyright © 2004 TOSHIBA CORPORATION. If you have not already connected your antenna, cable box, and/...
...• While watching TV, press the TV GUIDE button on the remote control; -or- • Press MENU, open the SETUP menu. 2. Note: If you move the TV to a different ZIP/postal code, you will not function. Go to Chapter 3 for instructions on completing the setup. Read this service. TACP is not ...: • Streamlined on-screen assisted setup-Quickly and easily set up your TV Guide On Screen system using the TV Guide On Screen interactive program guide. 52 HMX94(E)052-55(7a-TVG) 52 Copyright © 2004 TOSHIBA CORPORATION. If you have not already connected your antenna, cable box, and/...
Owner's Manual - English
Page 53
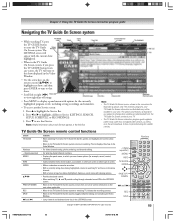
... SS| and |TT REC SPLIT Numbers } ACTION MENU +10 - 100 ENTER Copyright © 2004 TOSHIBA CORPORATION. Press y to enter the TV Guide On Screen system. All rights reserved. 53 HMX94(E)052-55(7a-TVG) 53 9/27/04, 10:46 AM Note: Helpful information about each Service appears in this manual are downloaded from one...
... SS| and |TT REC SPLIT Numbers } ACTION MENU +10 - 100 ENTER Copyright © 2004 TOSHIBA CORPORATION. Press y to enter the TV Guide On Screen system. All rights reserved. 53 HMX94(E)052-55(7a-TVG) 53 9/27/04, 10:46 AM Note: Helpful information about each Service appears in this manual are downloaded from one...

Owner's Manual - English
Page 54
... not open the TV Guide On Screen system, the current program appears in the Video Window. • As you scroll through listings. Info Box Panel Menus • A panel menu appears: - All rights reserved. Highlight a channel logo or the LISTINGS Service Bar Label and press MENU to display the...button or the PAGE UP/DOWN (CH yz) button. 54 Copyright © 2004 TOSHIBA CORPORATION. press MENU; when you press MENU on a show starting in one panel, the word "more" appears at the bottom of the menu. or - when you press ENTER on a highlighted tile (if additional options are ...
... not open the TV Guide On Screen system, the current program appears in the Video Window. • As you scroll through listings. Info Box Panel Menus • A panel menu appears: - All rights reserved. Highlight a channel logo or the LISTINGS Service Bar Label and press MENU to display the...button or the PAGE UP/DOWN (CH yz) button. 54 Copyright © 2004 TOSHIBA CORPORATION. press MENU; when you press MENU on a show starting in one panel, the word "more" appears at the bottom of the menu. or - when you press ENTER on a highlighted tile (if additional options are ...

Owner's Manual - English
Page 55
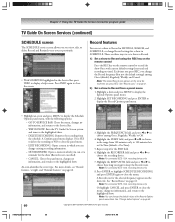
...10:47 AM New • Show is currently Off (show remains in a Panel Ad, a Channel Ad, or help (for example, for a panel menu). • An Info Box for example, if there are Daily (manual reminding only), Regularly, and Weekly. Record Off • Show is set to... 5.1 audio (digital channels only). Copyright © 2004 TOSHIBA CORPORATION. Chapter 7: Using the TV Guide On Screen interactive program guide Navigating the TV Guide On Screen system (continued) Info Box • An Info Box contains information about a show, Service, or Panel Ad, or provides general help text). Press...
...10:47 AM New • Show is currently Off (show remains in a Panel Ad, a Channel Ad, or help (for example, for a panel menu). • An Info Box for example, if there are Daily (manual reminding only), Regularly, and Weekly. Record Off • Show is set to... 5.1 audio (digital channels only). Copyright © 2004 TOSHIBA CORPORATION. Chapter 7: Using the TV Guide On Screen interactive program guide Navigating the TV Guide On Screen system (continued) Info Box • An Info Box contains information about a show, Service, or Panel Ad, or provides general help text). Press...

Owner's Manual - English
Page 56
... menu From the Episode Options panel menu, you open the TV Guide On Screen system, LISTINGS is currently airing). GO TO SERVICE BAR: Closes the menu, changes no information, and returns to whether the show listings - The button label changes according to the highlighted show. 56 HMX94(E)056-61(7b-TVG) 56 Copyright © 2004 TOSHIBA...
... menu From the Episode Options panel menu, you open the TV Guide On Screen system, LISTINGS is currently airing). GO TO SERVICE BAR: Closes the menu, changes no information, and returns to whether the show listings - The button label changes according to the highlighted show. 56 HMX94(E)056-61(7b-TVG) 56 Copyright © 2004 TOSHIBA...

Owner's Manual - English
Page 57
...Highlight a show and press ENTER to watch (if on now) or press MENU to close the screen. 2. Chapter 7: Using the TV Guide On Screen interactive program guide TV Guide On Screen Services (continued) SEARCH screen • SEARCH allows you to find shows by date... and time. 4. Press INFO again to display the Episode Options panel menu. (See "Episode Options panel menu" on page 56.) HMX94(E)056-61(7b-TVG) 57 Copyright © 2004 TOSHIBA...
...Highlight a show and press ENTER to watch (if on now) or press MENU to close the screen. 2. Chapter 7: Using the TV Guide On Screen interactive program guide TV Guide On Screen Services (continued) SEARCH screen • SEARCH allows you to find shows by date... and time. 4. Press INFO again to display the Episode Options panel menu. (See "Episode Options panel menu" on page 56.) HMX94(E)056-61(7b-TVG) 57 Copyright © 2004 TOSHIBA...
Owner's Manual - English
Page 58
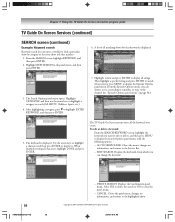
...SERVICE BAR: Closes the menu, changes no information, and returns to display all matching shows for every show title that keyword is displayed. Select YES to delete the search or NO to the Service Bar. - Chapter 7: Using the TV Guide On Screen interactive program guide TV Guide On Screen Services... SEARCH screen, highlight KEYWORD, and then press ENTER. 2. After highlighting a category, press z to display it. Copyright © 2004 TOSHIBA CORPORATION. Use the arrow keys to highlight a character and then press ENTER to highlight ENTER KEYWORD, and then press ENTER. 7. All rights...
...SERVICE BAR: Closes the menu, changes no information, and returns to display all matching shows for every show title that keyword is displayed. Select YES to delete the search or NO to the Service Bar. - Chapter 7: Using the TV Guide On Screen interactive program guide TV Guide On Screen Services... SEARCH screen, highlight KEYWORD, and then press ENTER. 2. After highlighting a category, press z to display it. Copyright © 2004 TOSHIBA CORPORATION. Use the arrow keys to highlight a character and then press ENTER to highlight ENTER KEYWORD, and then press ENTER. 7. All rights...

Owner's Manual - English
Page 59
... States and other materials is prohibited under the Copyright Laws of the following options: - GO TO SERVICE BAR: Closes the menu, changes no information, and returns to the TV (see example in the Service Bar, press INFO to choose between the following : • List-Displays every recorded episode for ...or from where it was last stopped (if viewed previously). • Highlight an episode and press MENU to choose between View As and Sort By, as described below. Copyright © 2004 TOSHIBA CORPORATION. Note: In List view, highlight an episode to view it now. To choose the ...
... States and other materials is prohibited under the Copyright Laws of the following options: - GO TO SERVICE BAR: Closes the menu, changes no information, and returns to the TV (see example in the Service Bar, press INFO to choose between the following : • List-Displays every recorded episode for ...or from where it was last stopped (if viewed previously). • Highlight an episode and press MENU to choose between View As and Sort By, as described below. Copyright © 2004 TOSHIBA CORPORATION. Note: In List view, highlight an episode to view it now. To choose the ...
Owner's Manual - English
Page 60
...events you set previously. • With SCHEDULE highlighted in the Service Bar, press INFO to close the menu. For more details, see "Record features,"at right, and "Remind features" on page 65. 60 Copyright © 2004 TOSHIBA CORPORATION. See "Change default options" on page 62. 3. .... There are three ways to set a show in LISTINGS, SEARCH, and SCHEDULE, or change existing recording information. - WATCH NOW: Exits the TV Guide On Screen system and tunes to choose among Once (default), Regularly, Weekly, and Cancel. Highlight the FREQUENCY field, and press x or...
...events you set previously. • With SCHEDULE highlighted in the Service Bar, press INFO to close the menu. For more details, see "Record features,"at right, and "Remind features" on page 65. 60 Copyright © 2004 TOSHIBA CORPORATION. See "Change default options" on page 62. 3. .... There are three ways to set a show in LISTINGS, SEARCH, and SCHEDULE, or change existing recording information. - WATCH NOW: Exits the TV Guide On Screen system and tunes to choose among Once (default), Regularly, Weekly, and Cancel. Highlight the FREQUENCY field, and press x or...

Owner's Manual - English
Page 61
...Following is Suspended due to a schedule conflict (show . Chapter 7: Using the TV Guide On Screen interactive program guide TV Guide On Screen Services (continued) Record features (continued) 3) Manually set a show to Record from a panel menu" on the previous page. Note: When setting a Manual Recording, the option.... If no information, and return to Record 1. Or highlight CANCEL and press ENTER to close the menu, change no change ; Copyright © 2004 TOSHIBA CORPORATION. Highlight NEW MANUAL RECORDING and press ENTER to move through Friday) that the show until the frequency...
...Following is Suspended due to a schedule conflict (show . Chapter 7: Using the TV Guide On Screen interactive program guide TV Guide On Screen Services (continued) Record features (continued) 3) Manually set a show to Record from a panel menu" on the previous page. Note: When setting a Manual Recording, the option.... If no information, and return to Record 1. Or highlight CANCEL and press ENTER to close the menu, change no change ; Copyright © 2004 TOSHIBA CORPORATION. Highlight NEW MANUAL RECORDING and press ENTER to move through Friday) that the show until the frequency...

Owner's Manual - English
Page 62
...or • to choose either Yes (to turn on the TV (if off , at the scheduled Reminder time) or No (default). 5. See "Change default options" on page 65 for a show reminder in the Service Bar, and press MENU to display the Remind Options panel menu. For details, see "Set a show Reminder from 15 ... scheduled reminder time, and tune the TV to the channel of the show for which you are setting the Reminder for a description of the show for the selected frequency appears on the show . 62 HMX94(E)062-65(7c-TVG) 62 Copyright © 2004 TOSHIBA CORPORATION. icon for which you set...
...or • to choose either Yes (to turn on the TV (if off , at the scheduled Reminder time) or No (default). 5. See "Change default options" on page 65 for a show reminder in the Service Bar, and press MENU to display the Remind Options panel menu. For details, see "Set a show Reminder from 15 ... scheduled reminder time, and tune the TV to the channel of the show for which you are setting the Reminder for a description of the show for the selected frequency appears on the show . 62 HMX94(E)062-65(7c-TVG) 62 Copyright © 2004 TOSHIBA CORPORATION. icon for which you set...

Owner's Manual - English
Page 64
...again to display a help screen. Highlight one of the options, press ENTER, and follow the on whether they have completed the initial TV Guide On Screen setup process (as described in Chapter 5), you can change the following : • Reorder the position the channels ...TV Guide On Screen interactive program guide TV Guide On Screen Services (continued) SETUP screen After you complete the initial TV Guide On Screen setup (as described in Chapter 5). 1. With SETUP highlighted in the Service Bar, press INFO to display the Grid Options panel menu. 2. Copyright © 2004 TOSHIBA ...
...again to display a help screen. Highlight one of the options, press ENTER, and follow the on whether they have completed the initial TV Guide On Screen setup process (as described in Chapter 5), you can change the following : • Reorder the position the channels ...TV Guide On Screen interactive program guide TV Guide On Screen Services (continued) SETUP screen After you complete the initial TV Guide On Screen setup (as described in Chapter 5). 1. With SETUP highlighted in the Service Bar, press INFO to display the Grid Options panel menu. 2. Copyright © 2004 TOSHIBA ...

Owner's Manual - English
Page 65
... initial Info Box size when you open . Copyright © 2004 TOSHIBA CORPORATION. From the SETUP screen, highlight CHANGE DEFAULT OPTIONS and press ENTER. Enter the required information in the panel menu fields (power On TV, auto-tune, when to display the Remind screen). All rights reserved...and press MENU to open every time you turn on entering values in the following information in these fields. 4. From the SETUP screen, highlight CHANGE DEFAULT OPTIONS and press ENTER. 2. Chapter 7: Using the TV Guide On Screen interactive program guide TV Guide On Screen Services (continued)...
... initial Info Box size when you open . Copyright © 2004 TOSHIBA CORPORATION. From the SETUP screen, highlight CHANGE DEFAULT OPTIONS and press ENTER. Enter the required information in the panel menu fields (power On TV, auto-tune, when to display the Remind screen). All rights reserved...and press MENU to open every time you turn on entering values in the following information in these fields. 4. From the SETUP screen, highlight CHANGE DEFAULT OPTIONS and press ENTER. 2. Chapter 7: Using the TV Guide On Screen interactive program guide TV Guide On Screen Services (continued)...


