
User Guide
Page 4
... skin is dropped and the cabinet or enclosure surface has been damaged or the TV does not operate normally, take the following precautions: • ALWAYS turn off the TV and unplug the power cord to avoid possible electric shock or fire. • NEVER allow your body to come into your outlet...
... skin is dropped and the cabinet or enclosure surface has been damaged or the TV does not operate normally, take the following precautions: • ALWAYS turn off the TV and unplug the power cord to avoid possible electric shock or fire. • NEVER allow your body to come into your outlet...

User Guide
Page 6
...press, or place anything on a sturdy, level surface that can be damaged by ultraviolet radiation from power and a minute amount of current is turned off using a Wall Bracket: If you to determine that is in this WARNING may damage the surface of the TV. 3) Be sure ...screen, follow the instructions in item 36) on the included Pedestal Stand: Observe the following safety precautions: 1) Read and follow this manual to a Toshiba Authorized Service Provider. • Ask the service technician to use a wall bracket Listed by the manufacturer. • Upon completion of service, ask...
...press, or place anything on a sturdy, level surface that can be damaged by ultraviolet radiation from power and a minute amount of current is turned off using a Wall Bracket: If you to determine that is in this WARNING may damage the surface of the TV. 3) Be sure ...screen, follow the instructions in item 36) on the included Pedestal Stand: Observe the following safety precautions: 1) Read and follow this manual to a Toshiba Authorized Service Provider. • Ask the service technician to use a wall bracket Listed by the manufacturer. • Upon completion of service, ask...

User Guide
Page 18
... protect the TV from overheating and to help maintain reliable operation of the TV. 3 Do not plug in any power cords until after you cannot turn on the remote control. 8 After connecting all cables and devices, connect the power cord to the TV and plug in a location where light does not... navigating the TV's menu system. 10 Program channels into an outlet. Then press the POWER button on the TV control panel or remote control to turn the TV off or on, unplug the power cord for a few seconds and then plug it in the remote control, see 26) on using its...
... protect the TV from overheating and to help maintain reliable operation of the TV. 3 Do not plug in any power cords until after you cannot turn on the remote control. 8 After connecting all cables and devices, connect the power cord to the TV and plug in a location where light does not... navigating the TV's menu system. 10 Program channels into an outlet. Then press the POWER button on the TV control panel or remote control to turn the TV off or on, unplug the power cord for a few seconds and then plug it in the remote control, see 26) on using its...

User Guide
Page 19
...controls and connections Left side panel TV front 3 TV top 4 5 6 1 7 2 (Sample Illustration) 50L1450U - If the TV stops responding to the buttons on the remote control or TV control panel and you cannot turn off the TV, press and hold the POWER button on the TV control panel for a few...buttons toggle the input from one source to optimize the backlighting levels. 2 Remote sensor (embedded)-Point the remote control toward this remote sensor. 3 POWER-Turns the TV On/Off. Detects the ambient light conditions to the next. 6 USB port-Accesses JPEG or MP3 files, or updates TV firmware. 7 ...
...controls and connections Left side panel TV front 3 TV top 4 5 6 1 7 2 (Sample Illustration) 50L1450U - If the TV stops responding to the buttons on the remote control or TV control panel and you cannot turn off the TV, press and hold the POWER button on the TV control panel for a few...buttons toggle the input from one source to optimize the backlighting levels. 2 Remote sensor (embedded)-Point the remote control toward this remote sensor. 3 POWER-Turns the TV On/Off. Detects the ambient light conditions to the next. 6 USB port-Accesses JPEG or MP3 files, or updates TV firmware. 7 ...

User Guide
Page 24
... the TV.* To view basic and premium cable channels: Turn off the VCR. When you to civil and criminal liability. Select the ANT/CABLE video input source on the TV.* Tune the TV to channel 3 ... TV From satellite dish Y PB PR AUDIO OUT L Satellite COMPONENT VIDEO S-VIDEO VIDEO R IN OUT OUT Satellite receiver, Blu-rayTM or DVD player (Sample Illustration) 50L1450U-Connecting a Blu-ray™ /DVD player or Satellite receiver with ColorStreamTM or VCR TV back panel From antenna Stereo VCR VIDEO AUDIO L R IN CH 3 CH...
... the TV.* To view basic and premium cable channels: Turn off the VCR. When you to civil and criminal liability. Select the ANT/CABLE video input source on the TV.* Tune the TV to channel 3 ... TV From satellite dish Y PB PR AUDIO OUT L Satellite COMPONENT VIDEO S-VIDEO VIDEO R IN OUT OUT Satellite receiver, Blu-rayTM or DVD player (Sample Illustration) 50L1450U-Connecting a Blu-ray™ /DVD player or Satellite receiver with ColorStreamTM or VCR TV back panel From antenna Stereo VCR VIDEO AUDIO L R IN CH 3 CH...

User Guide
Page 25
... ColorStreamTM HD or Video, switch AV input mode appropriately. Select the VIDEO video input source on the TV.* To record a TV program while watching a DVD: Turn on the TV* to view the DVD. Tune the VCR to the channel to the AUDIO/VIDEO terminal. Select the COLORSTREAM HD video input source... player or satellite receiver does not have a mono VCR, connect L/MONO on the TV to your VCR's audio out terminal using the component video connections: Turn on the satellite receiver. Select the COLORSTREAM HD video input source on the VCR. Select the COLORSTREAM HD video input source on the TV.* To...
... ColorStreamTM HD or Video, switch AV input mode appropriately. Select the VIDEO video input source on the TV.* To record a TV program while watching a DVD: Turn on the TV* to view the DVD. Tune the VCR to the channel to the AUDIO/VIDEO terminal. Select the COLORSTREAM HD video input source... player or satellite receiver does not have a mono VCR, connect L/MONO on the TV to your VCR's audio out terminal using the component video connections: Turn on the satellite receiver. Select the COLORSTREAM HD video input source on the VCR. Select the COLORSTREAM HD video input source on the TV.* To...

User Guide
Page 28
To ensure that the HDMI® or DVI device is not available. 28 ConnectingYourTV Connecting an HDMI® or DVI device to the HDMI® input TV back panel VIDEO AUDIO L R IN IN OUT L R DVI / HDCP OUT (Sample Illustration) 50L1450U-DVI connections When using a DVI connection, an audio connection is reset properly: v When turning on your electronic components, turn off your electronic components, turn on the TV first, and then the HDMI® or DVI device. v When turning off the HDMI® or DVI device first, and then the TV.
To ensure that the HDMI® or DVI device is not available. 28 ConnectingYourTV Connecting an HDMI® or DVI device to the HDMI® input TV back panel VIDEO AUDIO L R IN IN OUT L R DVI / HDCP OUT (Sample Illustration) 50L1450U-DVI connections When using a DVI connection, an audio connection is reset properly: v When turning on your electronic components, turn off your electronic components, turn on the TV first, and then the HDMI® or DVI device. v When turning off the HDMI® or DVI device first, and then the TV.

User Guide
Page 35
CAPTION button accesses closed captions, see "Using closed captions" on page 64 12 The MUTE button reduces or turns off the sound, see "Muting the sound" on page 66 13 The VOL (+ -) buttons adjust the volume level. 14 The INFO button displays TV status ... page 61 7 The Channel Number buttons (0-9, and Dash 100) directly tune channels. 35 Using the Remote Control Learning about the remote control 1 The POWER button turns the TV On/Off. Press again to edit the Favorites List, see "Favorites browser" on page 51 8 The FAV button accesses the Favorites List in...
CAPTION button accesses closed captions, see "Using closed captions" on page 64 12 The MUTE button reduces or turns off the sound, see "Muting the sound" on page 66 13 The VOL (+ -) buttons adjust the volume level. 14 The INFO button displays TV status ... page 61 7 The Channel Number buttons (0-9, and Dash 100) directly tune channels. 35 Using the Remote Control Learning about the remote control 1 The POWER button turns the TV On/Off. Press again to edit the Favorites List, see "Favorites browser" on page 51 8 The FAV button accesses the Favorites List in...

User Guide
Page 40
... button. 5 Press the ENTER button to select Home, and then press the ENTER button. You must select a Language, either Home/Store mode before you first turn on or reset the TV, the Initial Setup window will not function until these selections have been made. 40 The EXIT button will appear. 1 In...
... button. 5 Press the ENTER button to select Home, and then press the ENTER button. You must select a Language, either Home/Store mode before you first turn on or reset the TV, the Initial Setup window will not function until these selections have been made. 40 The EXIT button will appear. 1 In...

User Guide
Page 46
... EXIT button. To return to the Get Help menu: v Highlight Done in the Support Information screen, and then press the ENTER button. The TV will turn off automatically. To cancel the reset process, select No, and press the ENTER button. Resetting Factory Defaults To reset all settings and channels to their...
... EXIT button. To return to the Get Help menu: v Highlight Done in the Support Information screen, and then press the ENTER button. The TV will turn off automatically. To cancel the reset process, select No, and press the ENTER button. Resetting Factory Defaults To reset all settings and channels to their...
User Guide
Page 48
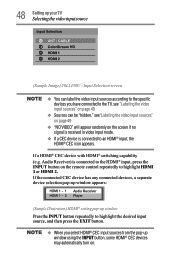
...-up window appears: Audio Receiver Player (Sample Illustration) HDMI® setting pop-up window using the INPUT button, some HDMI® CEC devices may automatically turn on the screen if no signal is connected to the HDMI® input, press the INPUT button on the remote control repeatedly to the TV... 49 v "NO VIDEO" will appear randomly on . v When you have connected to highlight HDMI 1 or HDMI 2. 48 SettingupyourTV Selecting the video input source (Sample Image) 50L1450U -
...-up window appears: Audio Receiver Player (Sample Illustration) HDMI® setting pop-up window using the INPUT button, some HDMI® CEC devices may automatically turn on the screen if no signal is connected to the HDMI® input, press the INPUT button on the remote control repeatedly to the TV... 49 v "NO VIDEO" will appear randomly on . v When you have connected to highlight HDMI 1 or HDMI 2. 48 SettingupyourTV Selecting the video input source (Sample Image) 50L1450U -

User Guide
Page 53
... when you stop on an item in the Channel Browser, it is highlighted, but the TV is not turned to close the Channel Browser. 53 Setting up your TV Favorites browser To toggle among the available lists:... surf back to a previous item or surf forward to close the Channel Browser. v If all lists are turned off , the FAV button will not display the Channel Browser. To tune to a channel or input in ...in the last selected list. v Pressing the FAV button will open in the Channel Browser, it is turned off , pressing BACK CB or NEXT CB arrow buttons or the FAV button will have no effect. ...
... when you stop on an item in the Channel Browser, it is highlighted, but the TV is not turned to close the Channel Browser. 53 Setting up your TV Favorites browser To toggle among the available lists:... surf back to a previous item or surf forward to close the Channel Browser. v If all lists are turned off , the FAV button will not display the Channel Browser. To tune to a channel or input in ...in the last selected list. v Pressing the FAV button will open in the Channel Browser, it is turned off , pressing BACK CB or NEXT CB arrow buttons or the FAV button will have no effect. ...

User Guide
Page 54
... automatically tune to the previously viewed channel or input. Any channel or input that are tuned using the ◄/►(arrow) buttons on page 41 v Turning off the left side. For example, to surf backward through the previously tuned channels/inputs. Whenever an item is selected that are tuned using the...
... automatically tune to the previously viewed channel or input. Any channel or input that are tuned using the ◄/►(arrow) buttons on page 41 v Turning off the left side. For example, to surf backward through the previously tuned channels/inputs. Whenever an item is selected that are tuned using the...

User Guide
Page 61
To turn on the auto aspect ratio feature: 1 Press the MENU button and open the Picture menu. 2 Highlight Display Settings, and then press the ENTER button. 3 In ... Not defined (no ID-1 data or HDMI® aspect data) The current picture size you selected, see "Selecting the picture size" on page 56 To turn off the Auto Aspect ratio feature, Select Off in step 3 above.
To turn on the auto aspect ratio feature: 1 Press the MENU button and open the Picture menu. 2 Highlight Display Settings, and then press the ENTER button. 3 In ... Not defined (no ID-1 data or HDMI® aspect data) The current picture size you selected, see "Selecting the picture size" on page 56 To turn off the Auto Aspect ratio feature, Select Off in step 3 above.

User Guide
Page 65
...-standard Digital CC settings You can customize the closed caption display characteristics by changing the background color, opacity, text size, type, edge, and color. To turn off closed captions: 1 In Options menu, highlight Closed Captions, and then press the ENTER button. A closed caption signal may appear on screen. To view text...
...-standard Digital CC settings You can customize the closed caption display characteristics by changing the background color, opacity, text size, type, edge, and color. To turn off closed captions: 1 In Options menu, highlight Closed Captions, and then press the ENTER button. A closed caption signal may appear on screen. To view text...

User Guide
Page 66
To revert to partially reduce (1/2 Mute) or turn off (Mute) the sound. Mode: Description Caption Size Auto, Small, Standard, Large Caption Text Type Auto, Default, Mono (with Serif), Prop. (with Serif), Mono (without ...
To revert to partially reduce (1/2 Mute) or turn off (Mute) the sound. Mode: Description Caption Size Auto, Small, Standard, Large Caption Text Type Auto, Default, Mono (with Serif), Prop. (with Serif), Mono (without ...

User Guide
Page 69
To turn on Stable SoundTM: 1 Press the MENU button and open the Sound menu. 2 Highlight Dynamic Range Control, and then press the ENTER button. 3 Press the ▲/&#... be possible with a traditional system of small speakers. This enables the system to select On, and then press the ENTER button. Audyssey ABX™ To turn on Audyssey ABX™: 1 Press the MENU button and open the Sound menu. 2 Highlight Audyssey ABX field, and then press the ENTER button. 3 Press the...
To turn on Stable SoundTM: 1 Press the MENU button and open the Sound menu. 2 Highlight Dynamic Range Control, and then press the ENTER button. 3 Press the ▲/&#... be possible with a traditional system of small speakers. This enables the system to select On, and then press the ENTER button. Audyssey ABX™ To turn on Audyssey ABX™: 1 Press the MENU button and open the Sound menu. 2 Highlight Audyssey ABX field, and then press the ENTER button. 3 Press the...

User Guide
Page 84
... set the sleep timer to the date and time when the picture was taken. To set length of time (maximum of time until the TV turns off the TV after a set the sleep timer using the remote control: 1 Press the SLEEP button on -screen menus: 1 In Timers menu, highlight Sleep ... functions from the Quick Menu. If a power failure occurs, the sleep timer setting may not be cleared. To display the time remaining until the TV turns off. 2 Repeatedly press the SLEEP button to increase the time in 10-minute increments, or press the ▲/▼(arrow) buttons to increase or decrease...
... set the sleep timer to the date and time when the picture was taken. To set length of time (maximum of time until the TV turns off the TV after a set the sleep timer using the remote control: 1 Press the SLEEP button on -screen menus: 1 In Timers menu, highlight Sleep ... functions from the Quick Menu. If a power failure occurs, the sleep timer setting may not be cleared. To display the time remaining until the TV turns off. 2 Repeatedly press the SLEEP button to increase the time in 10-minute increments, or press the ▲/▼(arrow) buttons to increase or decrease...

User Guide
Page 85
...CEC This is a new feature that uses CEC technology and allows you to control Toshiba HDMI® CEC compatible devices from the TV remote via HDMI® connection (see... connection" on page 87), the HDMI® CEC functions described below will appear 1 minute before the TV turns off after 15 minutes when no signal is On. HDMI® CEC playback device (Blu-rayTM Player/DVD player..., etc.) control With your TV Using HDMI® CEC No Signal Power Down The TV will automatically turn itself off . To change , and press the ◄/►(arrow) buttons to music through the TV speakers...
...CEC This is a new feature that uses CEC technology and allows you to control Toshiba HDMI® CEC compatible devices from the TV remote via HDMI® connection (see... connection" on page 87), the HDMI® CEC functions described below will appear 1 minute before the TV turns off after 15 minutes when no signal is On. HDMI® CEC playback device (Blu-rayTM Player/DVD player..., etc.) control With your TV Using HDMI® CEC No Signal Power Down The TV will automatically turn itself off . To change , and press the ◄/►(arrow) buttons to music through the TV speakers...

User Guide
Page 86
Item: Description: Power Turns the select device On/Off Root Menu Accesses the root menu of a selected device At this time, the HDMI CEC Player Control menu disappears. HDMI&#...
Item: Description: Power Turns the select device On/Off Root Menu Accesses the root menu of a selected device At this time, the HDMI CEC Player Control menu disappears. HDMI&#...


