User Manual
Page 5
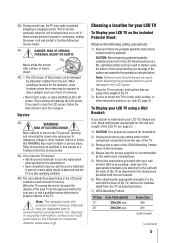
...the approved method for installation. 2) Unplug and remove any cables and/or other component connectors from the TV as described in this manual to a Toshiba Authorized Service Center. 44) If you need to dangerous voltage or other immovable structure. ( item 25, page 4) To Display your LCD ... the surface and assemble the pedestal as indicated below . 7) VESA Mounting Pattern TV Size 32" 40" Hole Pattern(HxV) 200x200 mm 200x200 mm Screw Size M6 M6 (unit in the next page. 4) Always use the screws supplied or recommended by ultraviolet radiation from the sun. If these sounds...
...the approved method for installation. 2) Unplug and remove any cables and/or other component connectors from the TV as described in this manual to a Toshiba Authorized Service Center. 44) If you need to dangerous voltage or other immovable structure. ( item 25, page 4) To Display your LCD ... the surface and assemble the pedestal as indicated below . 7) VESA Mounting Pattern TV Size 32" 40" Hole Pattern(HxV) 200x200 mm 200x200 mm Screw Size M6 M6 (unit in the next page. 4) Always use the screws supplied or recommended by ultraviolet radiation from the sun. If these sounds...
User Manual
Page 6
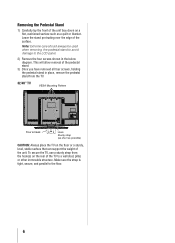
...secure the TV, use a sturdy strap from the TV. 32/40" TV VESA Mounting Pattern Four screws Hook Sturdy strap (as short as a quilt or blanket. Make sure the strap .... Leave the stand protruding over the edge of the pedestal stand. 3) Once you have removed all four screws, holding the pedestal stand in the below diagram. Note: Extreme care should always be used when removing the... pedestal stand to avoid damage to the LCD panel. 2) Remove the four screws shown in place, remove the pedestal stand from the hook(s) on the floor or a sturdy, level, ...
...secure the TV, use a sturdy strap from the TV. 32/40" TV VESA Mounting Pattern Four screws Hook Sturdy strap (as short as a quilt or blanket. Make sure the strap .... Leave the stand protruding over the edge of the pedestal stand. 3) Once you have removed all four screws, holding the pedestal stand in the below diagram. Note: Extreme care should always be used when removing the... pedestal stand to avoid damage to the LCD panel. 2) Remove the four screws shown in place, remove the pedestal stand from the hook(s) on the floor or a sturdy, level, ...


