User Manual
Page 1
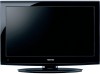
.... For details, please contact your TV antenna installer, cable provider, or satellite provider. © 2010 TOSHIBA CORPORATION All Rights Reserved Owner's Record The model number and serial number are on the back of steps for setting up your new TV, see page10. Note: To display a High Definition picture, the TV...;nition digital cable program, or a High Definition digital satellite program). Owner's Manual Integrated High Definition LCD Television HIGH-DEFINITION TELEVISION 32DT1U 40FT1U For an overview of your Toshiba dealer about this TV.
.... For details, please contact your TV antenna installer, cable provider, or satellite provider. © 2010 TOSHIBA CORPORATION All Rights Reserved Owner's Record The model number and serial number are on the back of steps for setting up your new TV, see page10. Note: To display a High Definition picture, the TV...;nition digital cable program, or a High Definition digital satellite program). Owner's Manual Integrated High Definition LCD Television HIGH-DEFINITION TELEVISION 32DT1U 40FT1U For an overview of your Toshiba dealer about this TV.
User Manual
Page 2
...required for installation. WARNING To prevent injury, this apparatus must be securely attached to the floor/wall in accordance with furniture and television sets. • Don't place flat panel displays on your new product, please keep it cannot be pushed, pulled over and cause injury...Issue • The home theater entertainment experience is committed to Article 820-40 of this Toshiba LCD TV. NO USER-SERVICEABLE PARTS INSIDE. However, flat panel displays are popular purchases. TOSHIBA Cares! • The consumer electronics industry is a growing trend and larger flat panel displays...
...required for installation. WARNING To prevent injury, this apparatus must be securely attached to the floor/wall in accordance with furniture and television sets. • Don't place flat panel displays on your new product, please keep it cannot be pushed, pulled over and cause injury...Issue • The home theater entertainment experience is committed to Article 820-40 of this Toshiba LCD TV. NO USER-SERVICEABLE PARTS INSIDE. However, flat panel displays are popular purchases. TOSHIBA Cares! • The consumer electronics industry is a growing trend and larger flat panel displays...
User Manual
Page 8
... lock feature 42 Using the GameTimer 42 Using the control panel lock feature 42 Using the PC settings feature 43 Setting the PC Audio 43 Using the USB Media 44 Using the Media Player with USB 44 To ...; digital noise reduction 47 Using MPEG noise reduction 48 Using the Game Mode feature 48 Using the advanced audio settings features 48 Using the Surround feature 48 Using the 7 Bands Equalizer feature 48 Chapter 8: Troubleshooting 49 General troubleshooting... United States Warranty for LCD Televisions....... 53 Limited Canadian Warranty for Toshiba Brand Flat Panel Televisions 54
... lock feature 42 Using the GameTimer 42 Using the control panel lock feature 42 Using the PC settings feature 43 Setting the PC Audio 43 Using the USB Media 44 Using the Media Player with USB 44 To ...; digital noise reduction 47 Using MPEG noise reduction 48 Using the Game Mode feature 48 Using the advanced audio settings features 48 Using the Surround feature 48 Using the 7 Bands Equalizer feature 48 Chapter 8: Troubleshooting 49 General troubleshooting... United States Warranty for LCD Televisions....... 53 Limited Canadian Warranty for Toshiba Brand Flat Panel Televisions 54
User Manual
Page 9
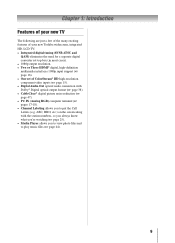
... following are just a few of the many exciting features of your new Toshiba widescreen, integrated HD, LCD TV: • Integrated digital tuning (8VSB ATSC and QAM) eliminates the need for a separate digital converter set-top box (in most cases). • 1080p output resolution. •... Two or Three HDMI® digital, high-definition multimedia interfaces 1080p input support ( page 16). • One set of ColorStream® HD high-resolution component video inputs ( page 15). • Digital Audio Out optical audio connection with the station numbers...
... following are just a few of the many exciting features of your new Toshiba widescreen, integrated HD, LCD TV: • Integrated digital tuning (8VSB ATSC and QAM) eliminates the need for a separate digital converter set-top box (in most cases). • 1080p output resolution. •... Two or Three HDMI® digital, high-definition multimedia interfaces 1080p input support ( page 16). • One set of ColorStream® HD high-resolution component video inputs ( page 15). • Digital Audio Out optical audio connection with the station numbers...
User Manual
Page 10
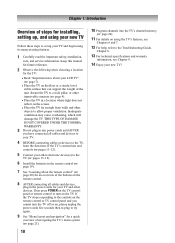
...8226; Place the TV on the TV control panel or remote control to allow proper ventilation. THIS TYPE OF DAMAGE IS NOT COVERED UNDER THE TOSHIBA WARRANTY. 3 Do not plug in any power cords until AFTER you cannot turn on the remote control or TV control panel and you have ...connected all cables and devices, plug in the power cords for your TV and other devices. Chapter 1: Introduction Overview of steps for installing, setting up your TV and begin using its many exciting features. 1 Carefully read the important safety, installation, care, and service information. If the TV ...
...8226; Place the TV on the TV control panel or remote control to allow proper ventilation. THIS TYPE OF DAMAGE IS NOT COVERED UNDER THE TOSHIBA WARRANTY. 3 Do not plug in any power cords until AFTER you cannot turn on the remote control or TV control panel and you have ...connected all cables and devices, plug in the power cords for your TV and other devices. Chapter 1: Introduction Overview of steps for installing, setting up your TV and begin using its many exciting features. 1 Carefully read the important safety, installation, care, and service information. If the TV ...
User Manual
Page 13
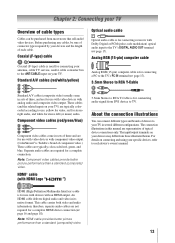
... manual. The connection illustrations in this manual are typically colorcoded according to TV. An HDMI cable delivers digital audio and video in sets of devices to each cable. Note: HDMI cable provides better picture performance than a standard (composite) video. Before purchasing any cables...and white for connecting audio signal from most stores that sell audio/ video devices. HDMI (High-Definition Multimedia Interface) cable is Toshiba's brand of typical device connections only. Component video cables (red/green/blue) Component video cables come in its native format. ...
... manual. The connection illustrations in this manual are typically colorcoded according to TV. An HDMI cable delivers digital audio and video in sets of devices to each cable. Note: HDMI cable provides better picture performance than a standard (composite) video. Before purchasing any cables...and white for connecting audio signal from most stores that sell audio/ video devices. HDMI (High-Definition Multimedia Interface) cable is Toshiba's brand of typical device connections only. Component video cables (red/green/blue) Component video cables come in its native format. ...

User Manual
Page 14
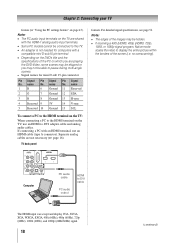
... a Cable box, you to civil and criminal liability. 14 The unauthorized recording, use, distribution, or revision of television programs, videotapes, DVDs, and other materials is set to change channels. Chapter 2: Connecting your TV Connecting a VCR and antenna or Cable TV TV back panel From Cable TV or antenna From Cable TV...
... a Cable box, you to civil and criminal liability. 14 The unauthorized recording, use, distribution, or revision of television programs, videotapes, DVDs, and other materials is set to change channels. Chapter 2: Connecting your TV Connecting a VCR and antenna or Cable TV TV back panel From Cable TV or antenna From Cable TV...
User Manual
Page 16
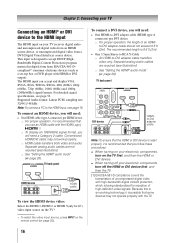
... 720p (60Hz), 1080i (60Hz) and 1080p (24Hz/60Hz) signal formats. Separate analog audio cables are required (see illustration). −− See "Setting the HDMI® audio mode" ( page 26). To connect a DVI device, you will need: • One HDMI cable (type A connector...-D compliance covers the transmission of high-definition video signals. Separate analog audio cables are not required (see illustration). −− See "Setting the HDMI® audio mode" ( page 26). For detailed signal specifications, see page 18. Supported Audio format: Linear PCM, ...
... 720p (60Hz), 1080i (60Hz) and 1080p (24Hz/60Hz) signal formats. Separate analog audio cables are required (see illustration). −− See "Setting the HDMI® audio mode" ( page 26). To connect a DVI device, you will need: • One HDMI cable (type A connector...-D compliance covers the transmission of high-definition video signals. Separate analog audio cables are not required (see illustration). −− See "Setting the HDMI® audio mode" ( page 26). For detailed signal specifications, see page 18. Supported Audio format: Linear PCM, ...

User Manual
Page 17
... field, select either the PC IN or HDMI connection, you can accept and display VGA, SVGA, XGA, WXGA and SXGA(Only for use the PC setting (continued) 17 Older audio systems that are trademarks of copy restrictions. ** Manufactured under license from the TV's speakers. For detailed signal specifications ( page 52... formats. To connect a PC to the PC IN terminal on the TV: When connecting a PC to the PC IN terminal on the TV, use a PC, set the monitor output resolution on page 38).
... field, select either the PC IN or HDMI connection, you can accept and display VGA, SVGA, XGA, WXGA and SXGA(Only for use the PC setting (continued) 17 Older audio systems that are trademarks of copy restrictions. ** Manufactured under license from the TV's speakers. For detailed signal specifications ( page 52... formats. To connect a PC to the PC IN terminal on the TV: When connecting a PC to the PC IN terminal on the TV, use a PC, set the monitor output resolution on page 38).
User Manual
Page 18
Chapter 2: Connecting your TV feature ( "Using the PC settings feature" on the TV are not necessary ( page 16). name 6 Ground 11 Reserved 2G 7 Ground 12 SDA 3B 8 Ground 13 H-sync 4 Reserved 9 5V 14 V-...
Chapter 2: Connecting your TV feature ( "Using the PC settings feature" on the TV are not necessary ( page 16). name 6 Ground 11 Reserved 2G 7 Ground 12 SDA 3B 8 Ground 13 H-sync 4 Reserved 9 5V 14 V-...
User Manual
Page 21
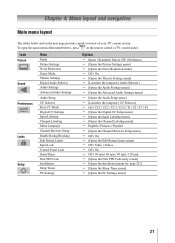
... TV's menu system. Icon Picture Sound Preferences Locks Setup Item Mode Picture Settings Noise Reduction Game Mode Theater Settings Digital Audio Selector Audio Settings Advanced Audio Settings Audio Setup CC Selector Base CC Mode Digital CC Settings Input Labeling Channel Labeling Menu Language Channel Browser Setup Enable Rating Blocking Edit...Code entry screen] [Opens the Installation menu ( page 22)] [Opens the Sleep Timer menu] [Opens the PC Settings menu] 21 To open the main menus (illustrated below and on the remote control or TV control panel.
... TV's menu system. Icon Picture Sound Preferences Locks Setup Item Mode Picture Settings Noise Reduction Game Mode Theater Settings Digital Audio Selector Audio Settings Advanced Audio Settings Audio Setup CC Selector Base CC Mode Digital CC Settings Input Labeling Channel Labeling Menu Language Channel Browser Setup Enable Rating Blocking Edit...Code entry screen] [Opens the Installation menu ( page 22)] [Opens the Sleep Timer menu] [Opens the PC Settings menu] 21 To open the main menus (illustrated below and on the remote control or TV control panel.

User Manual
Page 22
... move in the corresponding direction in the menu. • Press to save your TV's onscreen menu system. • Press to access and navigate your menu settings or select a highlighted item. (A highlighted menu item appears in a different color in the menu.) • All menus close automatically if you do not make a selection...
... move in the corresponding direction in the menu. • Press to save your TV's onscreen menu system. • Press to access and navigate your menu settings or select a highlighted item. (A highlighted menu item appears in a different color in the menu.) • All menus close automatically if you do not make a selection...

User Manual
Page 23
... normal home use, press t or u to select Start Scan and continue with t or u and press . 3無 Next, the Location setting window will appear. To tune digital channels preferentially over analog when entering channel number directly, select Auto. Configuring the antenna input source for the ANT... ANT/CABLE input source: 1無 Press and open the Preferences menu, highlight Menu Language. 2無 Press t or u to select your original settings, highlight Cancel and press . 3無 Press to select the input source (Cable or Antenna) for the ANT/CABLE input on -screen display of...
... normal home use, press t or u to select Start Scan and continue with t or u and press . 3無 Next, the Location setting window will appear. To tune digital channels preferentially over analog when entering channel number directly, select Auto. Configuring the antenna input source for the ANT... ANT/CABLE input source: 1無 Press and open the Preferences menu, highlight Menu Language. 2無 Press t or u to select your original settings, highlight Cancel and press . 3無 Press to select the input source (Cable or Antenna) for the ANT/CABLE input on -screen display of...

User Manual
Page 24
...not already done so ( page 23). 2無 Press and open the Setup menu. 3無 Highlight Installation and press . 4無 (A new set of channels will appear, as shown above). 5無 To cancel channel programming, press on the remote control (or highlight Cancel in its memory. To ...control. •• Programming channels when the ANT/ CABLE input is configured for Cable will appear in the channel memory. Setting channel skip To prevent certain channels from being viewed, channel positions can automatically detect all active channels in the box. Chapter...
...not already done so ( page 23). 2無 Press and open the Setup menu. 3無 Highlight Installation and press . 4無 (A new set of channels will appear, as shown above). 5無 To cancel channel programming, press on the remote control (or highlight Cancel in its memory. To ...control. •• Programming channels when the ANT/ CABLE input is configured for Cable will appear in the channel memory. Setting channel skip To prevent certain channels from being viewed, channel positions can automatically detect all active channels in the box. Chapter...
User Manual
Page 25
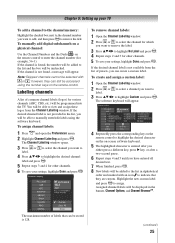
.... 4無 Press pqtu to highlight the desired channel label and press . 5無 Repeat steps 3 and 4 for other channels. 5無 To save your settings, highlight Done and press . To manually add digital subchannels on a physical channel: Use the Channel Numbers and the Dash ( ) on -screen software keyboard....example, 56-1). The software keyboard will be able to manually enter/edit labels using the number keys on the remote control. Chapter 5: Setting up your TV To add a channel to the channel memory: Highlight the checked box next to the channel number you want to remove...
.... 4無 Press pqtu to highlight the desired channel label and press . 5無 Repeat steps 3 and 4 for other channels. 5無 To save your settings, highlight Done and press . To manually add digital subchannels on a physical channel: Use the Channel Numbers and the Dash ( ) on -screen software keyboard....example, 56-1). The software keyboard will be able to manually enter/edit labels using the number keys on the remote control. Chapter 5: Setting up your TV To add a channel to the channel memory: Highlight the checked box next to the channel number you want to remove...
User Manual
Page 26
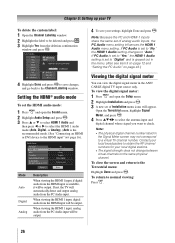
... digital channel number listed in the ANT/ CABLE digital TV input source only. Contact your local broadcasters to obtain the RF channel numbers for your settings, highlight Done and press . To view the digital signal meter: 1無 Press and open the Sound menu. 2無 Highlight Audio Setup and ..., and go back to the Channel Labeling window. When viewing the HDMI 1 input, analog audio from the PC Audio input will appear. Chapter 5: Setting up your TV To delete the custom label: 1無 Open the Channel Labeling window. 2無 Highlight the label to be deleted and press . ...
... digital channel number listed in the ANT/ CABLE digital TV input source only. Contact your local broadcasters to obtain the RF channel numbers for your settings, highlight Done and press . To view the digital signal meter: 1無 Press and open the Sound menu. 2無 Highlight Audio Setup and ..., and go back to the Channel Labeling window. When viewing the HDMI 1 input, analog audio from the PC Audio input will appear. Chapter 5: Setting up your TV To delete the custom label: 1無 Open the Channel Labeling window. 2無 Highlight the label to be deleted and press . ...
User Manual
Page 27
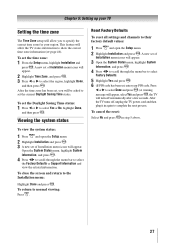
...select the Factory Defaults or Support Information and view the related information. To close the screen and return to normal viewing: Press . A new set of Installation menu icons will appear. 2無 Highlight Time Zone, and press . 3無 Press t or u to select the region, highlight... Done, and then press . After the TV turns off automatically after a few seconds. A new set the time zone: 1無 From the Setup menu, highlight Installation and press . Open the System Status menu, highlight System Information, and press . 4無...
...select the Factory Defaults or Support Information and view the related information. To close the screen and return to normal viewing: Press . A new set of Installation menu icons will appear. 2無 Highlight Time Zone, and press . 3無 Press t or u to select the region, highlight... Done, and then press . After the TV turns off automatically after a few seconds. A new set the time zone: 1無 From the Setup menu, highlight Installation and press . Open the System Status menu, highlight System Information, and press . 4無...

User Manual
Page 29
.... 3無 Highlight Reset and press . • Quickly surf and tune your channels and inputs. Favorites Browser The Favorites Browser allows you to quickly set -top box to HDMI 2, and a DVD player to HDMI 3 (only for 3 seconds. This feature allows you to: • Navigate the ... a history of the last 32 channels or inputs viewed. 3無 Press to highlight History List, and then press or to select the setting you prefer: either Browse Mode or Select Mode. For 32" Input Selection 0 ANT/CABLE 1 Video 2 ColorStream HD 3 HDMI 1 4 HDMI 2 5 PC 6 USB Media...
.... 3無 Highlight Reset and press . • Quickly surf and tune your channels and inputs. Favorites Browser The Favorites Browser allows you to quickly set -top box to HDMI 2, and a DVD player to HDMI 3 (only for 3 seconds. This feature allows you to: • Navigate the ... a history of the last 32 channels or inputs viewed. 3無 Press to highlight History List, and then press or to select the setting you prefer: either Browse Mode or Select Mode. For 32" Input Selection 0 ANT/CABLE 1 Video 2 ColorStream HD 3 HDMI 1 4 HDMI 2 5 PC 6 USB Media...

User Manual
Page 31
... analog and digital channels can be tuned Note: Digital mode will be most useful after analog channels are stored in 2009. A new set to the previously viewed channel or input. Note: This feature will appear. 2無 Open the Terrestrial menu, highlight Channel Tuning Mode,...or unprogrammed) Tuning analog channels: Press the Channel Number (0-9) on the remote control. Note: To use this feature, the Input Configuration must be set the Channel Tuning Mode: 1無 From the Setup menu, highlight Installation and press . Chapter 6: Using the TV's features • All channels...
... analog and digital channels can be tuned Note: Digital mode will be most useful after analog channels are stored in 2009. A new set to the previously viewed channel or input. Note: This feature will appear. 2無 Open the Terrestrial menu, highlight Channel Tuning Mode,...or unprogrammed) Tuning analog channels: Press the Channel Number (0-9) on the remote control. Note: To use this feature, the Input Configuration must be set the Channel Tuning Mode: 1無 From the Setup menu, highlight Installation and press . Chapter 6: Using the TV's features • All channels...
User Manual
Page 32
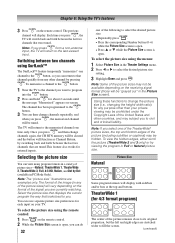
... channels again, the CH RTN memory will be prohibited under the Copyright Laws of the picture sizes may not be "grayed out" in the Theater Settings menu. 2無 Press or to the last-viewed input. To view the hidden edges, either scroll the picture (TheaterWide ...size using the remote control: 1無 Press on -screen. Natural Picture Size Some program formats will return to select the desired picture size setting. 3無 Highlight Done and press . The TV will function as Channel Return, by Dot (available in Full or Natural picture size. You...
... channels again, the CH RTN memory will be prohibited under the Copyright Laws of the picture sizes may not be "grayed out" in the Theater Settings menu. 2無 Press or to the last-viewed input. To view the hidden edges, either scroll the picture (TheaterWide ...size using the remote control: 1無 Press on -screen. Natural Picture Size Some program formats will return to select the desired picture size setting. 3無 Highlight Done and press . The TV will function as Channel Return, by Dot (available in Full or Natural picture size. You...


