Installation Manual
Page 2
...600 Irvine, CA 92614 Questions? 1-800-735-4328 www.thermador.com We look forward to hearing from you to the appliance or property may occur as a result of non-observance of this advisory. Table of Contents Safety 1 Installation 2 Step 1: EXHAUST-AIR MODE 2 Step 2: PREPARING... THE WALL 2 Step 3: INSTALLATION 3 Wire Diagram 5 Customer Support, Accessories & Parts back page Safety Definitions 9 WARNING This indicates that ...
...600 Irvine, CA 92614 Questions? 1-800-735-4328 www.thermador.com We look forward to hearing from you to the appliance or property may occur as a result of non-observance of this advisory. Table of Contents Safety 1 Installation 2 Step 1: EXHAUST-AIR MODE 2 Step 2: PREPARING... THE WALL 2 Step 3: INSTALLATION 3 Wire Diagram 5 Customer Support, Accessories & Parts back page Safety Definitions 9 WARNING This indicates that ...
Installation Manual
Page 3
... IMPORTANT: Save these instructions for future reference.This appliance conforms to the relevant safety regulations. Repairs should only be installed with any solid-state speed control device. b) Sufficient air is needed for use again. Consult a qualified electrician ... grounded. DO NOT use only metal ductwork. Never allow children to exhaust hazardous or explosive materials and vapors. INSTALLER: Please leave these Installation Instructions with packaging material. WARNING To avoid electrical shock hazard, before using the appliance. WARNING To reduce the...
... IMPORTANT: Save these instructions for future reference.This appliance conforms to the relevant safety regulations. Repairs should only be installed with any solid-state speed control device. b) Sufficient air is needed for use again. Consult a qualified electrician ... grounded. DO NOT use only metal ductwork. Never allow children to exhaust hazardous or explosive materials and vapors. INSTALLER: Please leave these Installation Instructions with packaging material. WARNING To avoid electrical shock hazard, before using the appliance. WARNING To reduce the...
Installation Manual
Page 4
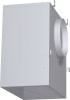
...that are also located. This rule does not apply to ensure that there is a risk of cooking appliances, such as reciprocal interlocking, etc. Installation Step 1: EXHAUST-AIR MODE Equipment Needed 䙚 Drill and Bit 䙚 Screwdriver 䙚 Rubber Mallet Equipment Included 䙚 Anchors (4) ...value will be located inside the building, according to the extractor hood except when used with downdraft systems. • DO NOT install the blower - near flammable materials. - national building regulations). An air-intake/exhaust-air wall box by other fuels. Step...
...that are also located. This rule does not apply to ensure that there is a risk of cooking appliances, such as reciprocal interlocking, etc. Installation Step 1: EXHAUST-AIR MODE Equipment Needed 䙚 Drill and Bit 䙚 Screwdriver 䙚 Rubber Mallet Equipment Included 䙚 Anchors (4) ...value will be located inside the building, according to the extractor hood except when used with downdraft systems. • DO NOT install the blower - near flammable materials. - national building regulations). An air-intake/exhaust-air wall box by other fuels. Step...
Installation Manual
Page 5
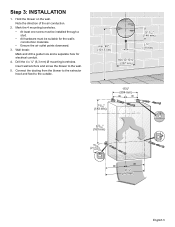
Mark the 4 mounting boreholes. • At least one screw must be installed through a stud. • All hardware must be suitable for electrical conduit. 4. Hold the blower on the wall. Note the direction of the air conduction. 2. Connect ..." (148 mm) ¾" (19 mm) 7 3/16" (183 mm) 15½" (394 mm) 6 5/16" (160 mm) 13/16" (21 mm) 21¼" (540 mm) English 3 Step 3: INSTALLATION 1. Insert wall anchors and screw the blower to the outside.
Mark the 4 mounting boreholes. • At least one screw must be installed through a stud. • All hardware must be suitable for electrical conduit. 4. Hold the blower on the wall. Note the direction of the air conduction. 2. Connect ..." (148 mm) ¾" (19 mm) 7 3/16" (183 mm) 15½" (394 mm) 6 5/16" (160 mm) 13/16" (21 mm) 21¼" (540 mm) English 3 Step 3: INSTALLATION 1. Insert wall anchors and screw the blower to the outside.
Installation Manual
Page 6
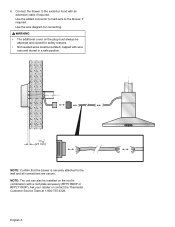
... be installed on the plug must always be attached and closed for connecting. 9 WARNING • The additional cover on the roof in a safe position. 13/16" (21 mm) NOTE: Confirm that the blower is securely attached to the wall and all connections are secure. Ask your retailer or contact the Thermador Customer...
... be installed on the plug must always be attached and closed for connecting. 9 WARNING • The additional cover on the roof in a safe position. 13/16" (21 mm) NOTE: Confirm that the blower is securely attached to the wall and all connections are secure. Ask your retailer or contact the Thermador Customer...